
Last April, I opened my front door and stepped into a soggy sneaker. Rain had blown in overnight. My shoes sat in a heap, and every pair was soaked.
I carried the wet pile inside, and mud followed me down the hall. That morning, I decided to fix my porch for good. Over the next few months, I tested five setups. Some failed fast.
Some stuck around. Below, you’ll find the five that held up, with steps, sizes, and costs. Pick the one that fits your porch and budget.
What Should You Look for in Front Porch Shoe Storage?
Look for storage that drains water, sits off the ground, and fits the shoes you really own. A rack that holds water will rot and smell within a season. Even a half-inch gap under the legs lets air move and wood dry out.
Use this quick checklist before you buy or build:
- Drainage: Slats, mesh, or drilled holes let rain escape.
- Material: Cedar, sealed pine, powder-coated metal, and resin all handle weather well.
- Capacity: Count your family’s pairs, then plan for two extra.
- Footprint: Leave about 36 inches of walking space by the door.
- Door swing: Make sure the door opens all the way without hitting anything.
How Do You Protect Porch Shoe Storage From Rain and Sun?
Seal it, lift it, and tilt it so water runs off. These three moves stop most porch damage. Bare wood ends drink water fastest, so they need the most sealer.
Follow these basics on any wood project:
- Sand rough spots with 120-grit sandpaper.
- Brush on an exterior sealer or stain. Apply two coats.
- Seal every cut end twice.
- Add rubber pads under the feet.
- Check your work each spring and touch up worn spots.
If your porch has no roof, plan for a cover too. Waterproof outdoor fabric works well and costs little.
Sun matters just as much as rain. Strong light fades stain and makes plastic brittle. Pick a shaded corner when you can, and reapply sealer once a year.
Which Porch Shoe Storage Idea Fits Your Space?
Match the idea to your porch size, budget, and skills. A tiny stoop needs a vertical fix, while a wide porch can handle a bench. Here is how I’d choose:
- Under 3 feet of space: Try the wall-mounted peg rack in Idea 3.
- No tools and no drilling: Go with the boot tray and rack in Idea 1.
- Tight budget: Build the crate cubbies in Idea 4.
- Need extra seating: Make the bench in Idea 2.
- Hate seeing shoes: Pick the deck box in Idea 5.
You can also mix two ideas. I pair the boot tray with a deck box. Muddy boots drip dry on the tray first. Clean shoes go inside the box once they’re dry.
Idea 1: Boot Tray and Slim Rack for a No-Tools Setup
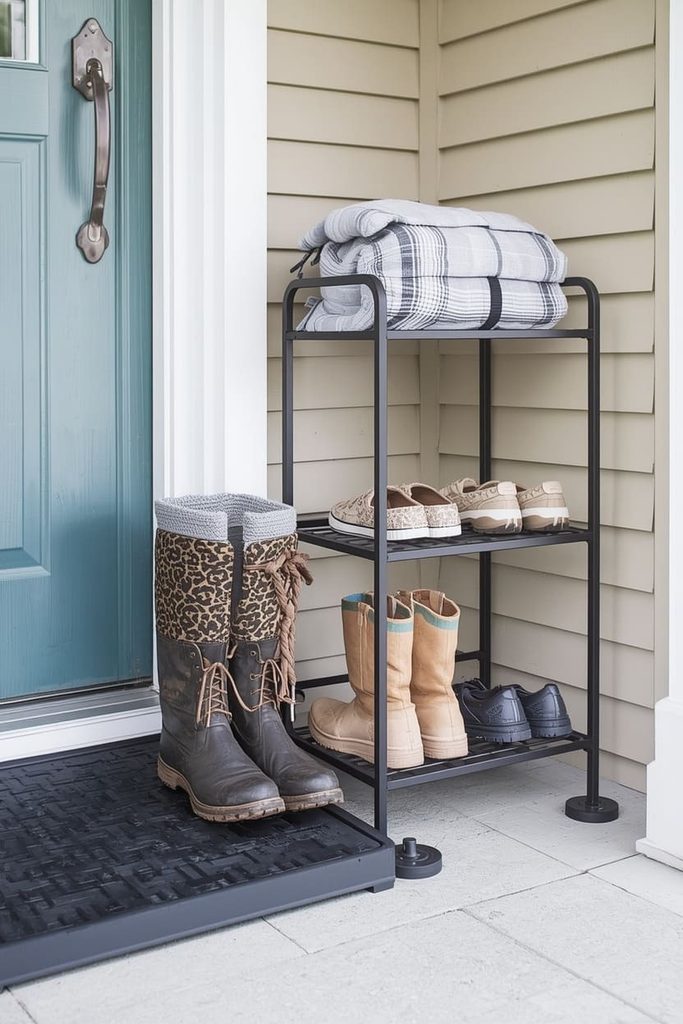
A rubber boot tray plus a two-tier rack is the fastest fix. You can finish it in about 15 minutes without a single tool. Both pieces come ready-made, so nothing needs cutting or drilling. Renters love it because nothing is attached to the house.
Who This Idea Suits
This setup works for renters, beginners, and anyone with a narrow stoop. It fits porches as slim as three feet wide.
Materials You Need
- 1 rubber or plastic boot tray, about 30 by 15 inches, with a raised lip
- 1 two-tier outdoor shoe rack in powder-coated metal or resin, about 28 inches wide
- 1 small bag of river rocks, about 2 pounds
- 4 stick-on rubber pads
You need no tools for this one.
Steps to Set It Up
- Pick a spot beside the door, on the wall side, so the door swing stays clear.
- Check that the floor is level. Slide a thin shim under any low corner.
- Press the rubber pads onto the rack feet.
- Set the rack against the wall.
- Place the tray at the base of the rack.
- Pour a thin layer of river rocks into the tray.
- Rest muddy boots on the rocks. Put sneakers and sandals on the rack.
Weatherproofing
Choose powder-coated metal or resin, since both resist rust. Wipe the rack with a damp cloth once a month.
Cost and Time
Expect to spend about $40 to $90. Setup takes around 15 minutes.
Common Mistake and Quick Tip
Plain steel racks rust fast, so skip them. Rinse the river rocks monthly to keep odors away.
Idea 2: Weatherproof 2×4 Bench With a Shoe Shelf
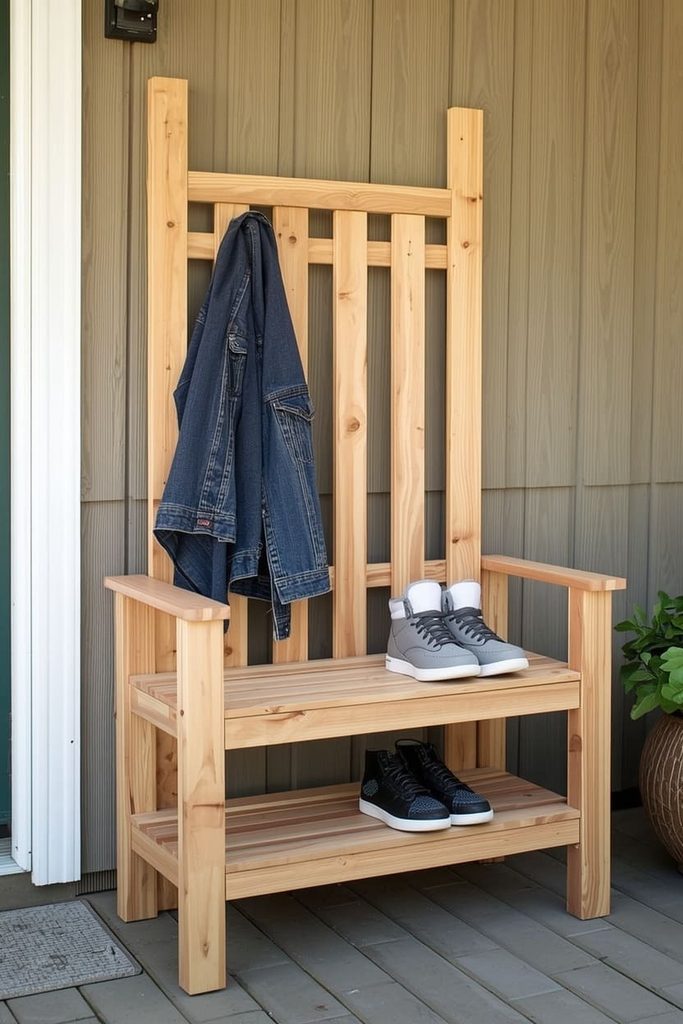
A simple 2×4 bench gives you a seat and a shelf for about five pairs of shoes. You can build it in one afternoon with basic tools. The slatted top and shelf let rain drain, and the shelf sits four inches off the ground. About 10 inches of space under the seat fits most sneakers and short boots.
Who This Idea Suits
This bench suits porches at least 48 inches wide. It works best for people who can use a saw and a drill.
Materials and Cut List
Use cedar or pressure-treated 2×4 boards. Cut these pieces:
- 4 legs, 16 inches each
- 4 long rails, 35 inches each
- 4 short rails, 15 inches each
- 5 top boards, 42 inches each
- 9 shelf slats cut from 1×4 boards, 17 inches each
- About 50 exterior deck screws, 2.5 inches long
- Exterior stain or sealer
- 4 rubber feet
You also need a saw, drill, tape measure, square, sandpaper, and a paintbrush.
Steps to Build the Bench
- Cut all pieces. Many stores will do this for you.
- Build two end frames. Screw a 15-inch rail between two legs at the top, flush with the leg tops.
- Add a second 15-inch rail 4 inches above the bottom of the legs.
- Stand the frames 35 inches apart. Connect them with the long rails at the same two heights.
- Measure both diagonals. Nudge the frame until they match.
- Screw the top boards on with a quarter-inch gap between each one.
- Lay the slats across the lower rails, leaving small gaps. Screw them down.
- Sand, then seal everything.
Weatherproofing
Apply two coats of exterior stain. Seal every cut end. Attach rubber feet so the legs never sit in puddles.
Cost and Time
Plan on about $60 to $110 in lumber and supplies. The build takes around three hours, plus drying time.
Common Mistake and Quick Tip
Drive screws into wet wood without pre-drilling, and it splits. Drill pilot holes first. Drop a few cedar blocks on the shelf to freshen the air.
Idea 3: Wall-Mounted Peg Rack for Tiny Porches
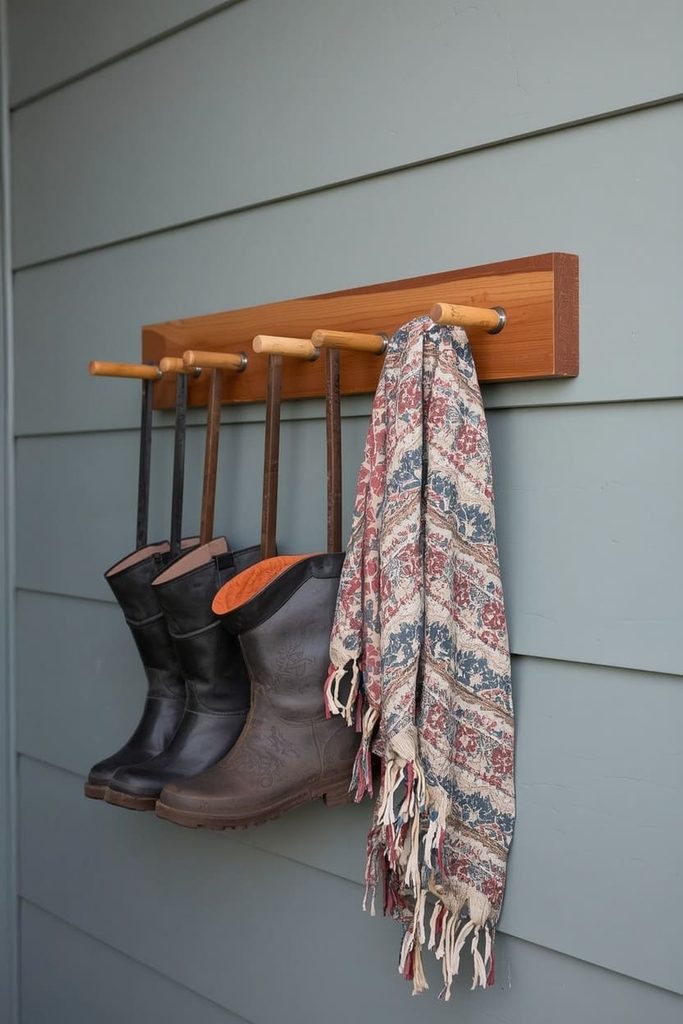
A wall-mounted peg rack holds three pairs of boots and keeps your floor clear. You can hang it in about an hour and a half. Boots hung upside down drain and dry faster than boots lying flat. This rack needs only two feet of wall.
Who This Idea Suits
Choose this idea if your porch is tiny or crowded. It works on wood siding and on brick.
Materials You Need
- 1 cedar 2×6 board, 36 inches long
- 6 hardwood dowels, 3/4 inch thick and 7 inches long
- Exterior wood glue
- 4 exterior screws, 3 inches long
- Wall anchors if you’re drilling into brick
- Exterior stain
- Exterior caulk
You also need a drill, a 3/4-inch drill bit, a level, a stud finder, and sandpaper.
Steps to Make and Hang It
- Mark six hole spots along the board. Start 3 inches from one end and space them 6 inches apart.
- Cut a wedge from scrap wood at a 15-degree angle. Use it as a drill guide.
- Drill each hole about one inch deep, angled upward. Wrap tape on the bit as a depth flag.
- Squeeze glue into each hole. Tap in a dowel.
- Round the dowel ends with sandpaper, then stain the whole piece.
- Find the wall studs. Mark their spots.
- Hold the board 12 inches above the floor. Drill pilot holes, then screw it in.
- Slide boots upside down over the pegs.
Weatherproofing
Run a thin bead of caulk along the top edge. This stops water from running behind the board. Seal the dowel holes with extra stain.
Cost and Time
Plan on about $20 to $40. Allow roughly an hour and a half, plus stain drying time.
Common Mistake and Quick Tip
Mounting the board too low lets splashes soak your boots. Keep it at least a foot up. Tuck a small tray underneath to catch drips.
Idea 4: Stacked Crate Cubbies on a Budget
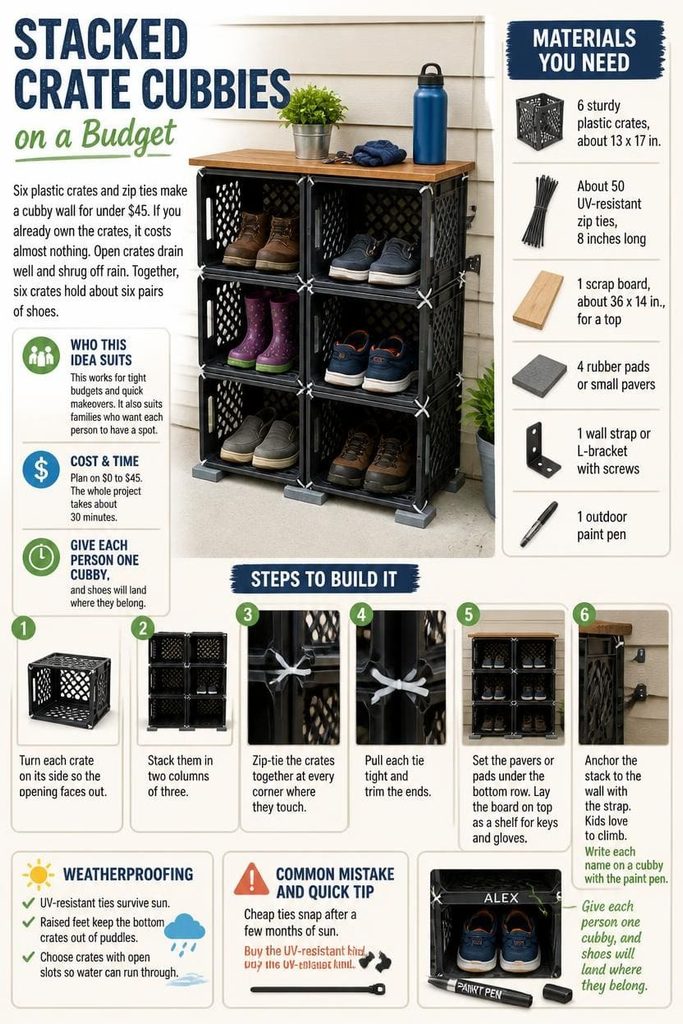
Six plastic crates and zip ties make a cubby wall for under $45. If you already own the crates, it costs almost nothing. Open crates drain well and shrug off rain. Together, six crates hold about six pairs of shoes.
Who This Idea Suits
This works for tight budgets and quick makeovers. It also suits families who want each person to have a spot.
Materials You Need
- 6 sturdy plastic crates, about 13 by 17 inches
- About 50 UV-resistant zip ties, 8 inches long
- 1 scrap board, about 36 by 14 inches, for a top
- 4 rubber pads or small pavers
- 1 wall strap or L-bracket with screws
- 1 outdoor paint pen
Steps to Build It
- Turn each crate on its side so the opening faces out.
- Stack them in two columns of three.
- Zip-tie the crates together at every corner where they touch.
- Pull each tie tight and trim the ends.
- Set the pavers or pads under the bottom row.
- Lay the board on top as a shelf for keys and gloves.
- Anchor the stack to the wall with the strap. Kids love to climb.
- Write each name on a cubby with the paint pen.
Weatherproofing
UV-resistant ties survive sun. Raised feet keep the bottom crates out of puddles. Choose crates with open slots so water can run through.
Cost and Time
Plan on $0 to $45. The whole project takes about 30 minutes.
Common Mistake and Quick Tip
Cheap ties snap after a few months of sun. Buy the UV-resistant kind. Give each person one cubby, and shoes will land where they belong.
Idea 5: Hidden Deck Box Storage That Doubles as a Seat
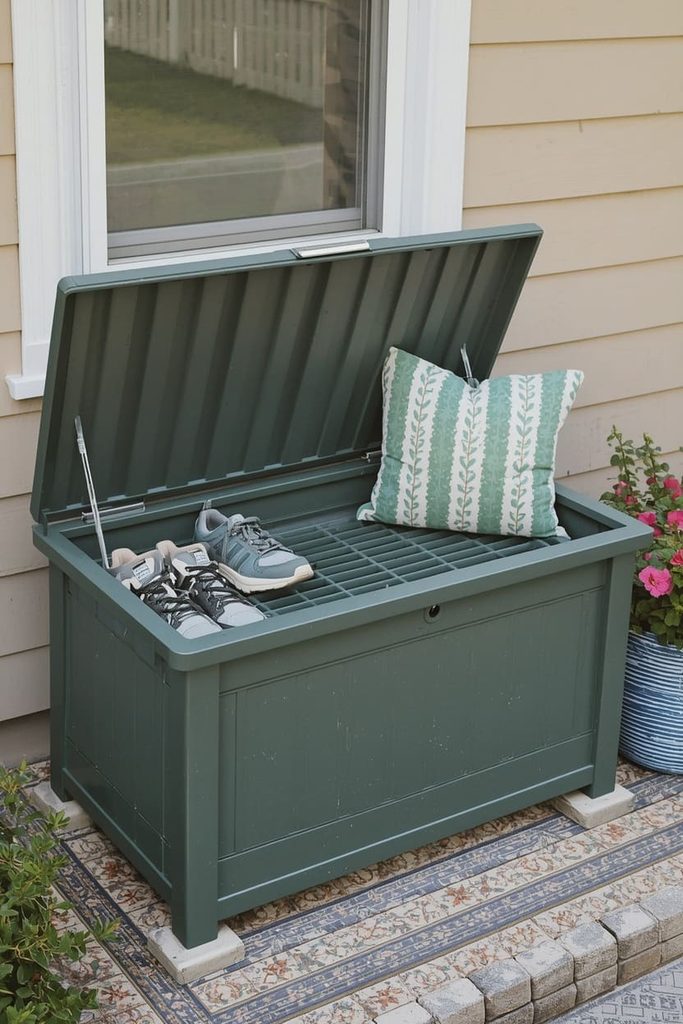
A resin deck box hides shoes completely and gives you a place to sit. It takes about an hour to set up. Resin doesn’t soak up water, and a closed lid blocks rain, dust, and curious eyes. A box about 45 inches wide holds around six pairs of sneakers.
Who This Idea Suits
This idea is perfect if you hate seeing shoes outside. It also works on uncovered porches.
Materials You Need
- 1 resin deck box, 40 to 50 inches wide, with a lid
- 4 small concrete pavers or rubber feet
- 1 plastic grid mat, cut to fit the box floor
- 1 outdoor seat cushion
- 1 small jar of baking soda
- A drill with a 1/4-inch bit
Steps to Set It Up
- Choose a spot close to the door but out of the walkway.
- Drill six quarter-inch holes in the box floor. Place three along each long side.
- Set a paver under each corner of the box.
- Slide a thin shim under the front feet. This tilts the lid so rain runs forward.
- Lay the grid mat inside to lift shoes above any water.
- Open the jar of baking soda and set it in a corner.
- Add the cushion on top.
- Load in dry shoes.
Weatherproofing
The drilled holes drain any water that sneaks in. Keep the lid closed between uses. Wipe the lid seams once a month.
Cost and Time
Expect about $80 to $150. The job takes roughly an hour.
Common Mistake and Quick Tip
Tossing in dripping shoes traps moisture and smell. Let them air out on a boot tray first. Replace the baking soda every month.
Frequently Asked Questions
How do you keep shoes dry on a front porch?
Store them under a roof, off the ground, in a spot with airflow. Even covered porches get blown-in rain. Slatted shelves and upside-down boot pegs let water drain instead of pool.
What material lasts longest outdoors?
Cedar, powder-coated metal, and resin last longest. Cedar naturally resists rot. Powder coating blocks rust, and resin never soaks up water. Plain pine and bare steel wear out quickly without sealer.
How do you stop porch shoes from smelling?
Let shoes dry fully, then add airflow and an odor absorber. Smells come from trapped dampness. A jar of baking soda or a few cedar blocks helps. Pull out insoles and wash them monthly.
Can you store shoes on an uncovered porch?
Yes, but use closed, sealed storage like the deck box in Idea 5. Open racks soak up rain on an uncovered porch. A waterproof cover over any rack gives extra protection.
How many pairs should your porch storage hold?
Plan for the pairs you wear daily, plus two extra. Move out-of-season shoes to a closet. That keeps your porch neat and leaves room for guests.
Pick one idea and start this weekend. Your porch will look tidy, and your hallway will stay clean. Save this post to your Pinterest board so the steps are ready when you are.

Sohel Rana is the writer, editor, publisher, and founder of The Tidy Porch. He is the man who is responsible for the craft (my wife created) being converted into a written piece. He also helps her wife (Sumona) by capturing videos of each craft. In short, he brings each craft created by her wife in front of you by transforming it into an article and a video.
