
Most crafts get made once and then get packed away. This one is different — it’s a tree trunk you keep on display, and every year, you add one more handprint leaf to it, dated like a growth chart.
By year three or four, it stops being a craft and starts being a record of exactly how your child’s hand has grown, one autumn at a time. Even in its very first year, before the tradition has had time to build, it works beautifully as a piece of fall decor on its own.
I’ll walk you through building the trunk once, and then exactly how to come back and add a new leaf each year going forward.
What You’ll Need to Buy (Top 5 Picks)
- Stretched canvas (11×14 or larger) — a sturdy canvas gives the trunk a permanent home that can hang on a wall for years, unlike paper that yellows or tears over time.
- Brown acrylic paint — acrylic dries into a more durable, long-lasting trunk than washable kids’ paint, since this piece is meant to stay on display rather than get put away.
- Washable kids’ paint set (fall colors: red, orange, yellow, green) — this is what your child’s hand gets painted with each year, so a multi-color set means their leaf can be a different color every season if you’d like.
- Fine-tip paint pens (metallic or white) — perfect for writing the date and initials directly onto each leaf once it’s dry, without smudging like a marker sometimes can on top of paint.
- Small foam brushes — these apply an even coat of paint to a small hand or to the trunk itself, without the bristle marks a regular paintbrush can leave behind.
Handprint Tree Growth Ring Keepsake
This craft has two parts. Part 1 is a one-time setup where you build the trunk and branches. Part 2 is what you’ll come back to every single year afterward, to add one new handprint leaf.
Materials Needed
For the Trunk (one-time):
- 1 stretched canvas (11×14 or larger)
- Brown acrylic paint
- 1 foam brush
- A pencil (for a rough sketch first)
- A damp washcloth or wipes
For Each Yearly Leaf:
- Washable kids’ paint (any fall color)
- A small bowl or paper plate (to hold the paint)
- A foam brush
- A fine-tip paint pen or marker (for dating the leaf)
- A damp washcloth or wipes
How to Make It
Part 1: Build the Trunk (One-Time Setup)
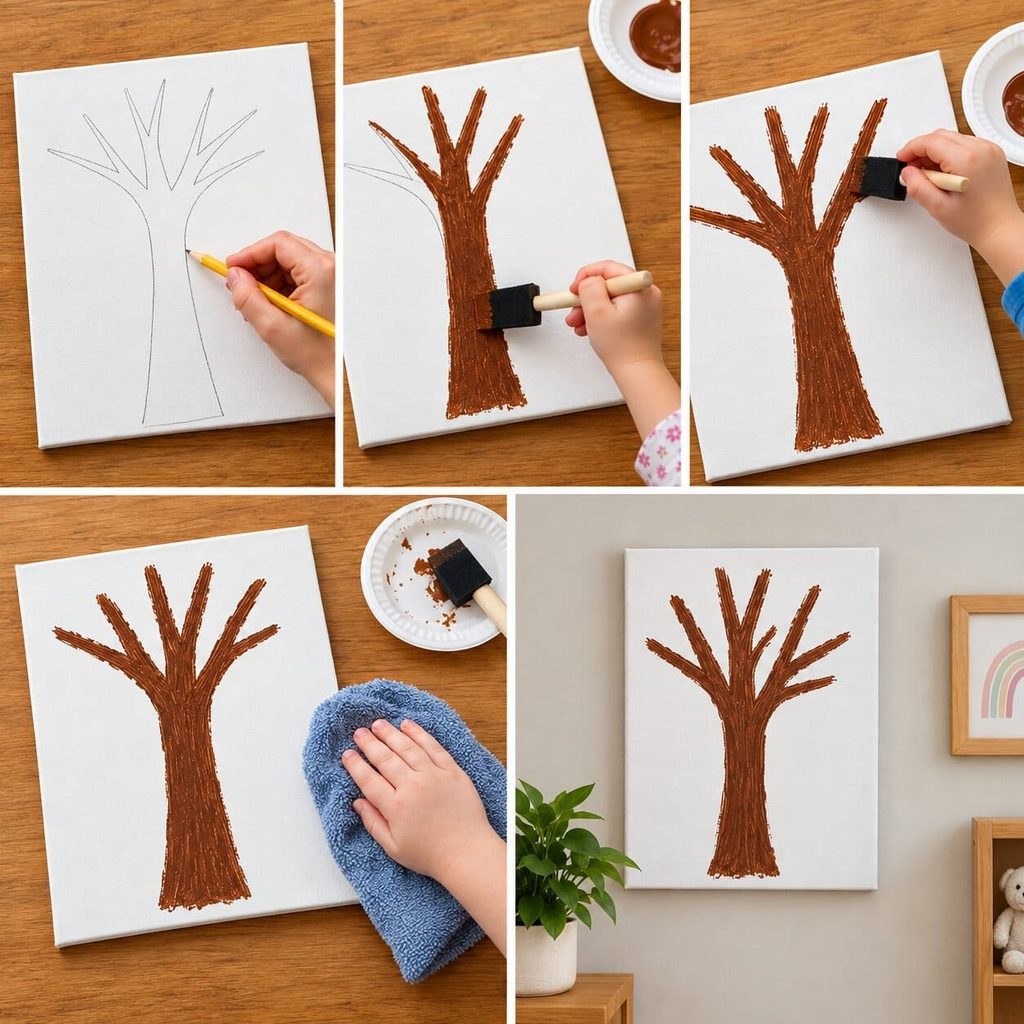
Step 1: Sketch the trunk shape. Parent: Using a pencil, draw a simple trunk shape starting from the bottom center of the canvas — a vertical rectangle that narrows slightly as it goes up, with 3–4 branch lines splitting off near the top, like the letter Y repeated a few times. This step works best as an adult step, since it sets the shape the whole tree will follow for years to come.
Step 2: Let your child help paint the trunk. Parent: Load the foam brush with brown paint and hand it to your child. Child: Brush the paint inside the pencil lines, going up and down like you’re painting a fence post. Parent: Guide their hand gently if the brush strays outside the lines — a little unevenness actually makes the bark look more textured and real.
Step 3: Fill in the branches. Child: Continue brushing brown paint along each of the branch lines, following them all the way to where they end. Parent: Talk your child through it: “Follow the line like you’re walking along a path that splits into smaller paths.”
Step 4: Clean up and let it dry. Parent: Wipe your child’s hands with the damp washcloth. Set the canvas flat and let the trunk dry fully for at least 1–2 hours before doing anything else — acrylic paint on canvas takes longer to dry than washable paint on paper.
Step 5: Hang the canvas somewhere it will stay. Parent: Once fully dry, hang the canvas in a spot where it can live long-term — a hallway, a playroom wall, or anywhere it won’t need to move often. This is the piece you’ll be adding to for years, so pick a spot you’re happy to commit to.
Part 2: Add a Leaf (Repeatable — Do This Every Year)
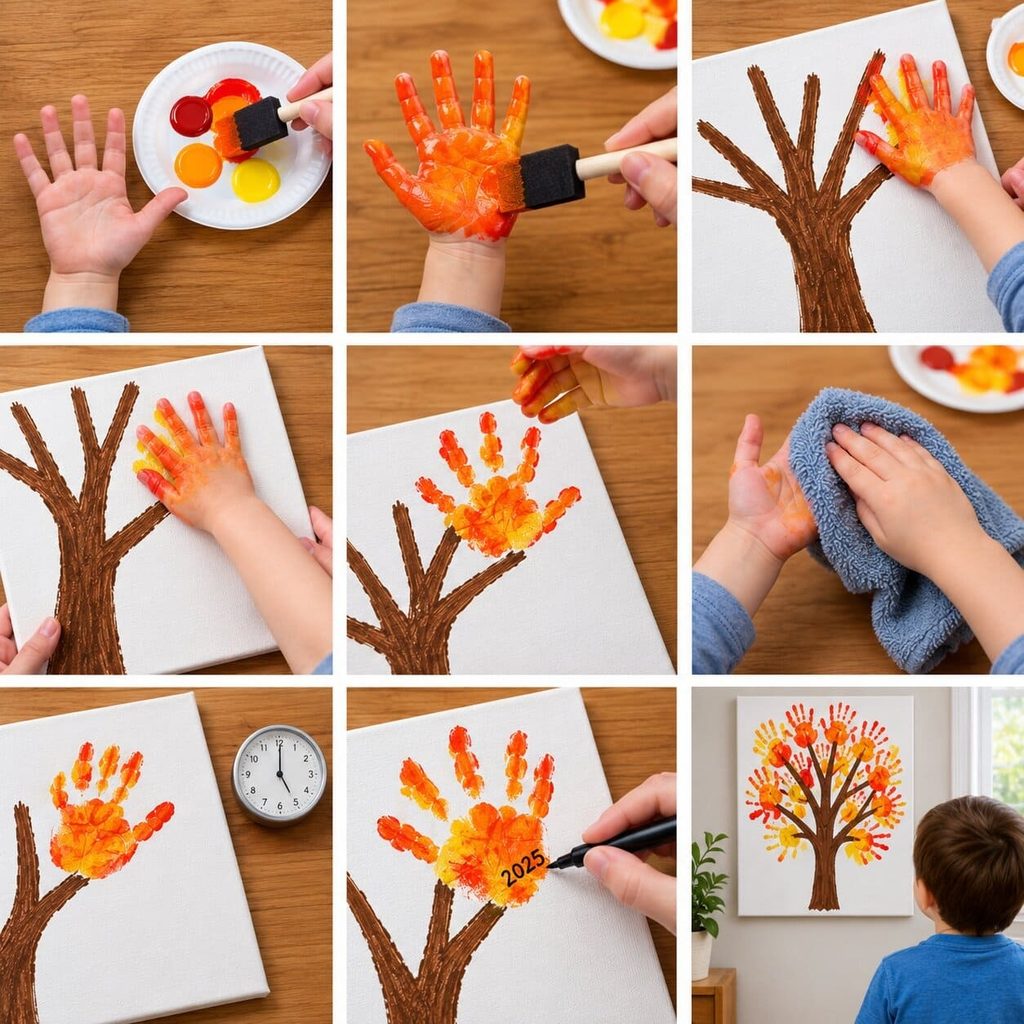
Come back to this section each year, whenever you’re ready to add a new handprint leaf to the tree.
Step 1: Load the paint. Parent: Dip the foam brush into your chosen fall color and dab off any extra so it isn’t dripping. Child: Hold your hand out flat, palm facing up, fingers relaxed and spread apart like a fan.
Step 2: Paint the hand. Parent: Brush the paint evenly across your child’s palm and fingers, all the way to the fingertips.
Step 3: Position the hand on a branch. Child: Press your hand onto one of the branch tips on the tree, fingers spread out like a leaf fanning open. Parent: Help guide their hand to a branch that has space, especially in later years when the tree starts to fill in.
Step 4: Make the print. Child: Press down firmly and count to three out loud — “one, two, three” — like you’re stamping a big stamp. Parent: Hold the edge of the canvas steady with your other hand so it doesn’t shift.
Step 5: Lift straight up. Child: Lift your hand straight up, like you’re pulling it out of a puddle. Parent: If it smudges slightly against the canvas texture, that’s fine — a little texture actually makes the leaf look more natural.
Step 6: Clean up little hands. Parent: Wipe your child’s hand right away with the damp washcloth before they touch anything else, since wet paint transfers easily onto whatever it touches next.
Step 7: Let the print dry. Let the new handprint dry for 15–20 minutes before adding the date, so the paint pen doesn’t smear into the wet paint underneath.
Step 8: Date the leaf. Parent: Once dry, use the fine-tip paint pen to write the year (and your child’s age, if you’d like) directly onto the handprint leaf, in a small corner of the palm or on one of the fingers. This is the single most important step for the growth-ring effect — without a date, the leaves blend together over time instead of telling a story.
Step 9: Step back and look. Take a moment with your child to look at the tree together and talk about how their hand has changed since last year, if this isn’t the first leaf. It’s a small moment, but it’s often the part kids remember most.
Tips
- Keep the same general paint colors year to year (reds, oranges, yellows) so the tree reads as one cohesive piece even as new leaves are added over time, rather than looking scattered.
- Store your leftover fall-colored paint and foam brush together in a small labeled bag, so next year’s leaf-adding session takes five minutes of setup instead of a search for supplies.
- If your child’s hand has grown enough that new handprints no longer fit the existing branch spacing, it’s completely fine to let leaves overlap slightly — it actually reinforces how much growth has happened between prints.
Turn It Into a Family Tree
Instead of using just one child’s handprint each year, invite the whole family to add a leaf in the same session — parents, siblings, even grandparents if they’re visiting.
Use a different color for each person, and date them all the same year, so a single season’s tree shows every hand size in the household at once.
This works especially well as a holiday gathering activity, since it gives everyone something to contribute to the same keepsake.
Display It as Fall Decor
Even before the multi-year tradition has had time to build, the trunk on its own works beautifully as autumn wall decor from the very first season.
Add a single handprint leaf or two in warm fall colors, and it stands on its own as a seasonal piece — the growth-ring tradition simply builds on top of what already looks complete in year one.
Frequently Asked Questions
What age is this handprint tree craft best for? This craft works well for children roughly ages 1 to 6, and it’s designed to be added to as they grow, so there’s no upper age limit on continuing the tradition. Toddlers under 2 will need a parent to guide the pressing and lifting, while preschoolers and older kids can usually manage the printing themselves each year.
Is the paint safe for toddlers? Washable kids’ paint used for the yearly leaves is designed to be non-toxic and safe for skin contact, though it’s worth doing a quick patch test if your child has sensitive skin. The acrylic paint used for the one-time trunk should be kept to adult application or closely supervised use, since acrylic isn’t formulated the same way as washable kids’ paint.
How do I store or preserve the tree between years? Since the trunk stays on canvas and hangs on display year-round, there’s no special storage needed between sessions — just keep it out of direct sunlight if possible, since sun exposure can fade paint colors over several years.
What if my child’s handprint smudges when I press it onto the canvas? A little smudging against the canvas texture is normal and often makes the leaf look more natural rather than like a flat sticker. If a print comes out too smudged to read as a handprint at all, let it dry, then simply add a fresh print on a nearby empty branch spot.
What happens once the tree runs out of room for new leaves? Once branches fill in, later handprints can simply overlap slightly with earlier ones, which reads as a fuller, more established tree rather than a problem. If you’d truly like more space, you can extend a branch line with a bit more brown paint before adding that year’s leaf.
Can I do this without a canvas? Yes — a large sheet of cardstock in a deep frame or a wooden board works as a substitute for canvas, as long as it’s sturdy enough to stay on display for multiple years without warping.

Sohel Rana is the writer, editor, publisher, and founder of The Tidy Porch. He is the man who is responsible for the craft (my wife created) being converted into a written piece. He also helps her wife (Sumona) by capturing videos of each craft. In short, he brings each craft created by her wife in front of you by transforming it into an article and a video.
