
If you’re planning a dinosaur-themed birthday party, you already know the favor bag question comes up eventually — do you buy a bag of plastic dinosaurs nobody remembers by Tuesday, or do you give the kids something they actually made?
This handprint dinosaur craft solves that for you. It doubles as the party activity and the take-home favor, so every guest leaves with a little dino they made themselves instead of a trinket from a bag.
And if there’s no party happening at all, it works just as well for a dino-obsessed toddler on a rainy afternoon or a classroom prehistoric unit — the same steps apply either way.
What You’ll Need to Buy (Top 5 Picks)
- Washable kids’ paint set — a set with green, and a couple of accent colors covers the dino body and spine details without needing anything specialty.
- Small paint cups with lids — these make pre-portioning paint for multiple kids fast, and the lids keep leftover paint usable if you’re prepping ahead of a party.
- White cardstock, bulk pack — sturdy enough to hold up as a keepsake or favor, and a bulk pack means you can cut enough sheets for an entire guest list without running out.
- Black fine-tip marker, multipack — having several on hand means you’re not passing one marker around a table of kids waiting their turn.
- Adhesive magnet strips — a simple way to turn the finished handprint dino into a fridge-ready take-home favor without needing a frame or extra materials.
Handprint Dinosaur Party Favor Craft
This craft uses one handprint, fingers spread, to form the dinosaur’s body and legs, with a few added details to finish the head, spine, and tail.
Plan for about 20–30 minutes total for one child, most of which is drying time — if you’re running this at a party, see the group note in Step 2 for streamlining it across several kids at once.
Materials Needed
- 1 sheet of white cardstock per child
- Green washable paint (plus an accent color for spine details, if you’d like)
- 1 foam paint brush per 2–3 kids
- Small paint cups or a paper plate (to hold the paint)
- A damp washcloth or wipes
- Black fine-tip marker
- Craft glue or a glue stick (only needed if adding wiggle eyes)
- Optional: wiggle eyes, adhesive magnet strips, or blank folded cardstock (for the take-home favor callout below)
How to Make It
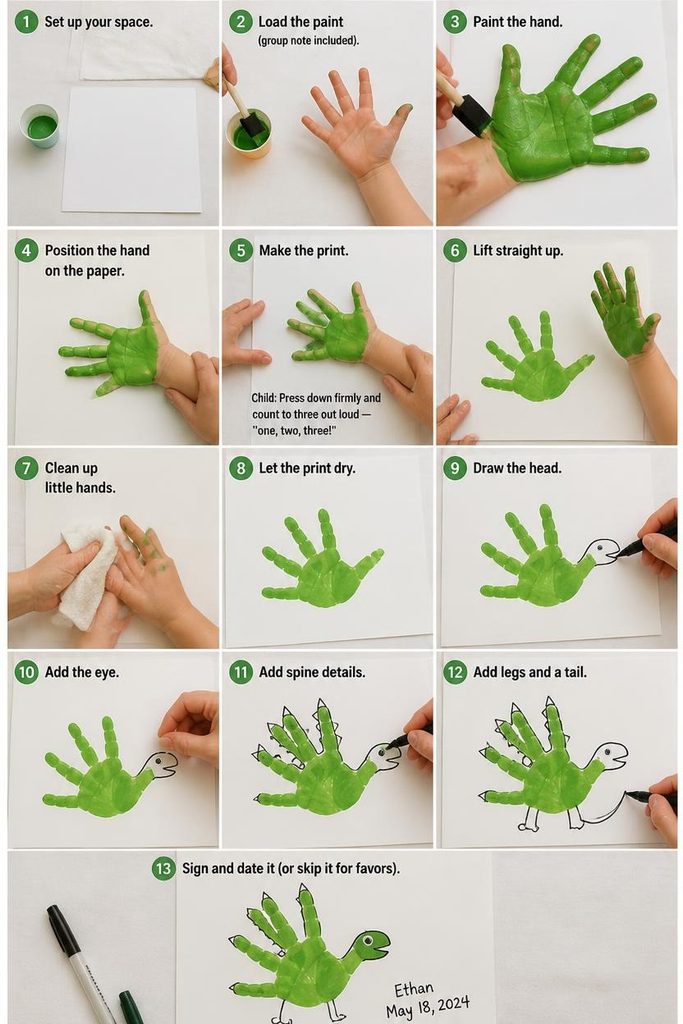
Step 1: Set up your space. Lay a paper towel or tablecloth down first, since paint tends to spread past the paper’s edge. Place a sheet of cardstock in front of each child, and set a small cup of green paint within easy reach of each one, rather than one shared bowl in the middle of the table.
Step 2: Load the paint (group note included). Parent: Dip the foam brush into the green paint and dab off any extra so it isn’t dripping. Child: Hold your hand out flat, fingers spread wide apart like a fan. For a group or party: Pre-pour paint into a small cup for each child before the activity starts, and set out one brush per 2–3 kids so you’re not stopping to refill a single shared bowl mid-craft — this alone saves the most time when one adult is guiding several kids at once.
Step 3: Paint the hand. Parent: Brush the paint evenly across your child’s palm and fingers, covering all the way to the fingertips, keeping the fingers spread apart as you go.
Step 4: Position the hand on the paper. Child: Press your hand down sideways on the paper, so your fingers point out to one side like the dinosaur’s back and tail spikes, and your palm forms the body.
Step 5: Make the print. Child: Press down firmly and count to three out loud — “one, two, three” — like you’re stamping a big stamp. Parent: Hold the edge of the paper steady with one hand so it doesn’t slide.
Step 6: Lift straight up. Child: Lift your hand straight up, like you’re pulling it out of a puddle, instead of dragging it sideways. Parent: A little smudging along the fingers is fine — it adds texture to the spiky back and won’t hurt the finished look.
Step 7: Clean up little hands. Parent: Wipe your child’s hand right away with the damp washcloth before they touch anything else, especially important at a party where kids may be moving straight from the craft table to playing.
Step 8: Let the print dry. Set the paper flat and let it dry for 10–15 minutes before adding any details. For a group or party: this is a natural moment to move into another party activity or snack time while everyone’s print dries at once.
Step 9: Draw the head. Parent: Once dry, use the black marker to draw a rounded dinosaur head shape extending from the thumb side of the palm print, with a small open mouth line. This step works best as an adult step for children under 4, since the shape needs a steadier hand to read clearly.
Step 10: Add the eye. Child: Glue one wiggle eye onto the head shape, or draw a small dot with the marker if you’d rather skip gluing. Parent: If gluing, help squeeze a small dot of glue first so your child has something for the eye to stick to.
Step 11: Add spine details. Child: Using the marker or a contrasting paint color, add small triangle or oval shapes along the top edge of the fingers to look like spikes or plates running down the dinosaur’s back. If it goes wrong: if the spikes don’t line up evenly, that’s fine — real dinosaurs weren’t perfectly symmetrical either, and it adds character.
Step 12: Add legs and a tail. Parent or child: Draw two or three short curved lines beneath the palm print for legs, and extend a curved line from the opposite side of the palm from the thumb for a tail.
Step 13: Sign and date it (or skip it for favors). Parent: For a keepsake at home, write your child’s name and the date on the paper. For party favors going home with guests, you may want to skip this step or just add each guest’s first name so they know which dino is theirs.
Tips
- If you’re doing this with a group, prep every sheet of cardstock with each guest’s name written lightly in pencil in a corner ahead of time, so prints don’t get mixed up before they’re dated.
- Keep a stack of damp washcloths at the table rather than one shared cloth, especially with several kids finishing around the same time.
- If the paint comes out too thick and the print looks blobby, dab a little off the hand with a paper towel before pressing down; a thin, even coat prints far more clearly than a heavy one.
Turn the Same Handprint Into a Stegosaurus or Triceratops
For party variety, this same fingers-spread handprint can become different dinosaurs with small swaps. For a Stegosaurus, add larger rounded plate shapes (instead of triangle spikes) along the back and a few short spikes at the tip of the tail.
For a Triceratops, skip the back spikes entirely, add three small horn shapes to the head, and draw a wide frill shape behind it. Assigning different dinosaurs to different guests means the finished favors won’t all look identical going home.
Turn It Into a Take-Home Favor
Once the print is fully dry and detailed, mount it onto a folded piece of cardstock to make a small card, or attach an adhesive magnet strip to the back for an instant fridge favor.
Either option turns the craft itself into the party favor, so there’s no separate favor bag to assemble — kids leave the party with something they made instead of something bought.
Frequently Asked Questions
What age is this handprint dinosaur craft best for? This craft works well for children roughly ages 1 to 6. Toddlers under 2 will need a parent to guide most of the pressing and lifting, while preschoolers and older kids can typically manage the printing themselves, with an adult handling the marker details.
Is the paint safe for toddlers? Washable kids’ paint is designed to be non-toxic and safe for skin contact, but if your child or a party guest has sensitive skin, it’s worth doing a quick patch test beforehand and washing hands promptly once the craft is finished.
Can I do this with a group of kids at a party? Yes — pre-pouring paint into individual small cups, prepping cardstock with names ahead of time, and having one brush per 2–3 kids (rather than one shared bowl and brush) makes this manageable for a single adult supervising a group, as covered in Step 2 above.
How far ahead of a party can I prep the supplies? You can portion paint into small lidded cups and pre-cut cardstock up to a day or two ahead of time, as long as the paint cups stay sealed so they don’t dry out. The craft itself, including drying time, is best done the day of the party since wet paint doesn’t hold up well if it needs to travel or wait too long before finishing.
What if my child’s handprint smudges or the fingers overlap? A little smudging is normal, especially with wiggly toddlers, and it usually just adds texture to the spiky back. If the fingers overlap too much to read as separate spikes, simply try a second print on a fresh sheet, reminding your child to spread their fingers “like a fan.”
How long does the craft take from start to finish? Plan for about 20–30 minutes total per child, including a 10–15 minute drying period between the handprint and the added details. If running this for a group, the hands-on printing portion for each child only takes a couple of minutes, so a full party group can move through it fairly quickly.

Sohel Rana is the writer, editor, publisher, and founder of The Tidy Porch. He is the man who is responsible for the craft (my wife created) being converted into a written piece. He also helps her wife (Sumona) by capturing videos of each craft. In short, he brings each craft created by her wife in front of you by transforming it into an article and a video.
