
Sometimes you want to send something small and sweet on the first day of school. Something that says thank you before the year even starts. This owl handprint craft is just that.
Your child’s handprint turns into a cute little owl. It folds right into a handmade card. You can hand it to a teacher on day one, or save it for teacher appreciation week.
Not making it as a gift? No problem. It also looks great as simple fall decor or a keepsake at home.
What You’ll Need to Buy (Top 5 Picks)
- Washable kids’ paint set (brown, tan, and white) — these three colors give the owl its layered feather look.
- Foam paint brushes — these spread paint evenly on small hands. They print more cleanly than a regular brush.
- Cardstock in a soft neutral color — this paper is sturdy. It folds well into a card and holds up if you’re giving it away.
- Wiggle eyes variety pack — different sizes let you match the eyes to your child’s handprint.
- Fine-tip markers (black and orange) — use these for the owl’s face and beak once the paint dries.
Owl Handprint Teacher Gift Craft
This craft uses two handprints. One makes the owl’s wings and body. A smaller print makes the head. Both go on one card front. Plan for about 25–30 minutes total. Most of that time is just drying time between the two prints.
Materials Needed
- 1 sheet of cardstock, folded in half to card size
- Brown, tan, and white washable paint
- 1 foam paint brush
- A small bowl or paper plate (to hold the paint)
- A damp washcloth or wipes
- 2 wiggle eyes
- Black and orange fine-tip markers
- Craft glue or a glue stick
- Optional: a small paper accessory (graduation cap or apple shape) for the “Match It to the Occasion” section below
How to Make It
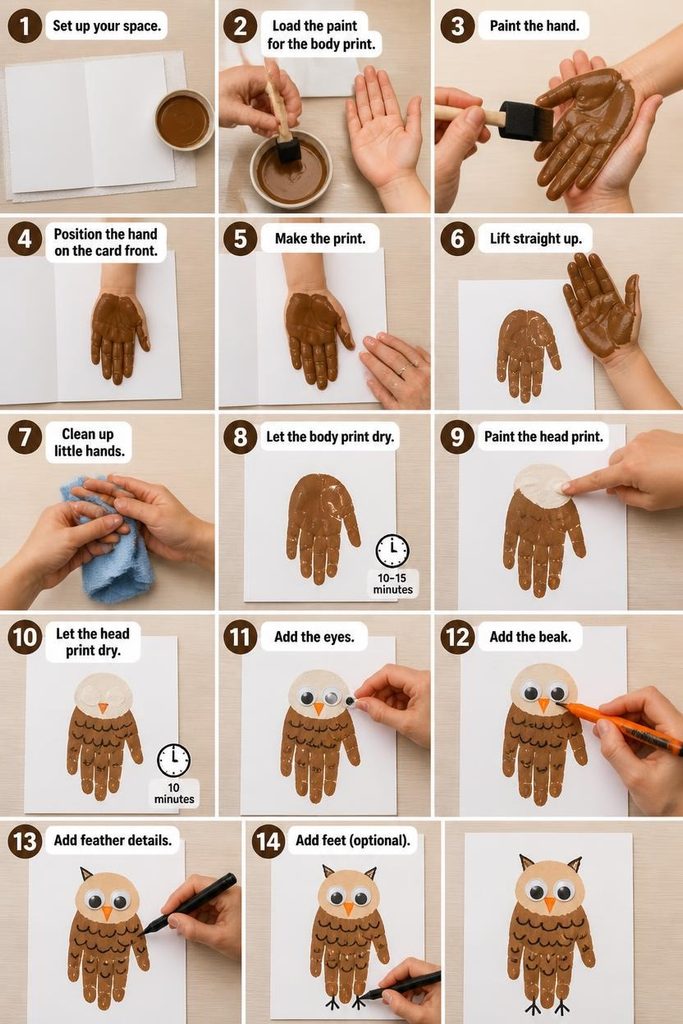
Step 1: Set up your space. Lay down a paper towel or old placemat first. Paint tends to spread past the edge of the paper. Open the folded cardstock flat so the front panel faces up. Set the bowl of brown paint close by.
Step 2: Load the paint for the body print. Parent: Dip the foam brush into the brown paint. Dab off any extra so it isn’t dripping. Child: Hold your hand out flat. Keep your fingers together instead of spread apart, like you’re doing a karate chop.
Step 3: Paint the hand. Parent: Brush the paint evenly over your child’s palm and fingers. Cover all the way to the fingertips. Keep the fingers held together as you paint. Say something like: “Keep your fingers snuggled together so they make one big wing shape.”
Step 4: Position the hand on the card front. Child: Press your hand down in the middle of the card front. Point your fingers downward. Your fingers will form the bottom of the owl’s body. Your palm will form the top.
Step 5: Make the print. Child: Press down firmly. Count to three out loud — “one, two, three” — like you’re stamping a big stamp. Parent: Hold the far edge of the card steady with one hand so it doesn’t slip.
Step 6: Lift straight up. Child: Lift your hand straight up. Pretend you’re pulling it out of a puddle. Don’t drag it sideways. Parent: A little smudging along the fingers is fine. It just adds texture to the feathers.
Step 7: Clean up little hands. Parent: Wipe your child’s hand right away with the damp washcloth. Do this before they touch anything else.
Step 8: Let the body print dry. Set the card flat. Let the print dry for 10–15 minutes before adding the head. This is a good time for a snack break. Wet paint smudges easily if little hands come back too soon.
Step 9: Paint the head print. Parent: Once the body print is dry, dip a finger or a small area of your child’s palm into tan or white paint. Child: Press this smaller print near the top of the brown body print. Overlap it slightly to form the owl’s round head. If it goes wrong: If the head print smears into the still-wet body print underneath, wait a few more minutes. The body layer needs to be fully dry first.
Step 10: Let the head print dry. Let this second layer dry for another 10 minutes before adding any details on top.
Step 11: Add the eyes. Child: Glue one wiggle eye onto each side of the head print. Parent: Squeeze a small dot of glue first, so your child has something for each eye to stick to.
Step 12: Add the beak. Parent: Using the orange marker, draw a small triangle between the eyes for the beak. This step works best for a grown-up if your child is under 4. It needs a steady hand to sit centered between the eyes.
Step 13: Add feather details. Child or parent: Using the black marker, draw a few short curved lines across the brown body print. These suggest layered feathers. Add two small pointed triangles at the top of the head for ear tufts.
Step 14: Add feet (optional). Parent or child: Draw two small V-shapes at the bottom of the print for the owl’s feet.
Tips
- If your child’s hands are ticklish, let them press their own palm into the paint on the plate. This gives them more control and cuts down on the wiggling.
- Do the two prints (body and head) on separate days if you’re short on time. The card front will still turn out fine as long as the first layer is fully dry before the second one goes on.
- If the paint comes out too thick and the print looks blobby, blot a little off the hand with a paper towel first. A thin coat prints much more clearly than a thick one.
Turn It Into a Card
Once everything is dry, the folded cardstock is already most of the way to being a finished card. Just add a note on the inside.
For a teacher gift, try something like “Owl always remember you” or “You’re owl-some, thank you.”
Have your child sign their name at the bottom. A teacher will treasure the handwriting just as much as the craft.
Match It to the Occasion
A few small swaps let this same owl fit different moments in the school year. For the first day of school, glue on a tiny paper graduation-cap shape.
Write “Owl be a great year!” inside. For teacher appreciation week in spring, add a small paper apple shape near the owl’s feet. Write “Owl always appreciate you.”
Not making it as a gift at all? Skip the accessory and note. The owl still works on its own as simple fall decor or a keepsake at home.
Frequently Asked Questions
What age is this owl handprint craft best for? This craft works well for kids roughly ages 1 to 6. Toddlers under 2 will need a parent to guide most of the pressing and lifting for both prints. Preschoolers and older kids can usually manage the printing themselves. An adult can handle the marker and gluing details.
Is the paint safe for toddlers? Washable kids’ paint is made to be non-toxic and safe for skin. Still, it’s smart to test a small patch on your child’s wrist first if they have sensitive skin. Wash hands right away once the craft is done.
When should I make this if I want to give it to a teacher? For a first-day-of-school gift, make it a few days ahead. This gives the paint plenty of time to dry. It also gives you time to add any card details without rushing. Teacher appreciation week usually falls in early May. The same timing tip applies there too — a few days’ head start keeps things relaxed.
What if I’m not making this as a gift — can I still use it as fall decor? Yes. Just skip the card fold and the accessory swaps. Let the finished owl print stand on its own, framed or displayed. It works well as autumn decor all by itself, without any of the gift-specific extras.
What if the two handprint layers don’t line up well? A little overlap or unevenness between the body and head prints is normal. It often just adds to the layered, feathery look. If the head print ends up way off-center, draw a small connecting curve between the two shapes with the black marker. This tends to blend any gap.
How long does the craft take from start to finish? Plan for about 25–30 minutes total. This includes two separate drying times of about 10 minutes each — one between the body print and the head print, and one before the final details. The hands-on part itself only takes a few minutes for each print.

Sohel Rana is the writer, editor, publisher, and founder of The Tidy Porch. He is the man who is responsible for the craft (my wife created) being converted into a written piece. He also helps her wife (Sumona) by capturing videos of each craft. In short, he brings each craft created by her wife in front of you by transforming it into an article and a video.
