
Last summer, my niece came home from her ocean unit covered in blue paint. Her hands were purple. Her nose had a smudge of green on it.
She held up a paper octopus like she’d caught a real one. That little paper octopus is still on my fridge. It made me realize how much a simple handprint craft can mean. It’s messy. It’s quick.
And it turns into something you actually want to keep. If you’re planning an ocean or summer unit, or you just want a fun afternoon project, this octopus handprint craft is the one to try.
5 Supplies That Make This Craft Easier
- Crayola Washable Kids Paint (6-Pack) — Washable paint means fewer stains on clothes, tables, and tiny fingers.
- Precut White Cardstock Sheets — Sturdy cardstock holds up to wet paint better than regular paper.
- Chubby Kid-Safe Paint Brushes — Wide handles are easy for small hands to grip during setup and cleanup.
- Wiggle Eyes Variety Pack — A few glued-on wiggle eyes instantly make the octopus look alive.
- Baby Wipes Travel Pack — Quick wipe-downs mean less time washing hands and more time crafting.
What Is the Octopus Handprint Craft?
This craft turns one handprint into a full octopus, using the palm as the head and the fingers as legs. It’s built for young kids, ages two to six, and works just as well for one child at home as it does for a group of ten in a classroom.
The idea is simple. You paint a hand. You press it onto paper. Then you add eyes, a smile, and a few extra painted legs to round out the octopus shape. That’s it. No fancy folding. No cutting shapes ahead of time. Just paint, a hand, and a little imagination.
Teachers like it because it fits neatly into an ocean or summer unit. Parents like it because the finished craft looks better than the process ever suggests it will.
Why This Craft Works So Well for an Ocean Unit
This craft earns its spot in an ocean unit because it’s easy to connect to a real animal, not just a shape on paper. Kids get to talk about how many legs an octopus has, why it lives in the ocean, and how it moves through the water. That gives the activity a little more purpose than a plain art project.
It also fits a wide age range. A two-year-old can manage the basic hand press with help. A five- or six-year-old can add their own extra legs, draw a face, and decorate the background with waves or bubbles. That flexibility makes it a good pick for mixed-age classrooms or family activities with siblings of different ages.
Materials Needed
- Washable kids’ paint (blue, purple, or teal work best)
- White or light-colored cardstock
- A paintbrush or sponge for applying paint
- Wiggle eyes (or a black marker for drawing eyes)
- Glue stick or craft glue
- Baby wipes or a damp cloth
- Black marker (fine-tip, for details)
- Optional: googly eye stickers, glitter glue, or foam shapes for extra decoration
How to Make It
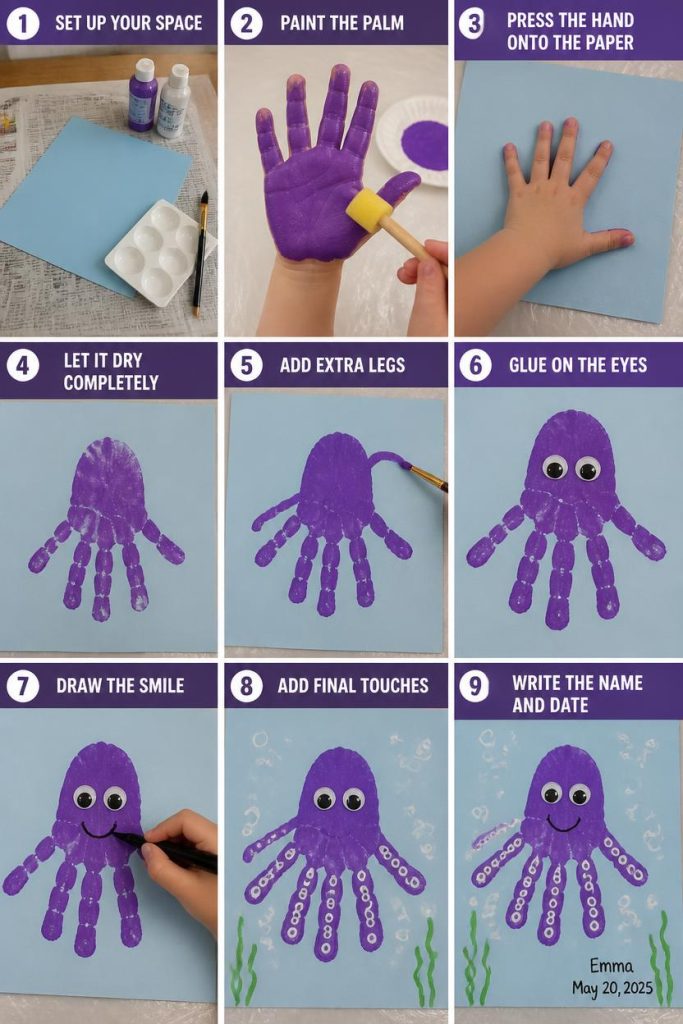
- Set up your space. Lay down a plastic tablecloth or newspaper. Paint gets everywhere, even with the washable kind.
- Paint the palm. Use a paintbrush or sponge to cover the child’s palm and fingers with paint. Keep the coat even. Thick globs will smear when pressed down.
- Press the hand onto the paper. Place the palm firmly in the center of the cardstock. Press down gently, then lift straight up. Don’t drag the hand, or the print will blur.
- Let it dry completely. This usually takes ten to fifteen minutes. Don’t rush this step. Wet paint smudges easily when you add details.
- Add extra legs. A real octopus has eight legs, but a hand only has five fingers. Use a paintbrush to add three extra curved legs coming from the palm print. Match the same paint color for a clean look.
- Glue on the eyes. Once the paint is fully dry, glue two wiggle eyes near the top of the palm print, where the head would be.
- Draw the smile. Use a black marker to add a simple curved smile under the eyes.
- Add final touches. This is the fun part. Add small dots, stripes, or bubbles around the octopus using a marker or paint. Some kids like adding suction cups to each leg with tiny dots.
- Write the name and date. Flip the paper over, or use a corner of the front, and write the child’s name and the date. This one small step turns a craft into a keepsake.
Tips for a Clean Handprint
- Paint one coat at a time. A thin, even layer prints better than a thick one, since thick paint pools in the creases of the palm and blurs the shape.
- Press, don’t wiggle. Wiggling the hand while it’s on the paper smears the print and ruins the octopus shape. A steady press-and-lift motion gives you the cleanest outline.
- Keep a damp cloth close by. Little hands want to touch everything right after painting, and a quick wipe stops small fingerprints from showing up on the table, chair, or nearby craft supplies.
- Work on a flat, hard surface. A wobbly table or a soft placemat can shift under the paper mid-press, which throws off the shape of the print.
Make It a Classroom Activity
This craft works well with a small group, but it does take a little planning. Here’s how to keep things running smoothly.
Set up paint stations. Instead of one paint tray for the whole class, set up two or three stations. This cuts down on wait time and keeps kids from crowding around one spot.
Assign a helper for each station. One adult per station can apply paint to each child’s hand and guide the press-and-lift motion. This keeps the print clean and avoids extra mess.
Plan for drying space. Lay finished prints flat on a table or drying rack. Avoid stacking wet papers, since they’ll stick together.
Label as you go. Write each child’s name on their paper before painting starts. It’s much easier than trying to remember whose print is whose after fifteen kids have gone through the station.
Keep a simple rotation. While one group paints, have another group work on a related activity, like coloring an ocean scene or looking at picture books about octopuses. This keeps the whole class engaged, not just the kids currently at the paint station.
Turn It Into a Keepsake
A handprint craft is cute in the moment, but it becomes something more once time passes. Small hands grow fast, and a dated handprint from age three looks completely different a year later.
Date every piece. Always write the date somewhere on the craft, even if it feels obvious now. You’ll be glad you did later.
Mount it on a colored background. Glue the finished octopus onto a slightly larger piece of colored cardstock. This creates a simple border and makes the piece look more finished.
Turn it into a card. Fold a piece of cardstock in half and glue the octopus print onto the front. Add a short message inside, like “Some-body loves you this much” or “Just squid-ding around, I love you.” It makes a sweet handmade card for a grandparent or family member.
Start a yearly tradition. If you do this craft every summer, you’ll build a collection of prints that shows exactly how much a child has grown. Keep them together in a folder or a small memory box.
Frequently Asked Questions
What kind of paint should I use for handprint crafts? Washable kids’ paint works best. It comes off skin and most fabrics easily, and it’s designed to be safe for young children. Regular craft paint can work in a pinch, but it stains more and takes longer to wash off small hands.
How do I keep the handprint from smudging? Press the hand down firmly without sliding it, then lift straight up. Let the print dry completely before adding any details on top. If you’re working with a wiggly toddler, hold their wrist gently while you guide the press so the hand doesn’t drag across the paper.
How far in advance can I prep this activity? You can cut and set out your cardstock the day before. Paint should be prepped right before the activity so it doesn’t dry out or separate. If you’re running this in a classroom, prepping name labels and paint stations the night before saves a lot of time on the actual day.
Can I do this craft with just one child at home? Yes. This craft works just as well one-on-one as it does in a group. You’ll just move through the steps a little faster without a whole class to manage, and you can spend a little more time on decorating and details together.
How do I store or display the finished craft? Once it’s fully dry, store it flat in a folder or frame it for display. Avoid folding it, since that can crack dried paint. A simple document box or a labeled folder works well if you’re keeping several years of crafts together.
What if my child doesn’t want their hand painted? Try painting a small area first, like just the fingertips, to ease into it. Some kids also do better watching a sibling or friend go first. You can also let them help paint your hand, so they see exactly what’s about to happen to theirs.
Can I make a whole ocean scene using more than one handprint? Yes. Once you’re comfortable with the basic octopus, you can add handprint fish, starfish, or seaweed around it to build a full ocean scene on one page. It’s a nice way to stretch the activity into a longer project on a rainy afternoon.
This octopus handprint craft is a small project with a big payoff. It takes less than an hour from start to finish, and it leaves you with something worth keeping. Whether you’re running a classroom activity or spending a quiet afternoon with your own child, this is one craft that’s worth the mess.

Sohel Rana is the writer, editor, publisher, and founder of The Tidy Porch. He is the man who is responsible for the craft (my wife created) being converted into a written piece. He also helps her wife (Sumona) by capturing videos of each craft. In short, he brings each craft created by her wife in front of you by transforming it into an article and a video.
