
Bring a little tropical charm to your crafting table with this easy hibiscus flower paper craft. Made with simple supplies such as colored cardstock, a glue stick, and scissors, this project is beginner-friendly and fun for kids and adults alike.
You can use bright pink, orange, yellow, purple, or red paper to create colorful hibiscus blooms. With a free hibiscus flower template to guide the shapes, you can quickly turn ordinary paper into a beautiful handmade flower for decorating cards, walls, gifts, or craft displays.
Materials Needed
- Free Hibiscus Flower Template – Use a printable template to get the basic hibiscus petal shapes. Print it on regular paper and cut out the individual pieces.
- Colored Cardstock or Construction Paper – Choose vibrant colors such as pink, red, orange, yellow, or purple for the flower. Green paper can also be used if you want to add leaves.
- Glue Stick – A glue stick works well for attaching the paper pieces without making the cardstock too wet.
- Scissors – Use sharp craft scissors to cut around the template and create neat flower shapes.
How to Make a Hibiscus Flower Paper Craft
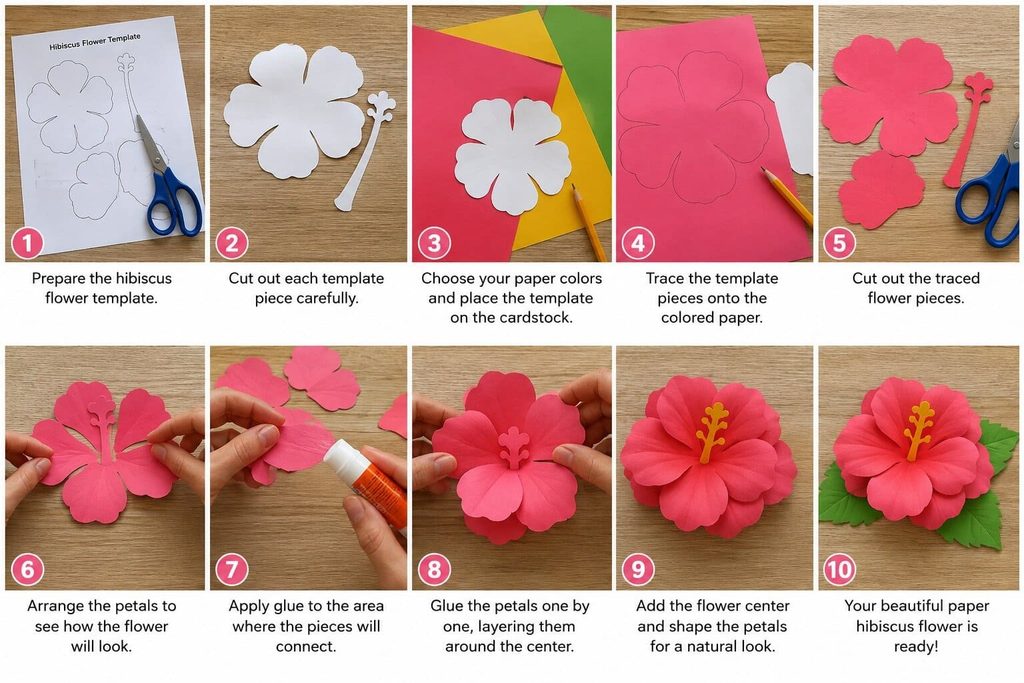
Step 1: Prepare the Hibiscus Flower Template
Start by downloading and printing the free hibiscus flower template. The template provides the basic shapes needed to create the paper flower, making it easier to achieve a recognizable hibiscus design.
Once printed, carefully cut out each template piece with scissors. Take your time around the curved edges so the petal shapes remain smooth.
If children are making the craft, an adult can help with cutting, especially when using sharp scissors.
Step 2: Choose Your Paper Colors
Select the colored cardstock or construction paper you want to use for your hibiscus.
Hibiscus flowers naturally come in many bright shades, so you can get creative with your color choices. Pink and red create a traditional tropical look, while orange, yellow, purple, or even multiple colors can give the flower a playful appearance.
For a more dimensional flower, choose one main color for the petals and a contrasting color for the center.
Step 3: Trace the Template Pieces
Place each paper template piece on your selected cardstock or construction paper. Trace around the shapes with a pencil.
Make sure the template stays still while tracing so the outlines do not become uneven. If you are making several flowers, you can trace multiple sets of petals before cutting.
Using sturdy cardstock will help the finished flower hold its shape better.
Step 4: Cut Out the Flower Pieces
Carefully cut along the traced outlines using your scissors.
Try to follow the curves of each petal as closely as possible. Small variations are perfectly fine and can make the finished flower look more handmade.
After cutting, lay all the pieces on your work surface and check that you have the pieces needed to assemble the hibiscus.
Step 5: Arrange the Petals
Before applying glue, arrange the paper pieces to see how the flower will look.
Position the larger petal shapes around the center of the flower. If your template includes several petal pieces, slightly overlap them to create a fuller appearance.
Experiment with the arrangement until you are happy with the shape. Layering the petals gives the paper hibiscus more depth and makes it look less flat.
Step 6: Glue the Hibiscus Together
Now it is time to assemble the flower.
Apply a small amount of glue to the areas where the paper pieces need to connect. Begin attaching the petals one at a time, keeping them evenly positioned around the flower center.
Press each piece gently after gluing it down. Hold it for a few seconds so the adhesive can grip the paper.
Avoid using too much glue because excess adhesive can make the paper soggy or leave visible marks.
Step 7: Build Up the Flower Layers
Continue layering and stacking the petal pieces until your hibiscus looks full and dimensional.
Slightly overlapping the petals creates a natural-looking flower shape. You can also gently bend or curve the petals upward with your fingers to give the paper flower more volume.
For a more realistic effect, avoid making every petal perfectly flat. A little variation in the angle and position of the petals can make your handmade hibiscus look more natural.
Step 8: Add the Flower Center
Pay special attention to the center of your hibiscus because it helps bring the whole flower together.
Use a contrasting piece of colored paper for the center if your template includes one. You can also add small details with a marker or colored pencil.
For an extra decorative touch, tiny yellow pom-poms can be added around the center to represent the hibiscus’s prominent floral details. The original craft tutorial also suggests this optional embellishment.
Step 9: Shape and Finish Your Paper Hibiscus
Once all the pieces are securely glued, gently shape the petals with your fingers.
Curl the edges slightly upward or bend individual petals in different directions to create a three-dimensional appearance. Be gentle so you do not crease or tear the cardstock.
Allow the glue to dry completely before moving the flower.
Your colorful paper hibiscus is now ready to display!
Step 10: Get Creative With Your Flowers
Once you have made one hibiscus, try creating several in different colors.
Combine pink, orange, yellow, purple, and red flowers to make a bright tropical arrangement. You can also attach your paper hibiscus flowers to greeting cards, gift packages, classroom displays, bulletin boards, or handmade decorations.
If you want to experiment further, add green paper leaves or use different sizes of petals to create flowers with varying shapes and layers. Using sturdy paper and layering the petals are also recommended ways to give the finished flowers more structure and dimension.
Give It A Try
This hibiscus flower paper craft is a simple and colorful way to turn basic craft supplies into a beautiful tropical decoration. The free template makes it easy to create the flower shapes, while colored cardstock gives the petals enough strength to hold their form.
Don’t worry about making every cut or petal perfectly identical—the small imperfections can give your handmade flowers their own character. Pick your favorite colors, grab your scissors and glue, and create a cheerful paper hibiscus flower today!

Sohel Rana is the writer, editor, publisher, and founder of The Tidy Porch. He is the man who is responsible for the craft (my wife created) being converted into a written piece. He also helps her wife (Sumona) by capturing videos of each craft. In short, he brings each craft created by her wife in front of you by transforming it into an article and a video.
