
Last March, I handed a four-year-old a brush loaded with orange paint. “Press your hand down, with your fingers pointing at your toes,” I said. She frowned.
Then she lifted her hand and gasped. “It’s a beard!”
We glued on a face and a green hat. Then she wanted gold, so we pressed yellow fingertips in a curve and counted every coin out loud.
This leprechaun handprint craft became a counting game too. It takes about 40 minutes, plus drying time.
Here is how you can make your own peek-a-boo leprechaun.
What You Need for a Leprechaun Handprint Craft
You need orange and yellow paint, a few sheets of colored paper, and glue. Most of it is probably in your craft drawer already.
- Paper: One sheet of white cardstock, 12 x 18 inches. Add one sheet each of green, black, and peach or cream paper.
- Paint: Washable, non-toxic paint. Plan on 2 tablespoons of orange and 1 tablespoon of yellow. Add 1 teaspoon of pink for cheeks if you like.
- Glue and marker: A glue stick and a black marker.
- Eyes: Two googly eyes, or two black marker dots.
- Tools: A flat 1-inch brush or foam sponge, two paper plates, and scissors for an adult.
- Cleanup: Baby wipes, a damp towel, and newspaper.
Cardstock matters. Thin paper wrinkles under wet paint, and wrinkles blur the beard fingers.
How to Make a Peek-a-Boo Leprechaun Step by Step
Plan for about 40 minutes of work and 30 minutes of drying. Follow these fourteen steps in order.
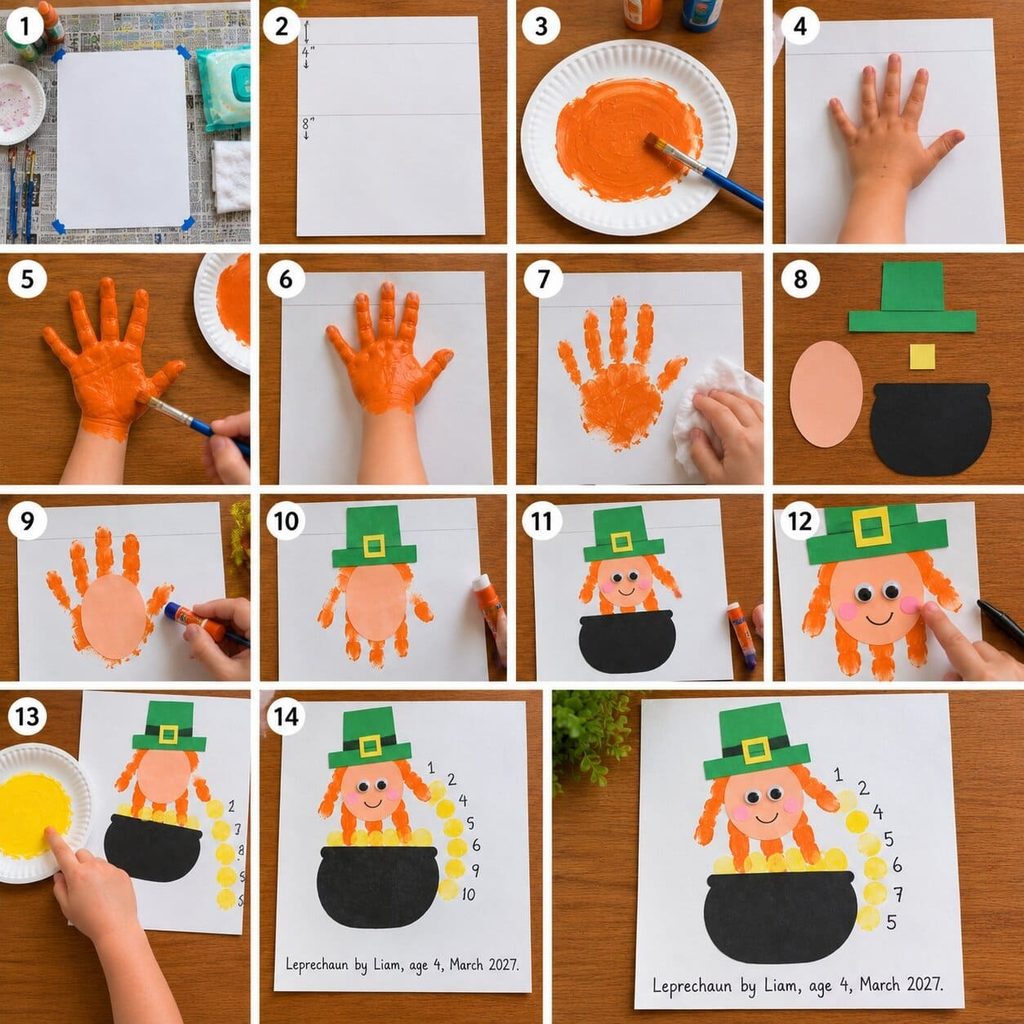
- Set up your space. Cover the table with newspaper. Tape the white cardstock down by its corners, with the long sides running up and down. Keep the wipes and damp towel within reach before you open any paint.
- Mark your layout. Draw a light pencil line 4 inches from the top edge. The wrist goes here. Draw a second line 8 inches from the top. The top of the pot will sit here. If your child’s hand is larger, move both lines down an inch.
- Spread the paint. Squeeze 2 tablespoons of orange onto a plate. Brush it into a thin, even layer a little bigger than a hand. Thin paint gives crisp fingers. Thick paint makes them blur together.
- Do a dry run. Have your child hold a hand over the paper with the wrist crease on the top line. The fingers should spread slightly and point down toward the bottom of the page. Angle the thumb out to the side. The thumb will look like a pointy ear.
- Paint the hand. Brush orange over the palm, each finger, and the thumb. Use light strokes. Keep the fingers slightly apart so the paint does not bridge the gaps.
- Press the hand. Set the wrist crease on the top line. Press the palm first, then each finger, then the thumb. Count to three. Lift straight up without sliding.
- Clean up and dry. Wipe the hand with a baby wipe right away, then wash it with soap. Let the page dry flat for about 30 minutes.
- Cut the paper pieces. While you wait, cut these shapes. For toddlers and preschoolers, an adult does the cutting.
- Peach face: an oval, about 2.5 inches wide and 3 inches tall
- Green hat brim: a strip, 4 inches wide and 1 inch tall
- Green hat top: a rectangle, 2.5 inches wide and 2 inches tall
- Yellow buckle: a 1-inch square
- Black pot: 5 inches wide and 3 inches tall, with a rounded bottom
- Glue on the face. Rub the glue stick on the back of the oval. Press it over the palm, centered, with the top edge just below the wrist line. Hold it for 10 seconds.
- Add the hat. Glue the brim across the top of the face so it covers the wrist edge. Glue the hat top above the brim. Add the yellow buckle at the center of the brim.
- Place the pot. Glue along the top edge of the pot. Line that edge up with your 8-inch pencil line. The pot now covers the bottom 1.5 inches of the fingers, so the leprechaun looks like he is peeking over it.
- Add the face details. Glue the googly eyes about 1 inch apart. Draw a small smile with the marker. Dab two pink cheeks with a fingertip.
- Press ten gold coins. Squeeze 1 tablespoon of yellow onto a clean plate. Dip a fingertip, then press it on the paper. Start at the right edge of the pot and make an arc that rises up and out toward the right. Leave 1 inch between coins.
- Number the coins and add a caption. When the coins dry, write the numbers 1 to 10 beside them. Add a caption along the bottom: “Leprechaun by Liam, age 4, March 2027.”
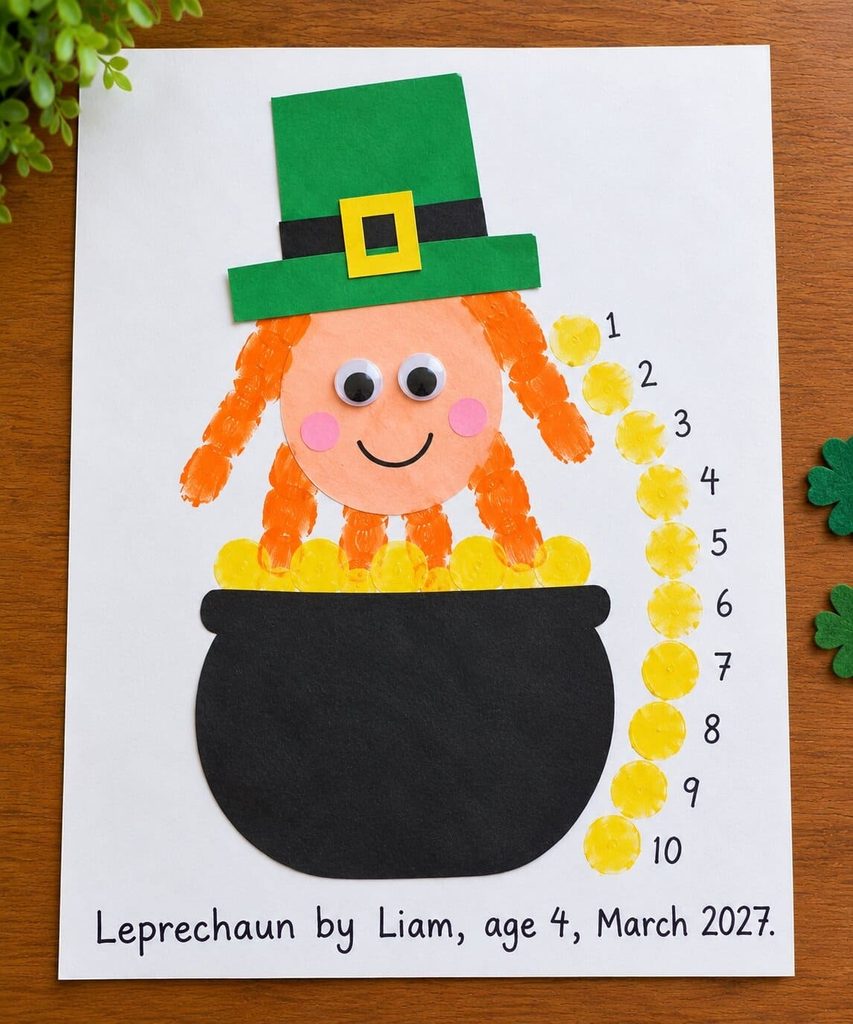
A note for babies and toddlers: Lay the paper on the floor and have a helper hold the child’s wrist. Brush the paint on slowly, since the tickle often opens tiny fingers. Make only five coins and skip the numbers.
How to Fix a Smudged or Messy Leprechaun
Most problems come from too much paint or a sliding hand. Each one has a quick fix.
- Blurry beard fingers: The paint was too thick. Blot the painted hand on a paper towel once before pressing.
- Fingers that touch: The hand was not spread. Once dry, trace a thin gap between them with white paint.
- A hat that sits crooked: Glue it down while you can still move it, then press for 10 seconds.
- Smeared coins: The fingertip was too wet. Blot it before pressing.
- A pot that hides too much: It was placed too high. Peel it up gently and glue it lower.
A Two-Minute Count the Gold Activity
Touch each coin and count out loud, one at a time. It takes about two minutes and needs no extra supplies.
Say, “How many coins did the leprechaun hide? Let’s touch each one and count.” Point to the first coin and say “One!” Keep going to ten. Then ask, “How many coins are there in all?” For toddlers, stop at five.
For an easy extension, cover the last three coins with your hand. Ask, “How many more to reach ten?” You can also ask, “Which coin is first? Which is last?”
A Classroom Version and Display Ideas for Teachers
Pre-cut every hat, face, and pot ahead of time, and the project runs smoothly. Set up two paint stations with one orange plate and one wipe station each. Send four children at a time while the others write their names.
Give each child a sheet of 12 x 18 inch paper. After the paint dries, let them glue on the pieces. For a fun display, cover a door or wall and title it “The Leprechauns Were Here.” You can also fold the page into a take-home St. Patrick’s Day card. For another holiday idea, see my [link to a related spring or holiday handprint craft].
Frequently Asked Questions
What paint is safe for toddlers?
Choose paint labeled washable and non-toxic. Check the age range on the label. Keep paint away from mouths, and wash hands right after printing. If your child has sensitive skin, ask your pediatrician first.
Can I use a footprint instead of a handprint?
Yes. A footprint works well for babies who cannot open their hands. Press it with the toes pointing down, so the toes become the beard. The shape will look rounder and softer.
How do I get bright orange paint?
Buy orange paint, or mix yellow and red. Use 2 parts yellow to 1 part red. Test a small dab on scrap paper before you paint the hand.
How do I make the hat and pot without scissors skills?
Let an adult cut the pieces, or use pre-cut shapes. Your child can still glue them on. You can also tear the paper into rough shapes. Torn edges look charming on a pot of gold.
What paper works best?
Heavy white cardstock or watercolor paper works best. It holds paint without wrinkling. Printer paper curls and tears.
Final Thoughts
A leprechaun handprint craft is quick, silly, and full of counting. Hang your leprechaun where everyone can see him. Next March, press a new hand beside the old one and count the gold again.

Sohel Rana is the writer, editor, publisher, and founder of The Tidy Porch. He is the man who is responsible for the craft (my wife created) being converted into a written piece. He also helps her wife (Sumona) by capturing videos of each craft. In short, he brings each craft created by her wife in front of you by transforming it into an article and a video.
