
One rainy afternoon, my niece ran laps around the living room. She was loud, wiggly, and wound up like a spring. I handed her a paintbrush instead of asking her to sit down.
We pressed her brown hand on paper and glued a twig above it. She named the sloth Pickle. Then we breathed slowly, just like Pickle would.
By the third breath, she was giggling and calm. This sloth handprint craft takes about 30 minutes. Here is how you can make a Slow Down Sloth of your own.
What You Need for a Sloth Handprint Craft
You need washable paint, heavy paper, and one dry twig. Most of it is likely in your craft drawer already.
- Paper: One sheet of 9 x 12 inch white cardstock.
- Paint: Washable, non-toxic paint. Use 2 tablespoons of brown, 1 teaspoon of cream, and 1 teaspoon of black. Add 1 teaspoon of green if you want leaves.
- Twig: One dry, smooth twig, 10 to 12 inches long and about as thick as a pencil.
- Glue: Tacky glue, or a hot-glue gun for the adult.
- Brushes: A flat 1-inch brush or foam sponge, plus a thin brush for the face.
- Extras: A black marker, two paper plates, baby wipes, a damp towel, and newspaper.
Cardstock matters. Thin paper curls under wet paint and cannot hold a twig.
How to Make a Slow Down Sloth Step by Step
Plan for about 30 minutes of work and an hour of drying in total. Follow these twelve steps in order.
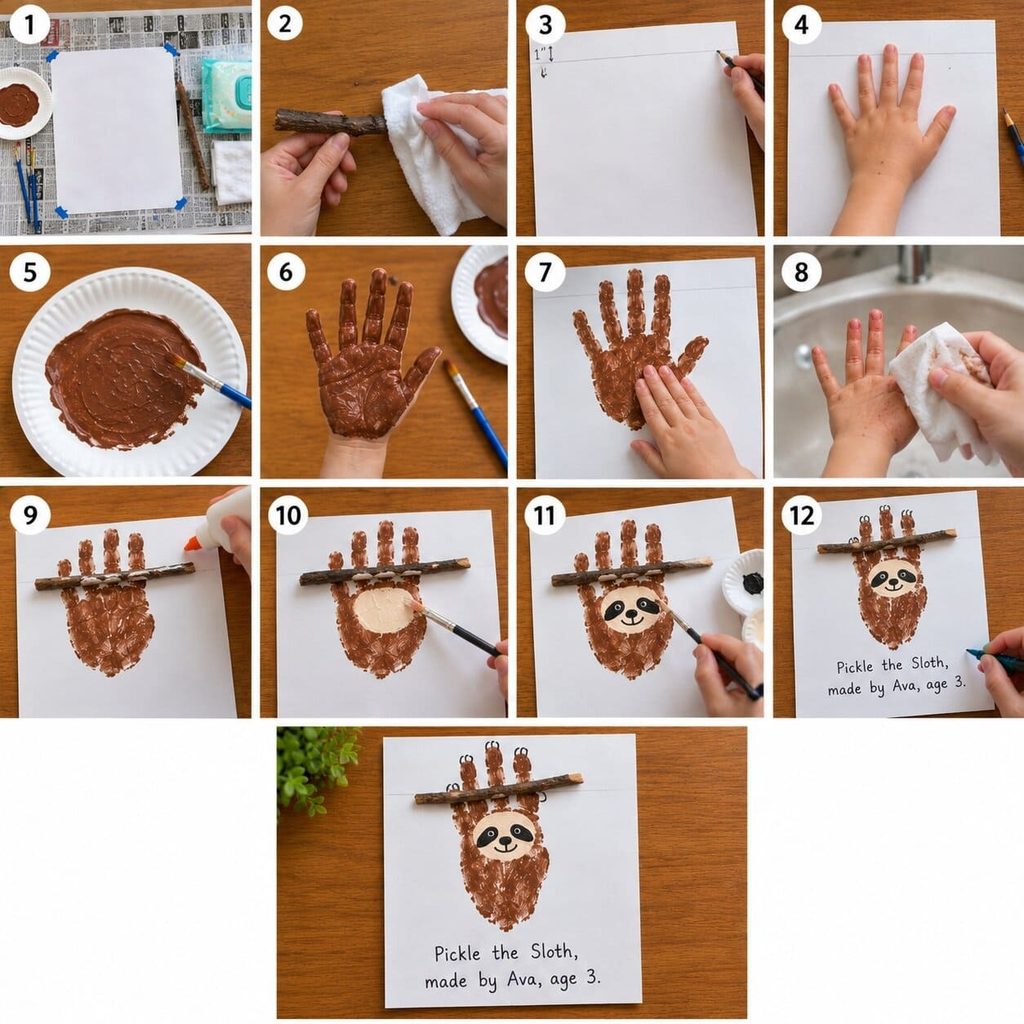
- Set up your space. Cover the table with newspaper. Tape the paper’s corners down so it stays flat. Place the wipes and damp towel within reach before you open any paint.
- Prepare the twig. Wipe the twig with a dry cloth to remove dirt. Run your fingers along it and check for splinters or sharp points. Sand any rough spot, or pick a different twig. Set it aside for later.
- Mark the twig line. Hold the paper upright. Draw a light pencil line 1 inch below the top edge. This line is where the twig will sit.
- Do a dry run. Have your child rest one hand on the paper with the fingers spread and pointing up. The fingertips should touch the pencil line. Tilt the thumb out to the side. Make a small pencil dot at the base of the palm so you know where the wrist lands.
- Spread the paint. Squeeze 2 tablespoons of brown paint onto a plate. Brush it into a thin, even layer slightly larger than a hand. Thin paint gives clean fingers. Thick paint makes them blur together.
- Paint the hand. Brush brown over the palm, each finger, and the thumb. Use light strokes. Keep the fingers spread while you paint so the paint does not bridge the gaps.
- Press the hand. Line the fingertips up with the pencil line. Press the palm down first, then each finger, then the thumb. Count to three. Lift the hand straight up without sliding. Straight lifting keeps the fingers sharp.
- Clean up and dry. Wipe the hand with a baby wipe right away. Then wash with soap at the sink. Let the page dry flat for about 30 minutes.
- Glue on the twig. Run a line of tacky glue along the pencil line. Press the twig on top, so it covers about half an inch of each fingertip. Hold it for 30 seconds. An adult can use hot glue for a faster hold. Leave the page flat for 20 more minutes.
- Add the face patch. Use the thin brush to paint a cream oval about 2 inches wide on the upper palm. This is the sloth’s face. Let it dry for 10 minutes.
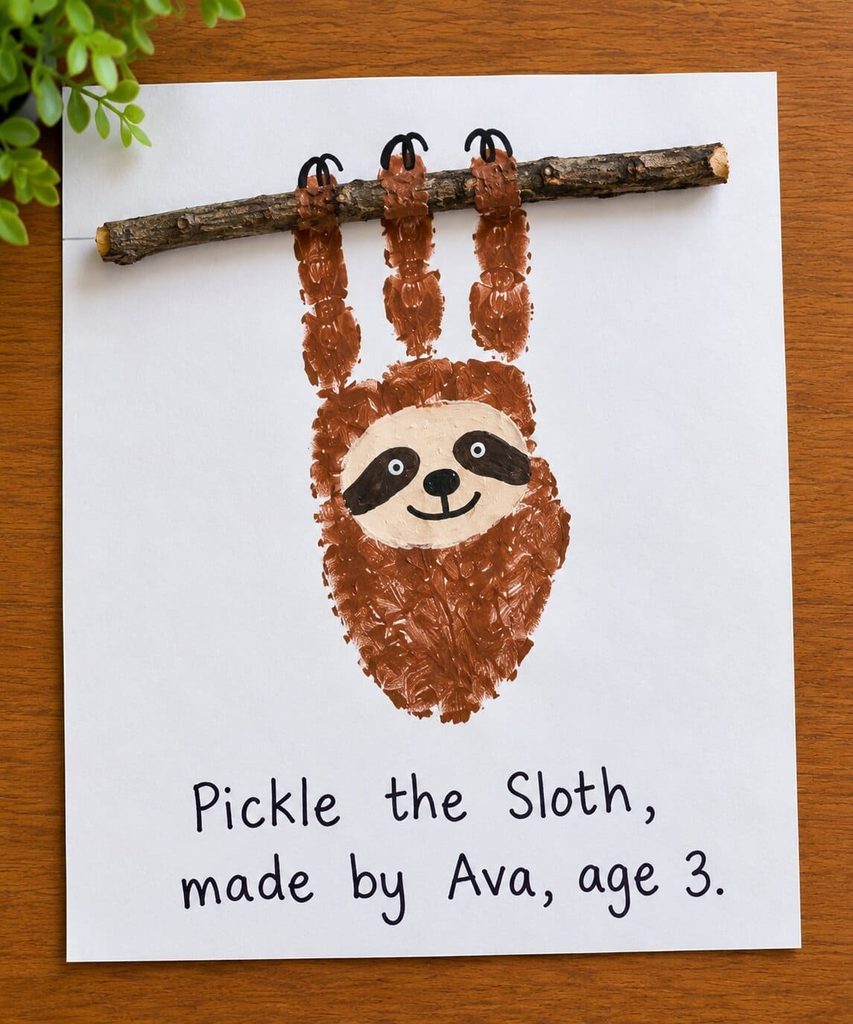
- Paint the eyes, nose, and smile. On the cream oval, paint two black eye patches that slant downward toward the center, like teardrops. Add a tiny cream dot in the middle of each patch for the eyes. Paint a small black nose below them. Draw a curved smile with the marker.
- Add claws and a caption. Use the marker to draw a short curved claw at the tip of each finger, hooking over the twig. Write your child’s name and the date along the bottom edge. For example: “Pickle the Sloth, made by Ava, age 3.”
A note for babies and toddlers: Lay the paper on the floor. Have a helper hold the child’s wrist. Brush the paint on slowly, since the tickle often opens tiny fingers. Gently press each finger flat with your own fingertip. For babies, skip the twig and use a paper strip instead.
How to Fix a Smudged or Messy Sloth
Most problems come from too much paint or a sliding press. Each one has a quick fix.
- Blurry fingers: The paint was too thick. Blot the painted hand on a paper towel once before pressing.
- Fingers that touch: The hand was not spread wide enough. Once the page is dry, trace a thin gap between them with cream paint.
- A twig that slides: The glue was too thin. Add a bead of glue at each end and press for 30 seconds.
- Face paint that bleeds: The brown was not fully dry. Wait until it feels dry, then paint again.
- Wrinkled paper: The paper was too thin. Once dry, press the page under a heavy book overnight.
A One-Minute Slow Down Sloth Calm-Down Activity
Hold the finished sloth where your child can see it, then do three slow breaths and a slow-motion walk. It takes about one minute.
Say these words aloud: “Let’s be slow like a sloth.” Breathe in through your nose for four slow counts: one, two, three, four. Breathe out slowly for four counts. Repeat this three times. Then say, “Now we move like sloths,” and walk in slow motion across the room for 30 seconds. End with a big stretch and the words “Hang in there.”
Hang the sloth at your child’s eye level in a calm corner, bedroom, or classroom. This is a gentle calming activity, not a treatment. If big feelings are a daily struggle, talk with your pediatrician or school counselor.
Give Your Sloth as a “Hang In There” Card
A sloth with a kind message makes a thoughtful gift for a friend or family member who needs a boost. Write the message under the sloth, then slide the page into a large envelope or a frame.
Try one of these short messages:
- “Hang in there.”
- “Take your time.”
- “Slow and steady.”
- “You’ve got this.”
- “Sending slow hugs.”
A Classroom Version for Teachers
Prepare the twigs a week early, and the project runs smoothly. Collect, wipe, and dry twigs, then cut them to 10 inches. Set up two paint stations with a plate of brown paint and a wipe station. Send four children at a time while the others listen to a sloth story.
Glue the twigs yourself during drying time. Tie the sloths into your rainforest or animal unit with a bulletin board titled “Hang in There, Rainforest.” For another animal idea, see my [link to a related rainforest or animal handprint craft].
Frequently Asked Questions
What paint is safe for toddlers?
Choose paint labeled washable and non-toxic. Check the age range on the label. Keep paint away from mouths, and wash hands right after printing. If your child has sensitive skin, ask your pediatrician first.
Can I use a paper strip instead of a real twig?
Yes. Cut a brown paper strip 1 inch wide and 10 inches long. Glue it over the fingertips the same way. It is a safe choice for babies and for large classes.
How do I stop the twig from falling off?
Use thick tacky glue and hold the twig for 30 seconds. Let the page dry flat. An adult can add a dab of hot glue at each end for a stronger hold.
How do I make the sloth face look cute?
Slant the eye patches downward, keep the nose small, and curve the smile upward. Those three details give a sloth its sweet look.
What paper works best?
Heavy white cardstock or watercolor paper works best. It holds paint without wrinkling and supports a twig. Printer paper curls and tears.
Final Thoughts
A sloth handprint craft is a small project that helps everyone slow down. Hang your sloth where you can see it. When the day gets loud, take one slow breath together and let the sloth lead the way.

Sohel Rana is the writer, editor, publisher, and founder of The Tidy Porch. He is the man who is responsible for the craft (my wife created) being converted into a written piece. He also helps her wife (Sumona) by capturing videos of each craft. In short, he brings each craft created by her wife in front of you by transforming it into an article and a video.
