
Last spring, I opened my hall closet and a tower of shoe boxes slid onto my feet. I had kept them for years. Just in case.
Meanwhile, my craft table looked like a glitter bomb had gone off. Markers sat in a mug. Glue sticks rolled under the couch.
Then it hit me. The storage was already in my hands. I grabbed scissors, contact paper, and one quiet weekend. By Sunday night, every mess had a home.
Here are five shoe box storage ideas I use at my house. Each one is free or nearly free. Each one has steps you can follow today.
What You Need Before You Start
You need a sturdy box, a sharp blade, and something pretty to cover it. That is all. Most of it is probably in your junk drawer right now.
Basic supplies for every project:
- Shoe boxes with lids
- Scissors and a craft knife
- Ruler and pencil
- Hot glue gun or strong white craft glue
- Contact paper, wrapping paper, or fabric scraps
- Mod Podge and a foam brush
Pick a strong box. Press your thumb into a side wall. If it bends easily, skip it. Boot and sneaker boxes are the best. Thin sandal boxes tend to sag once you fill them.
Prep the box. Wipe off the dust and peel away old tape. Toss the tissue paper inside. Then run a ruler along each corner to make the folds crisp. I do this to every box. Dust is the main reason paper peels, so a clean, dry surface gives you a much better finish.
Idea 1: Craft Supply Organizer That Keeps Markers, Glue, and Scissors in Reach
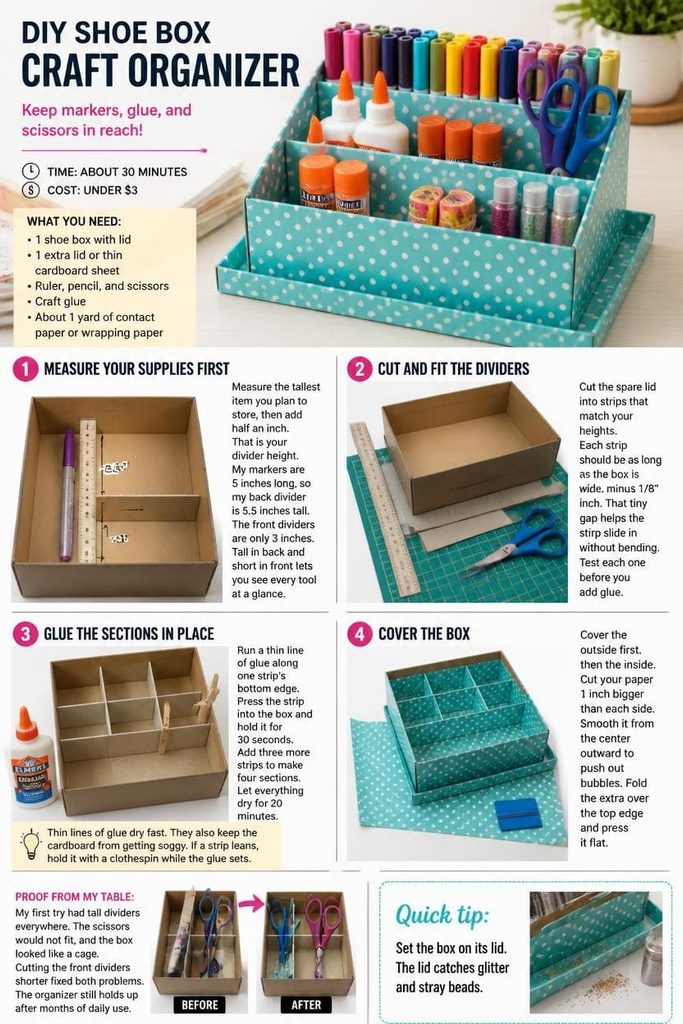
You can turn one shoe box into a sectioned craft organizer in about 30 minutes. Dividers give each tool its own spot, so nothing rolls away.
What you need:
- 1 shoe box with lid
- 1 extra lid or thin cardboard sheet
- Ruler, pencil, and scissors
- Craft glue
- About 1 yard of contact paper or wrapping paper
Time and cost: About 30 minutes. Under $3.
Measure Your Supplies First
Measure the tallest item you plan to store, then add half an inch. That is your divider height. My markers are 5 inches long, so my back divider is 5.5 inches tall. The front dividers are only 3 inches. Tall in back and short in front lets you see every tool at a glance.
Cut and Fit the Dividers
Cut the spare lid into strips that match your heights. Each strip should be as long as the box is wide, minus 1/8 inch. That tiny gap helps the strip slide in without bending. Test each one before you add glue.
Glue the Sections in Place
- Run a thin line of glue along one strip’s bottom edge.
- Press the strip into the box and hold it for 30 seconds.
- Add three more strips to make four sections.
- Let everything dry for 20 minutes.
Thin lines of glue dry fast. They also keep the cardboard from getting soggy. If a strip leans, hold it with a clothespin while the glue sets.
Cover the Box
Cover the outside first, then the inside. Cut your paper 1 inch bigger than each side. Smooth it from the center outward to push out bubbles. Fold the extra over the top edge and press it flat.
Proof from my table: My first try had tall dividers everywhere. The scissors would not fit, and the box looked like a cage. Cutting the front dividers shorter fixed both problems. The organizer still holds up after months of daily use.
Quick tip: Set the box on its lid. The lid catches glitter and stray beads.
Idea 2: Drawer Dividers That Stop the Junk Drawer Chaos
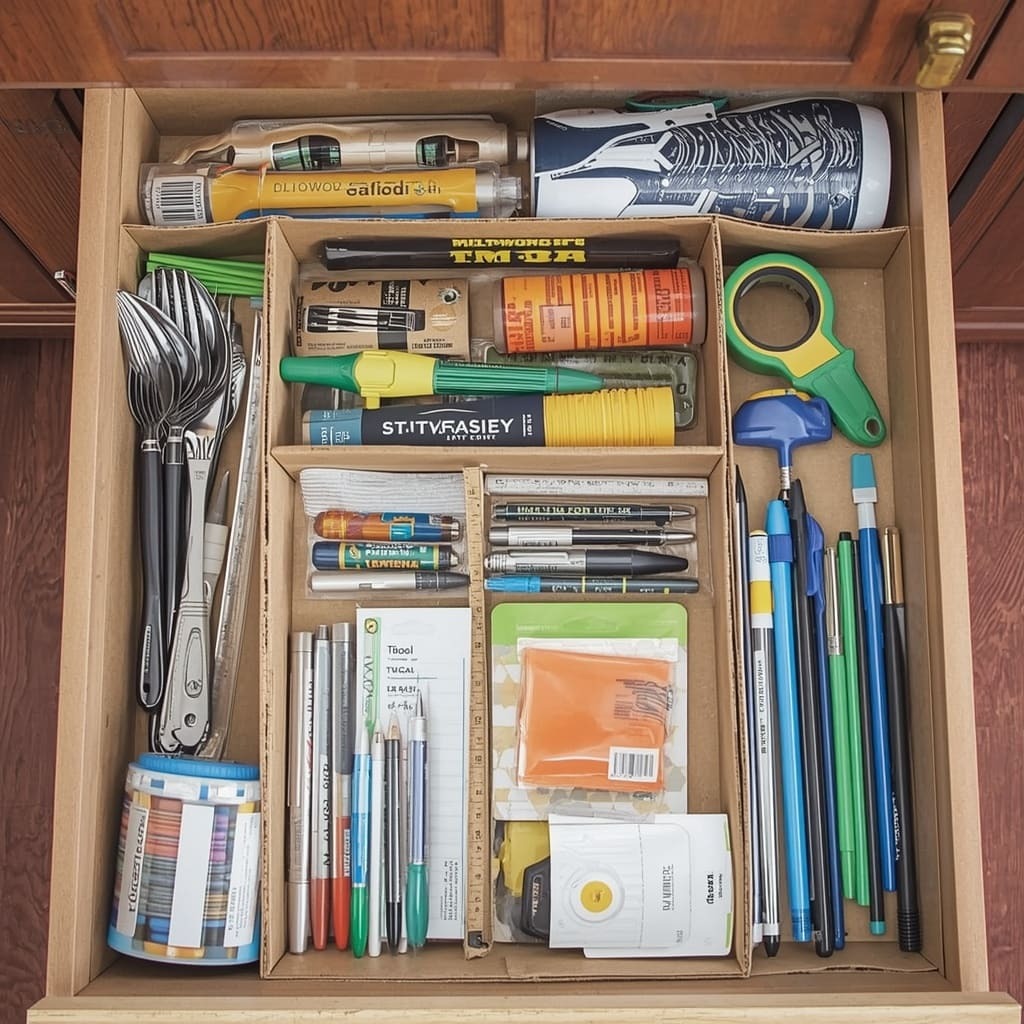
Cut shoe boxes into shallow trays, and you get custom drawer dividers for free. They fit your drawer better than store-bought sets because you size them yourself.
What you need:
- 2 to 3 shoe boxes
- Tape measure and pencil
- Craft knife and ruler
- Hot glue or craft glue
- Wrapping paper or contact paper
- Non-slip shelf liner (optional)
Time and cost: About 45 minutes. Under $5.
Measure the Drawer
Measure the drawer’s depth from bottom to rim. Subtract 1/2 inch. This is your tray height. The gap lets the drawer close without scraping. Then decide how many sections you need. I count the item types first, such as tape, pens, and batteries.
Cut Trays to Size
- Mark your tray height on each box wall with a pencil.
- Draw a straight line with your ruler.
- Cut along the line with a craft knife. Use a few light passes instead of one hard cut.
- Cut a few different tray sizes so they fit like puzzle pieces.
Light passes give you clean edges. One hard cut often tears the cardboard.
Cover and Line the Trays
Wrap each tray in paper, inside and out. Fold the paper over the cut edges so they feel smooth. Then stick a square of shelf liner under each tray. It keeps them from sliding when you open the drawer.
Test Before You Finish
Set the trays in the drawer and open it a few times. Move things around if a tray shifts. Trim any tray that rubs the sides. A snug fit is good, but a tight fit will jam the drawer.
Proof from my kitchen: I used four trays in my utensil drawer. The first set slid to the back every time I pulled it open. The shelf liner stopped that right away. Now the peeler and the tape both stay where I put them.
Quick tip: Use a lid as a shallow tray for flat items like sticky notes and rubber bands.
Idea 3: Under-Bed Toy Bins With Handles for Easy Cleanup
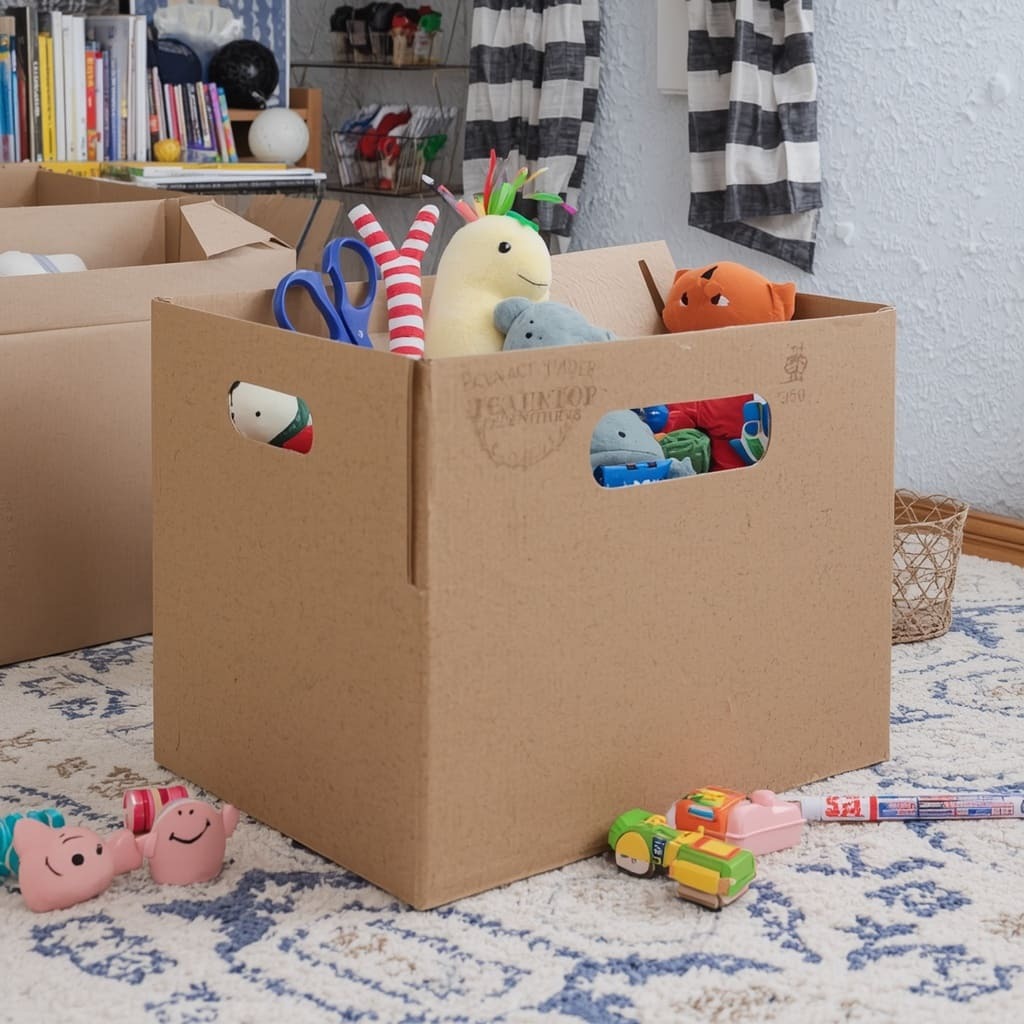
A shoe box with cut-out handles makes a toy bin that kids can pull out and put away alone. It slides under a bed or onto a low shelf. It holds light toys well.
What you need:
- 1 large boot or sneaker box
- 1 extra sheet of cardboard
- Craft knife and ruler
- Hot glue
- Fabric or contact paper
- Scissors
Time and cost: About 40 minutes. Under $4.
Strengthen the Bottom First
Glue a second layer of cardboard inside the bottom of the box. Trace the box base onto your extra cardboard, cut it out, and glue it flat. The doubled base keeps the box from bowing under blocks and toy cars.
Cut the Handle Openings
- Find the center of one short side, about 2 inches below the top edge.
- Draw a rectangle 4 inches wide and 1 inch tall.
- Poke a hole in each corner with scissors.
- Cut between the holes with your craft knife.
- Repeat on the other short side.
Placing the handle a little below the rim leaves enough cardboard above it. That way the edge does not rip when your child pulls.
Reinforce and Cover the Handles
Fold a strip of paper or fabric over the cut edge of each handle. Glue it down on both sides. Then cover the whole box. Smooth the paper around the handle so the edges lie flat.
Proof from my hallway: My first handle tore in one week because I skipped the reinforcing strip. The fix took five minutes. I glued a folded strip over the edge, and it has held ever since. I keep to light toys only, like stuffed animals, blocks, and small cars.
Quick tip: Tape a picture of the toy to the front. Non-readers can match and tidy up on their own.
Idea 4: Kids’ Desk and Classroom Supply Caddy That Stacks Two Boxes
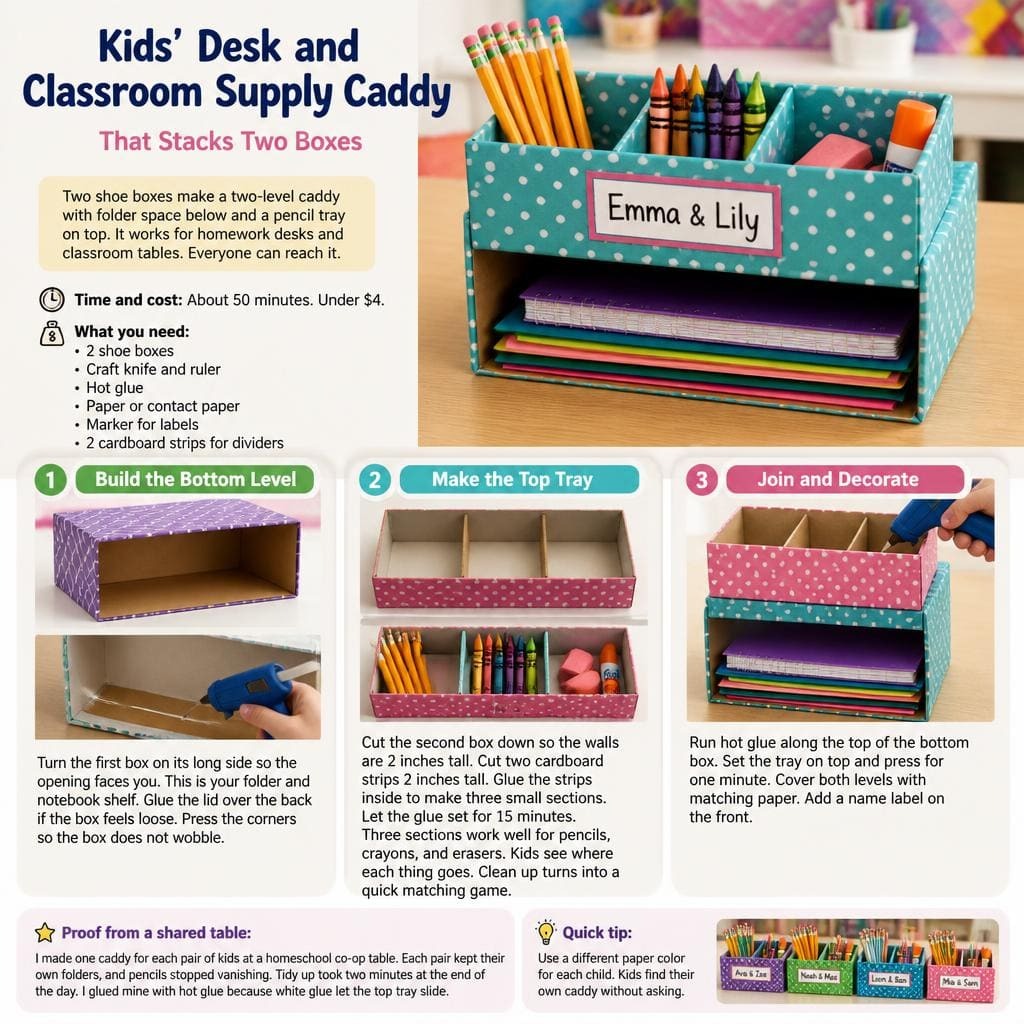
Two shoe boxes make a two-level caddy with folder space below and a pencil tray on top. It works for homework desks and classroom tables. Everyone can reach it.
What you need:
- 2 shoe boxes
- Craft knife and ruler
- Hot glue
- Paper or contact paper
- Marker for labels
- 2 cardboard strips for dividers
Time and cost: About 50 minutes. Under $4.
Build the Bottom Level
Turn the first box on its long side so the opening faces you. This is your folder and notebook shelf. Glue the lid over the back if the box feels loose. Press the corners so the box does not wobble.
Make the Top Tray
- Cut the second box down so the walls are 2 inches tall.
- Cut two cardboard strips 2 inches tall.
- Glue the strips inside to make three small sections.
- Let the glue set for 15 minutes.
Three sections work well for pencils, crayons, and erasers. Kids see where each thing goes. Clean up turns into a quick matching game.
Join and Decorate
Run hot glue along the top of the bottom box. Set the tray on top and press for one minute. Cover both levels with matching paper. Add a name label on the front.
Proof from a shared table: I made one caddy for each pair of kids at a homeschool co-op table. Each pair kept their own folders, and pencils stopped vanishing. Tidy up took two minutes at the end of the day. I glued mine with hot glue because white glue let the top tray slide.
Quick tip: Use a different paper color for each child. Kids find their own caddy without asking.
Idea 5: Keepsake and Memory Box for School Art, Cards, and Photos
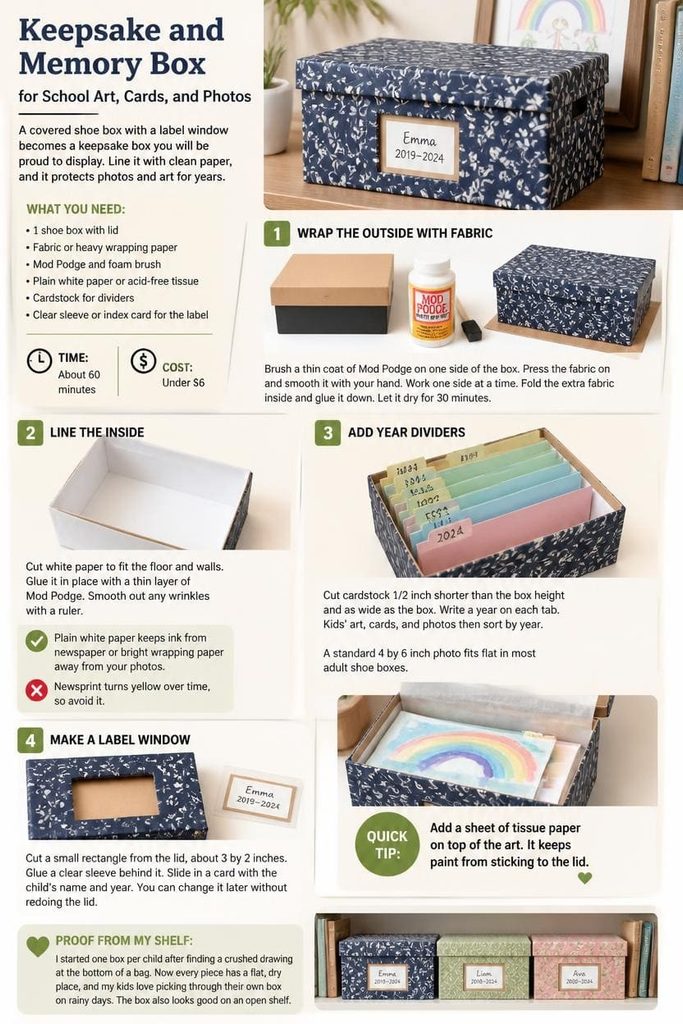
A covered shoe box with a label window becomes a keepsake box you will be proud to display. Line it with clean paper, and it protects photos and art for years.
What you need:
- 1 shoe box with lid
- Fabric or heavy wrapping paper
- Mod Podge and foam brush
- Plain white paper or acid-free tissue
- Cardstock for dividers
- Clear sleeve or index card for the label
Time and cost: About 60 minutes. Under $6.
Wrap the Outside With Fabric
Brush a thin coat of Mod Podge on one side of the box. Press the fabric on and smooth it with your hand. Work one side at a time. Fold the extra fabric inside and glue it down. Let it dry for 30 minutes.
Line the Inside
- Cut white paper to fit the floor and walls.
- Glue it in place with a thin layer of Mod Podge.
- Smooth out any wrinkles with a ruler.
Plain white paper keeps ink from newspaper or bright wrapping paper away from your photos. Newsprint turns yellow over time, so avoid it.
Add Year Dividers
Cut cardstock 1/2 inch shorter than the box height and as wide as the box. Write a year on each tab. Kids’ art, cards, and photos then sort by year. A standard 4 by 6 inch photo fits flat in most adult shoe boxes.
Make a Label Window
Cut a small rectangle from the lid, about 3 by 2 inches. Glue a clear sleeve behind it. Slide in a card with the child’s name and year. You can change it later without redoing the lid.
Proof from my shelf: I started one box per child after finding a crushed drawing at the bottom of a bag. Now every piece has a flat, dry place, and my kids love picking through their own box on rainy days. The box also looks good on an open shelf.
Quick tip: Add a sheet of tissue paper on top of the art. It keeps paint from sticking to the lid.
Frequently Asked Questions
How can I make shoe boxes sturdier?
Glue a second layer of cardboard to the bottom and long walls. Tape the inside corners with packing tape before you cover them. This adds strength without much extra weight.
What glue works best for shoe box projects?
Hot glue works best for joining cardboard pieces because it grips fast. Mod Podge is better for paper and fabric. Plain white craft glue is fine for light projects if you can wait for it to dry.
How do I cover printed logos on shoe boxes?
Brush on one coat of white paint first. Let it dry fully. Then add paper or contact paper on top. The paint stops the logo from showing through light colors.
How do I keep boxes from sagging over time?
Do not overfill them. Double the base with an extra layer of cardboard. Store them on a flat surface so the walls stay straight. Heavy items should go in a bin made of stronger material, such as a plastic tub. Shoe boxes shine with light, everyday clutter.
Are these DIY boxes safe for kids?
Yes, if you take a few steps. Cover every cut edge with paper or tape. Use non-toxic glue. Keep small parts like beads away from toddlers, and let an adult handle the craft knife.

Sohel Rana is the writer, editor, publisher, and founder of The Tidy Porch. He is the man who is responsible for the craft (my wife created) being converted into a written piece. He also helps her wife (Sumona) by capturing videos of each craft. In short, he brings each craft created by her wife in front of you by transforming it into an article and a video.
