
Hello, Mamas & Teachers! I’m always on the hunt for easy holiday crafts, and this reindeer handprint one has become a total favorite in our house!
Using brown paper, a handful of basic supplies, and our printable template, I helped my little one turn their tiny handprint into the sweetest reindeer.
It was quick, mess-free, and so much fun to make together. Now we have a keepsake I’ll cherish for years to come!
Materials Needed
Here is everything you need to make this easy reindeer handprint craft:
- Reindeer Template – Download the printable template at the end of this post.
- Brown Craft Paper Sheet – This will be used to create the reindeer handprint.
- Cardstock Paper – Use cardstock as the base of your craft.
- Fine Marker Pens – Use these to draw the reindeer’s eyes, mouth, and other small details.
- Glue Stick – Use a glue stick to attach the handprint and other paper pieces.
- Scissors – Use scissors to cut out the handprint and template pieces. An adult should help younger children with cutting.
How to Make a Reindeer Handprint Craft
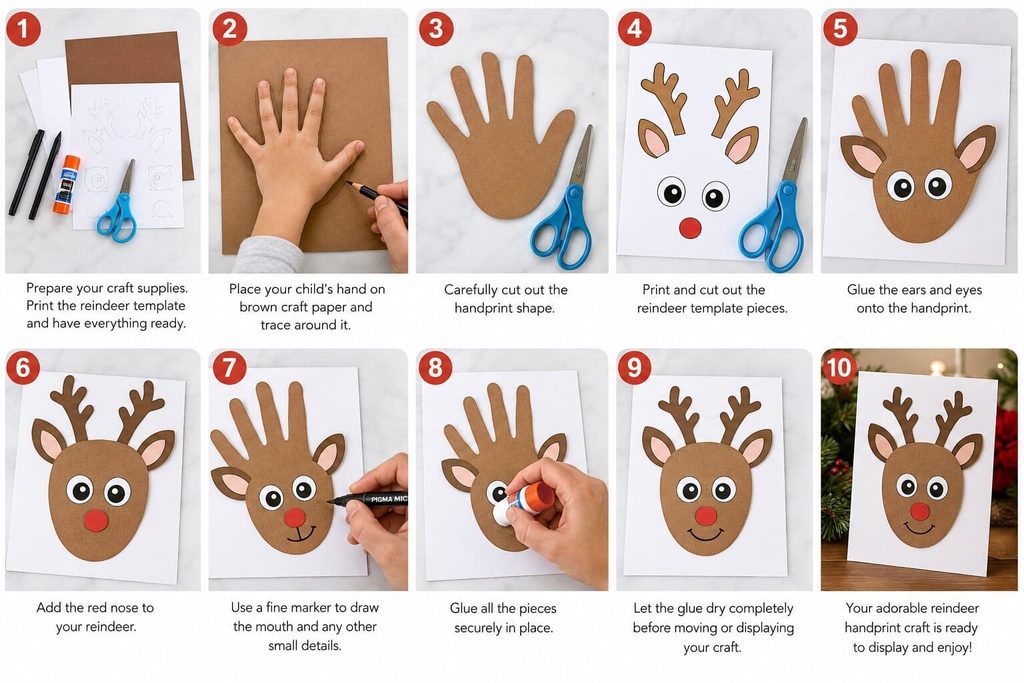
Step 1: Prepare Your Craft Supplies
Before you begin, gather all your materials and place them on a clean table.
Print the reindeer template if you are using one. Have your brown craft paper, cardstock, marker pens, glue stick, and scissors ready.
For younger children, it helps to prepare the workspace before they start. This keeps the activity simple and prevents you from stopping halfway through to look for supplies.
Step 2: Trace Your Child’s Hand
Place the brown craft paper on the table.
Ask your child to place one hand flat on the paper. Keep the fingers slightly spread apart.
Carefully trace around the hand with a pencil or fine marker. Try to keep the hand still while you trace so the outline stays neat.
The fingers will become the reindeer’s antlers, while the palm will become its head.
This is the part kids usually enjoy the most because they get to see their own hand turn into a Christmas reindeer!
Step 3: Cut Out the Handprint
Once the handprint outline is complete, carefully cut around it with scissors.
For young children, an adult should do the cutting. Older children can help with this step if they are comfortable using scissors safely.
Take your time around the fingers. These smaller spaces can be tricky to cut.
When you finish, you should have a brown handprint shape ready to become your reindeer.
Step 4: Prepare the Reindeer Template
Now, print and cut out the pieces from your reindeer template.
Depending on your template, you may have pieces for the reindeer’s ears, eyes, nose, or other facial details.
Cut each piece carefully and place them on the table so your child can see all the parts.
You can also let your child help decide where each piece should go. This turns the craft into a fun hands-on activity instead of simply following instructions.
Step 5: Add the Reindeer’s Face
Place the brown handprint on the cardstock.
The palm should be in the center, with the fingers pointing upward. The fingers will look like the reindeer’s antlers.
Now it is time to give your reindeer a face!
Use the glue stick to attach the eyes, ears, and nose from the template. Press each piece gently so it sticks well.
If you do not have separate template pieces, you can draw the eyes and mouth directly onto the handprint with your fine marker.
Step 6: Give Your Reindeer a Nose
A red nose can turn your handprint reindeer into Rudolph!
If your template includes a nose, glue it onto the center of the reindeer’s face.
You can also draw a round nose with a fine marker and color it in.
Ask your child what they would like their reindeer’s name to be if they want to make their own special Christmas character.
Step 7: Draw the Small Details
Use your fine marker pens to add the finishing details.
Draw a small smile below the nose. You can also add tiny details to the eyes or outline parts of the face.
Let your child add their own creative touches. Every handprint is a little different, so every reindeer will have its own look.
If your child wants to make the craft more festive, they can add small Christmas details around the reindeer on the cardstock.
Step 8: Glue Everything in Place
Take a moment to check the placement of all the pieces before gluing them.
Once everything looks right, use the glue stick to secure the pieces.
Press each piece gently with your fingers for a few seconds. This helps the paper stick firmly to the cardstock.
Try not to use too much glue. A thin layer is usually enough for paper crafts.
Step 9: Let the Craft Dry
After all the pieces are attached, place the finished craft on a flat surface.
Let the glue dry completely before moving it around or displaying it.
This is a great time to write your child’s name and the year on the back of the cardstock. It turns this simple Christmas handprint craft into a special keepsake.
Step 10: Display Your Finished Reindeer
Your adorable reindeer handprint craft is now ready!
You can display it on the refrigerator, hang it on a wall, or add it to your child’s Christmas craft collection.
You can also make one with each child in the family. Place the finished handprint reindeer together for a cute holiday display.
Give It A Try
This reindeer handprint craft is a piece of cake for your child. Just grab the supplies, help your little one trace and cut the handprint, and let them have fun creating their own Christmas reindeer.
The best part is that no two handprints are exactly alike. So, each reindeer becomes a special little keepsake.
We would love to see your child’s craft! Share your little one’s finished reindeer handprint with us and tag us on Instagram using #thetidyporch.

Sohel Rana is the writer, editor, publisher, and founder of The Tidy Porch. He is the man who is responsible for the craft (my wife created) being converted into a written piece. He also helps her wife (Sumona) by capturing videos of each craft. In short, he brings each craft created by her wife in front of you by transforming it into an article and a video.
