
If you’re planning a farm week, an “Old MacDonald” theme, or just a rainy afternoon of barnyard fun, this cow handprint craft is the perfect place to start.
I love that it uses one simple handprint shape as a base — because once you’ve got the technique down, you can swap a few details and turn that same print into a pig or a horse for a whole matching set.
It’s guided enough that little hands can lead the way, with easy cues you can read aloud step by step, and it holds up well enough to save as part of a farm week keepsake, too.
What You’ll Need to Buy (Top 5 Picks)
- Washable kids’ paint set — a basic set with white, black, and pink covers everything you need for the cow’s body, spots, and nose without any specialty colors to track down.
- Foam paint brushes — these spread an even, thin coat of paint onto a small hand, which prints far more cleanly than a thick, uneven coat from a bristle brush.
- White cardstock — sturdier than regular printer paper, so the finished print holds up well if you’re saving it as a keepsake or laminating it for classroom use.
- Black fine-tip marker — for adding spots, ears, and facial details once the paint has dried.
- Pink construction paper — a couple of small triangle cutouts become the cow’s ears and nose, adding dimension beyond just the painted print.
Cow Handprint Keepsake Craft
This craft uses one handprint, fingers together, to form the cow’s head and body in a single print. From there, a few simple painted or drawn details finish it off. Plan for about 20–30 minutes total, most of which is drying time.
Materials Needed
- 1 sheet of white cardstock
- White washable paint
- 1 foam paint brush
- A small bowl or paper plate (to hold the paint)
- A damp washcloth or wipes (for quick cleanup)
- Black fine-tip marker
- Pink construction paper scraps
- Craft glue or a glue stick
- Optional: scissors (adult step) for cutting the ear and nose shapes
How to Make It
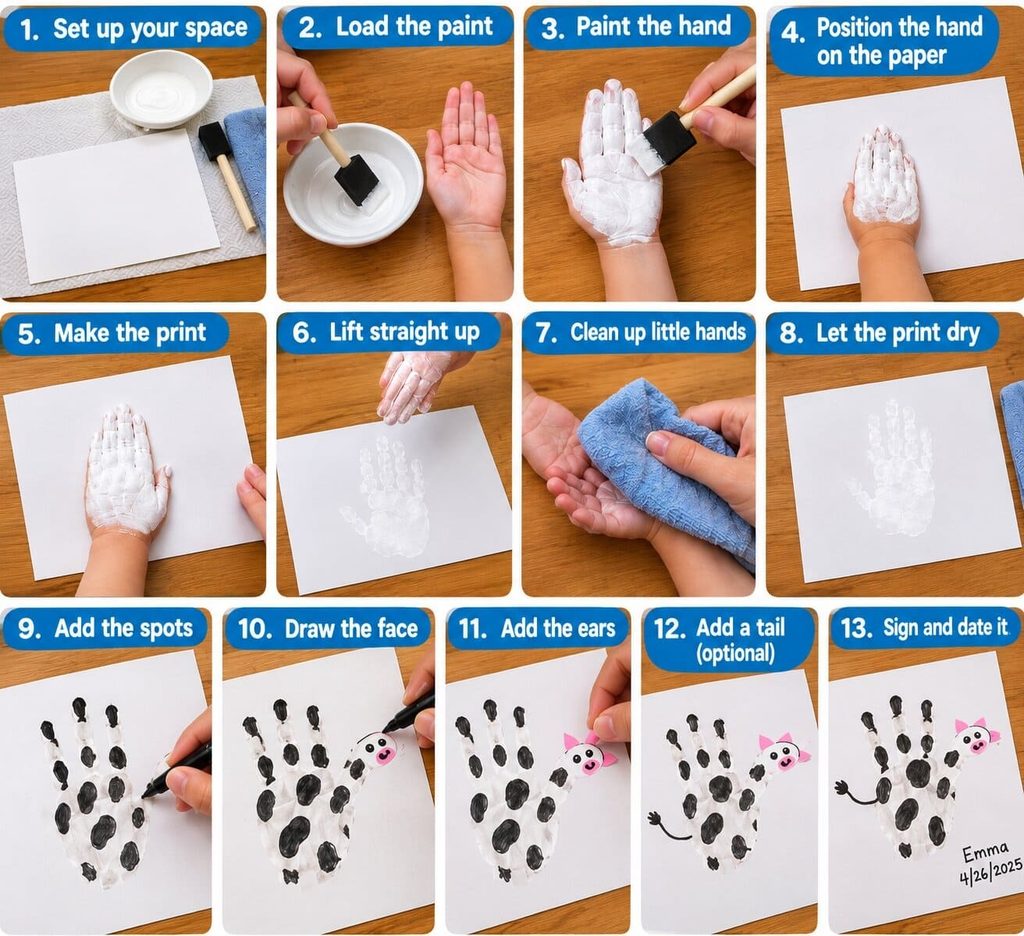
Step 1: Set up your space. Lay down a paper towel or old placemat first, since paint tends to spread past the paper’s edge. Place your cardstock in front of your child with the long side facing them, and set the bowl of white paint within easy reach.
Step 2: Load the paint. Parent: Dip the foam brush into the white paint and dab off any extra so it isn’t dripping. Child: Hold your hand out flat, palm facing up, with your fingers pressed together instead of spread apart — like you’re doing a karate chop.
Step 3: Paint the hand. Parent: Brush the paint evenly across your child’s palm and fingers, covering all the way to the fingertips, keeping the fingers held together as you go. Talk your child through it: “Keep your fingers snuggled together like they’re holding hands with each other — that’s what makes the cow’s head and body one shape.”
Step 4: Position the hand on the paper. Child: Press your hand down near the bottom of the paper, fingers pointing straight up and held together, like a flag standing tall.
Step 5: Make the print. Child: Press down firmly and count to three out loud — “one, two, three” — like you’re stamping a big stamp. Parent: Hold the far edge of the paper steady with one hand so it doesn’t slip.
Step 6: Lift straight up. Child: Lift your hand straight up, like you’re pulling it out of a puddle, instead of dragging it sideways. Parent: A little smudging along the fingers is fine — it just adds texture and won’t affect the finished look.
Step 7: Clean up little hands. Parent: Wipe your child’s hand right away with the damp washcloth before they touch anything else, since this is the moment stray white paint tends to end up on furniture or clothing.
Step 8: Let the print dry. Set the paper flat and let it dry for 10–15 minutes before adding any details. This is a good moment for a snack break, since wet paint smudges easily if little hands come back too soon.
Step 9: Add the spots. Parent or child: Once dry, use the black marker (or a fingertip dipped in black paint, for younger kids) to add 4–6 irregular oval spots across the print — two or three on the “body” part of the palm, and one or two smaller ones on the fingers, which become the legs. If it goes wrong: if the spots start to blend together, let each one dry for a few seconds before adding the next, or use a smaller brush for more control.
Step 10: Draw the face. Parent: On the thumb, which sticks out to the side and becomes the head, draw two small oval eyes and a rounded pink nose shape with the marker. This step works best as an adult step for children under 4, since the face needs a steadier hand to read clearly.
Step 11: Add the ears. Parent: Cut two small triangle shapes from the pink construction paper (adult step, scissors). Child: Glue one triangle on each side of the thumb-head, pointing slightly outward, to form the ears. Parent: Help squeeze a small dot of glue first, so your child has something for the ear to stick to.
Step 12: Add a tail (optional). Child or parent: Draw a thin curved line extending from the opposite side of the palm from the thumb, with a small tuft at the end, to give the cow a tail.
Step 13: Sign and date it. Parent: Write your child’s name and the date somewhere on the paper, either in a corner on the front or on the back. This one detail turns the craft into a record of exactly how small their hand was during this farm week.
Tips
- If your child’s hands are ticklish, let them press their own palm into the paint on the plate instead of you brushing it on — it gives them more control and cuts down on the wiggling.
- Keep the damp washcloth on the table itself, not across the room, so it’s within reach the moment the print is made.
- If the paint comes out too thick and the print looks blobby, blot a little off the hand with a paper towel before pressing down; a thin coat prints far more clearly than a heavy one.
Turn the Same Handprint Into a Pig or Horse
Once you’ve got this base handprint technique down, the same fingers-together print becomes a whole farm set with a few swaps.
For a pig, use pink paint instead of white, skip the spots, and add two oval nostril dots to a rounded snout on the thumb. For a horse, use brown paint, add a few short upright lines along the top of the fingers for a mane, and swap the pink triangle ears for slightly longer, pointed ones.
Each animal uses the exact same pressing-and-lifting technique from Steps 2 through 8, so once your child has done it once, the rest of the set goes quickly.
Make It a Farm Week Keepsake
If you’d like to save this as more than a single craft, glue the finished handprint cow onto a simple background — a hand-drawn or printed green field with a red barn in the corner works well.
You can label it with the theme and date, like “Farm Week, Spring 2026.” It turns a single afternoon activity into a keepsake of that specific unit or week, one your child (or their classroom) will recognize years later as “the one from farm week.”
Frequently Asked Questions
What age is this cow handprint craft best for? This craft works well for children roughly ages 1 to 6. Toddlers under 2 will need a parent to guide most of the pressing and lifting, while preschoolers and older kids can typically manage the printing themselves, with an adult handling the marker details and any scissor work.
Is the paint safe for toddlers? Washable kids’ paint is designed to be non-toxic and safe for skin contact, but if your child has sensitive skin, it’s worth doing a quick patch test on their wrist first and washing hands promptly once the craft is done.
What if my child’s handprint smudges or the fingers spread apart? A little smudging is normal, especially with wiggly toddlers, and it won’t affect the finished look once the spots and face are added. If the fingers spread too far apart and it no longer reads as one connected shape, simply try a second print on a fresh sheet, reminding your child to keep their fingers “snuggled together.”
Can I turn this into a full farm animal set? Yes — the same fingers-together handprint technique works for a pig or a horse with a few swapped details, covered in the “Turn the Same Handprint Into a Pig or Horse” section above, so you can build out a full set using the same base method.
How long does the craft take from start to finish? Plan for about 20–30 minutes total, including a 10–15 minute drying period between the handprint and the added details. The hands-on portion itself only takes a few minutes.
How do I preserve the handprint so it lasts, especially for classroom use? Once everything is fully dry, laminating the piece or covering it with clear contact paper helps it hold up to handling, which is especially useful if a whole class is making a set of these to send home or display together.

Sohel Rana is the writer, editor, publisher, and founder of The Tidy Porch. He is the man who is responsible for the craft (my wife created) being converted into a written piece. He also helps her wife (Sumona) by capturing videos of each craft. In short, he brings each craft created by her wife in front of you by transforming it into an article and a video.
