
Last winter, I counted twelve pairs of shoes by my front door. Boots leaned on sneakers. One sandal hid under the mat. I tripped over a pair while carrying groceries.
My entry is only five feet wide, so I couldn’t add much. I needed storage that fit and hid the mess. I tried seven setups over a few months. Some saved real space.
Others went right back to the garage. Below are the seven that worked, with sizes, steps, and costs. Pick one, and you can finish it this weekend.
How Do You Measure Your Front Entry for Shoe Storage?
Measure the open wall width, the depth you can spare, and the height up to any light switch. Most entries need about 36 inches of clear walking space. Anything deeper than 12 inches can squeeze a narrow hall.
Follow these quick steps:
- Measure the wall from corner to corner.
- Measure from the wall to the edge of your door swing.
- Subtract 36 inches from that depth. The answer is your maximum storage depth.
- Write down the height to the nearest switch or outlet.
Take a photo of the wall and jot your numbers on it. You can hold the photo up while you shop.
How Many Pairs Should Your Entry Storage Hold?
Plan for each person’s daily shoes plus two extra pairs. Most people wear two or three pairs a week. A family of four needs room for about 12 pairs. Store out-of-season shoes in a closet to save entry space. Count what lands by your door for one week. That is your true daily number. Kids outgrow shoes fast, so leave a little spare room.
Idea 1: Flip-Down Shoe Cabinet That Hides 12 Pairs
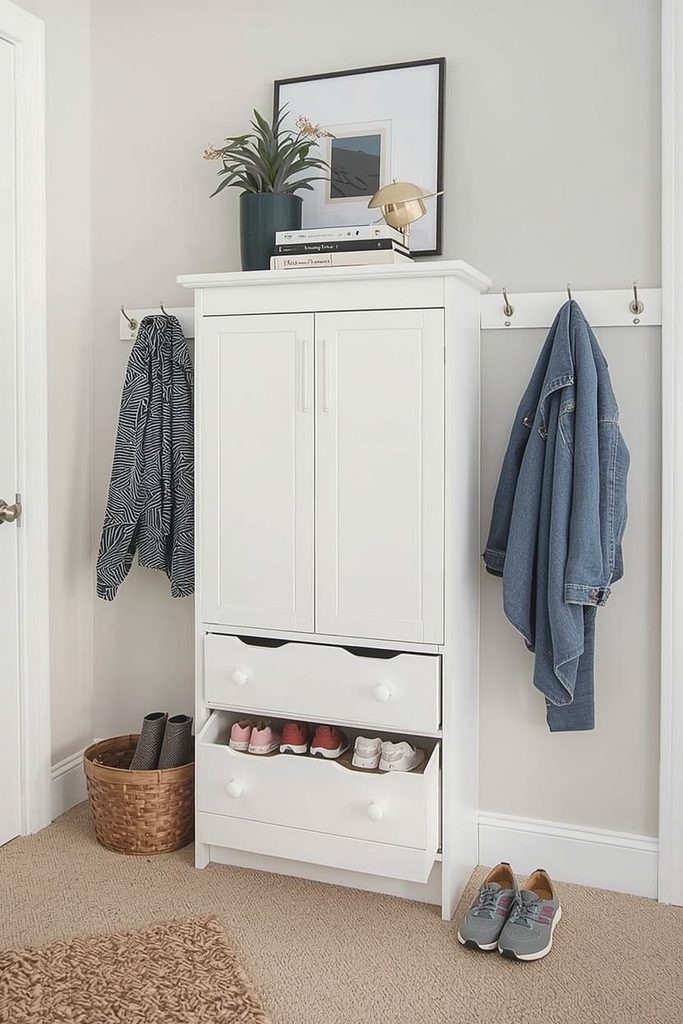
A slim flip-down cabinet hides about 12 pairs behind closed doors. A common size is 31 inches wide, 8 inches deep, and 50 inches tall. That depth fits almost any hall. Closed fronts keep the entry looking calm.
Who It Suits
This suits entries at least 40 inches wide with a free wall. Renters like it, since you only drill two small holes. Beginners can finish it easily. Flip-down drawers also need less depth than standard drawers, because they tilt open instead of sliding out.
Materials and Tools
- 1 flip-down shoe cabinet with three drawers
- 2 anti-tip wall brackets
- 4 felt floor pads
- A drill, level, stud finder, and screwdriver
Steps
- Build the cabinet using the instructions in the box.
- Press felt pads onto the base.
- Stand it against the wall near your door.
- Find a stud and mark it.
- Screw the anti-tip bracket into the stud and the cabinet.
- Load shoes toe to heel in each drawer.
Cost, Time, and Capacity
Expect to spend $70 to $180. Assembly takes about an hour. Each drawer holds three to four pairs.
Common Mistake and Quick Tip
Skipping the wall bracket is risky, since tall cabinets can tip. Put kids’ shoes in the bottom drawer so little hands can reach them.
Idea 2: Storage Bench With a Shelf for 10 Pairs
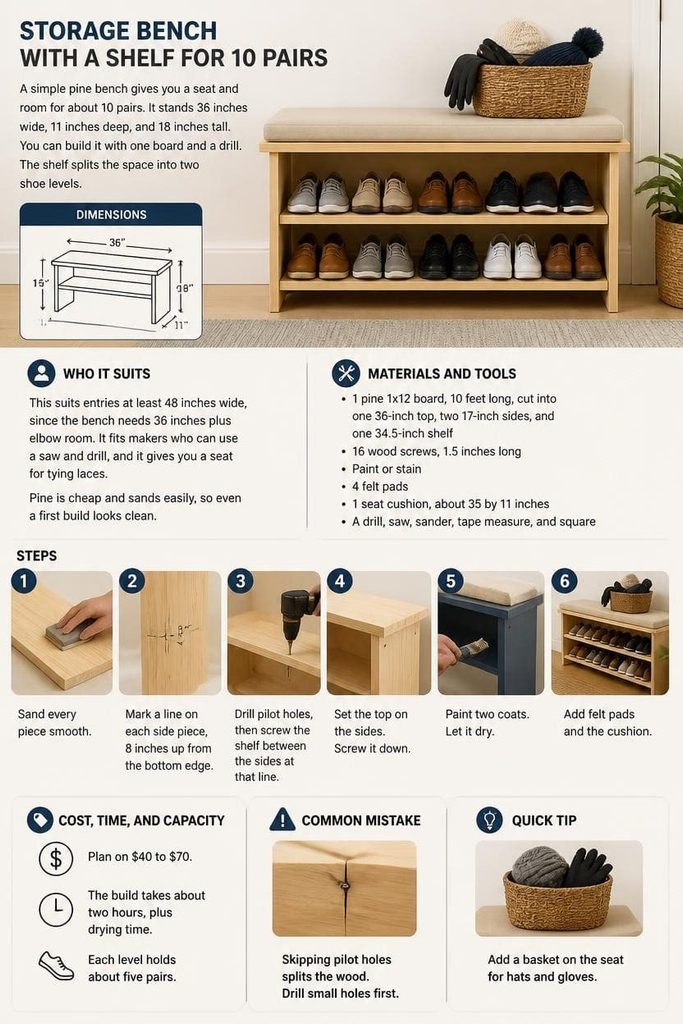
A simple pine bench gives you a seat and room for about 10 pairs. It stands 36 inches wide, 11 inches deep, and 18 inches tall. You can build it with one board and a drill. The shelf splits the space into two shoe levels.
Who It Suits
This suits entries at least 48 inches wide, since the bench needs 36 inches plus elbow room. It fits makers who can use a saw and drill, and it gives you a seat for tying laces. Pine is cheap and sands easily, so even a first build looks clean.
Materials and Tools
- 1 pine 1×12 board, 10 feet long, cut into one 36-inch top, two 17-inch sides, and one 34.5-inch shelf
- 16 wood screws, 1.5 inches long
- Paint or stain
- 4 felt pads
- 1 seat cushion, about 35 by 11 inches
- A drill, saw, sander, tape measure, and square
Steps
- Sand every piece smooth.
- Mark a line on each side piece, 8 inches up from the bottom edge.
- Drill pilot holes, then screw the shelf between the sides at that line.
- Set the top on the sides. Screw it down.
- Paint two coats. Let it dry.
- Add felt pads and the cushion.
Cost, Time, and Capacity
Plan on $40 to $70. The build takes about two hours, plus drying time. Each level holds about five pairs.
Common Mistake and Quick Tip
Skipping pilot holes splits the wood. Drill small holes first. Add a basket on the seat for hats and gloves.
Idea 3: Slim Wall Shelves for Narrow Halls
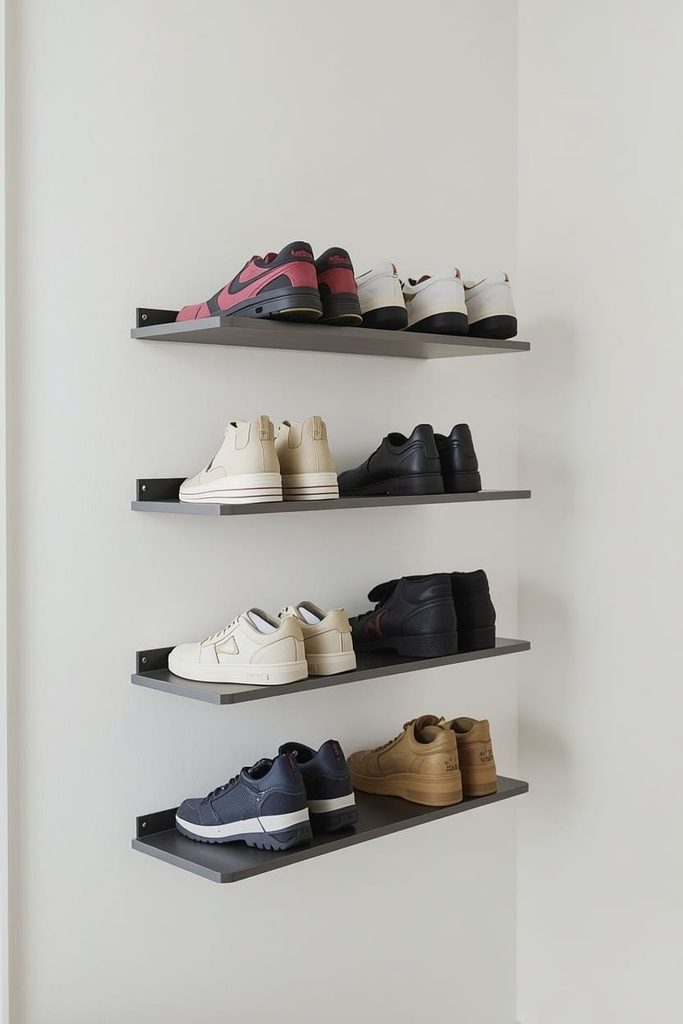
Two wall-mounted shoe shelves hold six pairs in just 7 inches of depth. Each unit is about 24 inches wide. They keep your floor completely open, which makes a small hall feel bigger. Tilted shelves hold shoes at an angle.
Who It Suits
This suits halls as narrow as 36 inches. It works for renters who can patch small screw holes and for anyone who wants a clear floor. Angled shelves keep shoes from sliding out, so you don’t need lips or bars.
Materials and Tools
- 2 wall-mounted tilt shoe shelves, about 24 by 7 inches
- 4 wall screws and heavy-duty anchors (if no stud is available)
- A drill, level, pencil, and stud finder
Steps
- Pick a wall beside your door.
- Mark the bottom shelf 8 inches above the floor.
- Mark the second shelf 11 inches above the first.
- Find studs along those lines.
- Hold each shelf level and mark the screw holes.
- Drill, then screw each shelf to the wall.
- Load three pairs on each shelf, heels toward the wall.
Cost, Time, and Capacity
Expect $30 to $60 and about 45 minutes. Together, the shelves hold six pairs.
Common Mistake and Quick Tip
Plastic anchors alone can pull out under weight. Use studs or heavy-duty anchors. Hang a mirror above the shelves to bounce light around the hall.
Idea 4: Behind-the-Door Rack That Uses Zero Floor Space
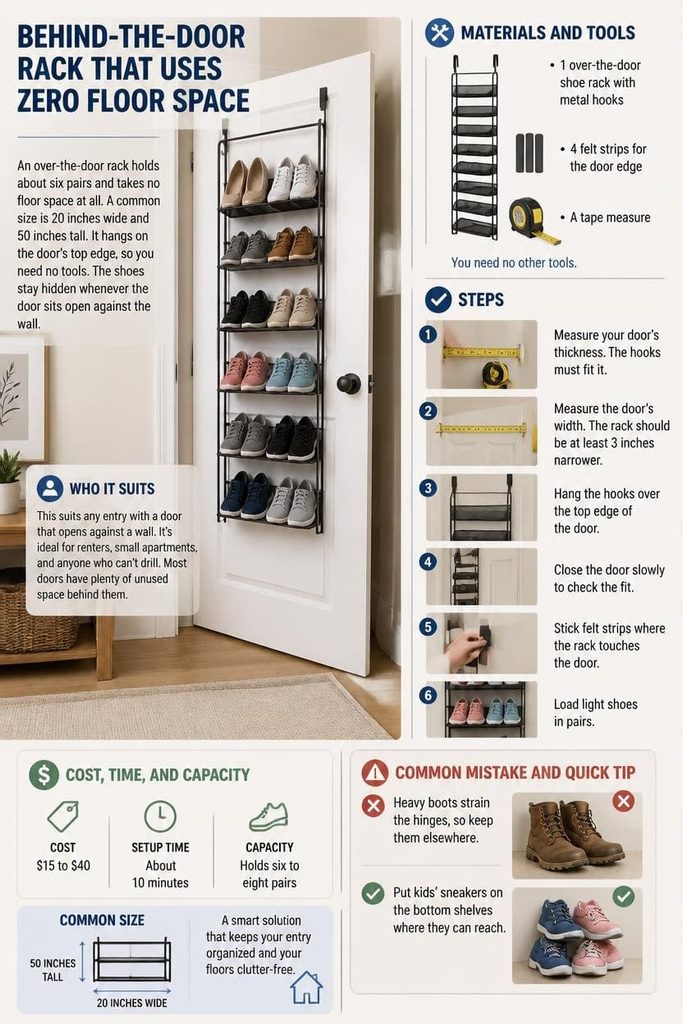
An over-the-door rack holds about six pairs and takes no floor space at all. A common size is 20 inches wide and 50 inches tall. It hangs on the door’s top edge, so you need no tools. The shoes stay hidden whenever the door sits open against the wall.
Who It Suits
This suits any entry with a door that opens against a wall. It’s ideal for renters, small apartments, and anyone who can’t drill. Most doors have plenty of unused space behind them.
Materials and Tools
- 1 over-the-door shoe rack with metal hooks
- 4 felt strips for the door edge
- A tape measure
You need no other tools.
Steps
- Measure your door’s thickness. The hooks must fit it.
- Measure the door’s width. The rack should be at least 3 inches narrower.
- Hang the hooks over the top edge of the door.
- Close the door slowly to check the fit.
- Stick felt strips where the rack touches the door.
- Load light shoes in pairs.
Cost, Time, and Capacity
Plan on $15 to $40. Setup takes about 10 minutes. Most racks hold six to eight pairs.
Common Mistake and Quick Tip
Heavy boots strain the hinges, so keep them elsewhere. Put kids’ sneakers on the bottom shelves where they can reach.
Idea 5: Stacked Crate Shelf for Under $45
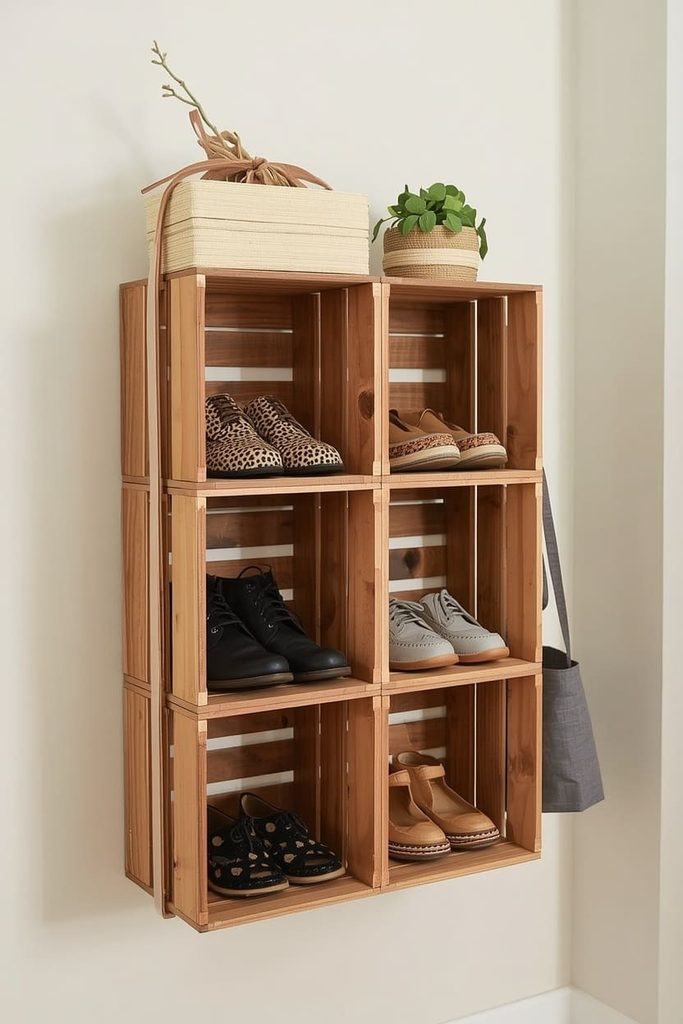
Four wooden crates screwed together make a rustic shelf for about eight pairs. Each crate is about 16 inches wide, 12 inches deep, and 10 inches tall. Stack two by two, and the unit stands about 32 inches wide and 20 inches tall. It is a great pick when money is tight.
Who It Suits
This suits tight budgets and quick makeovers. It needs wall space about 32 inches wide and works for beginners who can use a drill. Crates are sold at craft stores, and thrift shops often have them for less.
Materials and Tools
- 4 wooden crates, 16 by 12 by 10 inches
- 12 wood screws, 1.25 inches long
- Sandpaper and paint
- 4 felt pads
- 1 wall strap
- A drill and screwdriver
Steps
- Sand each crate to remove splinters.
- Paint all four crates and let them dry.
- Set two crates side by side, openings facing out.
- Screw their sides together with two screws.
- Stack the other pair on top and screw them together.
- Join the top and bottom pairs with four screws.
- Add felt pads and anchor the stack with the wall strap.
Cost, Time, and Capacity
Expect $20 to $45 and about an hour. Each crate holds two pairs.
Common Mistake and Quick Tip
Leaving the stack unanchored is a tipping risk, especially with kids. Always strap it to the wall. Line each crate with a scrap of felt so heels don’t scratch the wood.
Idea 6: Console Table With Hidden Shoe Baskets
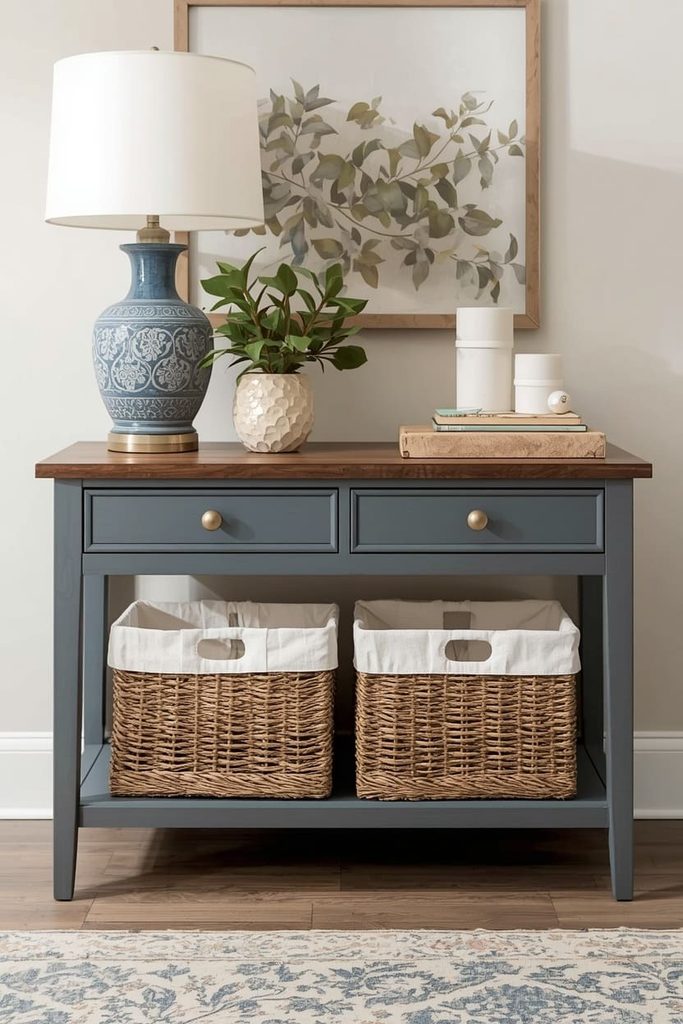
A slim console table with two baskets hides six pairs and looks like decor. A typical table is 36 inches wide and 12 inches deep. The baskets slide under, and the tabletop holds keys and a lamp. Guests see furniture, not shoes.
Who It Suits
This suits entries with a wall at least 40 inches wide and a table you can spare. It’s perfect if you care about style. Baskets also let kids pull out their own shoes without opening a door.
Materials and Tools
- 1 console table, about 36 by 12 inches, with 10 inches of clearance below
- 2 woven baskets, about 15 inches wide, 11 inches deep, and 8 inches tall
- 2 cotton liners or towels
- A tape measure
Steps
- Measure the clearance under the table.
- Choose baskets that are at least one inch shorter than that gap.
- Lay a liner inside each basket.
- Place three pairs of shoes in each basket.
- Slide both baskets under the table.
- Style the top with a lamp and a small tray.
Cost, Time, and Capacity
If you own the table, baskets cost about $25 to $50. A new table adds $60 to $150. The setup takes about 15 minutes. You will hold six pairs.
Common Mistake and Quick Tip
Baskets that are too tall will not slide under. Measure first. Pick baskets with handles so they pull out easily.
Idea 7: Kid-Height Cubby Bench Kids Can Use Alone
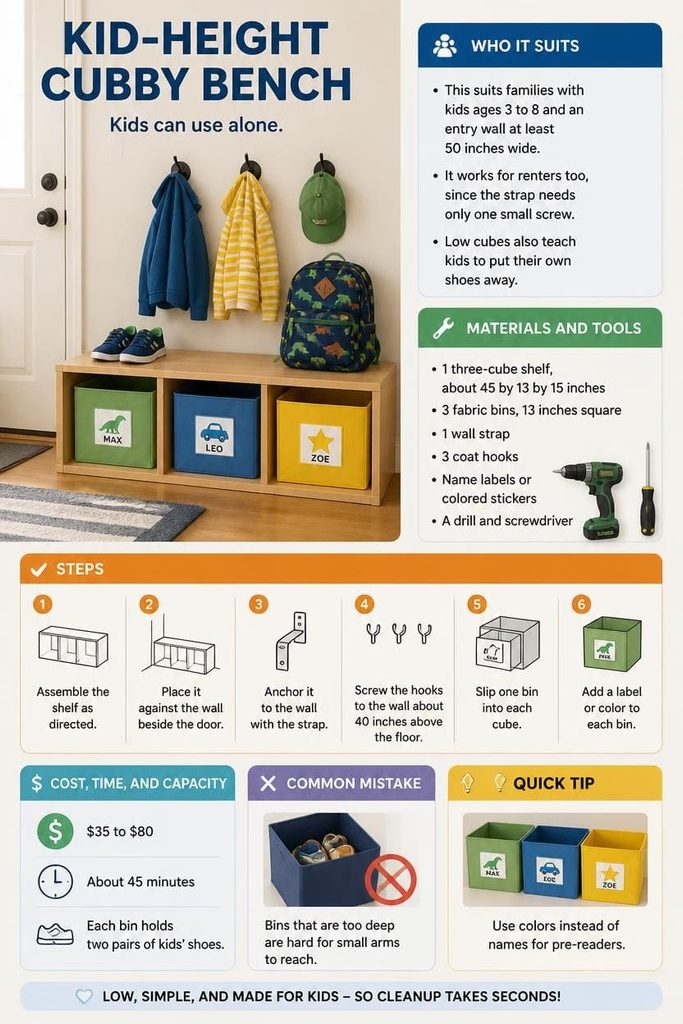
A low three-cube shelf lets kids store their own shoes. The unit is about 45 inches wide, 13 inches deep, and 15 inches tall. Each child gets one bin, so cleanup takes seconds. A bench-height top also gives kids a seat for putting on shoes.
Who It Suits
This suits families with kids ages 3 to 8 and an entry wall at least 50 inches wide. It works for renters too, since the strap needs only one small screw. Low cubes also teach kids to put their own shoes away.
Materials and Tools
- 1 three-cube shelf, about 45 by 13 by 15 inches
- 3 fabric bins, 13 inches square
- 1 wall strap
- 3 coat hooks
- Name labels or colored stickers
- A drill and screwdriver
Steps
- Assemble the shelf as directed.
- Place it against the wall beside the door.
- Anchor it to the wall with the strap.
- Screw the hooks to the wall about 40 inches above the floor.
- Slip one bin into each cube.
- Add a label or color to each bin.
Cost, Time, and Capacity
Plan on $35 to $80. It takes about 45 minutes. Each bin holds two pairs of kids’ shoes.
Common Mistake and Quick Tip
Bins that are too deep are hard for small arms to reach. Pick shallow bins. Use colors instead of names for pre-readers.
Frequently Asked Questions
How do you store boots in a small entry?
Store boots on a tilted wall shelf or in a tall basket. Boots take more room than sneakers. Use a boot tray under the shelf to catch drips. A tall basket by the door also works well for rain boots.
How do you hide shoes in a small entry?
Use closed storage like a cabinet or a lidded basket. Closed fronts hide visual clutter. A bench or console table adds seating or style at the same time. Pick a color that matches your wall so the piece blends in.
How many pairs should you plan for?
Plan for each person’s daily shoes plus two extra pairs. A family of four needs room for about 12 pairs. Keep off-season shoes in a closet.
How do you stop shoes from smelling?
Let shoes air out before you store them. Moisture causes most smells. Tuck a small bag of baking soda or charcoal in each drawer or bin.
How do you keep the entry neat with kids?
Give each child a labeled spot at their own height. Kids put things away when the spot is easy to reach. Do a quick two-minute reset each evening.
Pick one idea and start this weekend. Your entry will feel calmer, and mornings will run smoother. Save this post to your Pinterest board so the steps are ready when you are. Your future self will thank you at the next pile-up.

Sohel Rana is the writer, editor, publisher, and founder of The Tidy Porch. He is the man who is responsible for the craft (my wife created) being converted into a written piece. He also helps her wife (Sumona) by capturing videos of each craft. In short, he brings each craft created by her wife in front of you by transforming it into an article and a video.
