
My dad’s hand took up most of the page. Mine took up less. My niece’s looked like a small green starfish lost in the corner. I stared at the three tracings and had an idea.
What if the size difference was the point? We cut them out, ordered them from big to small, and stacked them like branches. A tree appeared. Nobody had drawn a triangle.
This handprint Christmas tree craft needs no paint, no drying time, and no template. It also tells you exactly who made it. I’ll show you how to build yours, one hand at a time.
What You Need for a Handprint Christmas Tree Craft
You need green paper, a big poster board, and a few basic tools. There’s no paint on the list.
- About 6 sheets of green construction paper or cardstock
- One sheet of brown paper
- One sheet of yellow paper
- One 22 x 28 inch poster board, in cream, navy, or another color that stands out from green
- A pencil and a black marker
- Scissors
- A glue stick and white craft glue
- A ruler
- Stickers, buttons, or pom-poms (optional)
Plan on about 45 minutes. Tracing and cutting take about 20. Gluing and decorating take the rest. Cardstock holds its shape better than thin paper, which matters when the fingers hang loose.
Why Different Hand Sizes Make the Tree Shape
Big hands at the bottom and small hands on top make a triangle without any drawing. Hand size does the shaping.
A tree is wide at the base and narrow at the top. Adult hands are much longer than a toddler’s. Stack them from biggest to smallest, and each row gets narrower on its own.
Same-size handprints can look like a green blob, since nothing tells your eye where the tree ends. The size steps do. Names and ages on the palms add a bonus. The tree becomes a record of who made it and how big everyone was that year.
How to Make a Handprint Christmas Tree Craft Step by Step
You trace and cut six hands, glue them in rows from the bottom up, and add a trunk and star. Follow the steps in order.
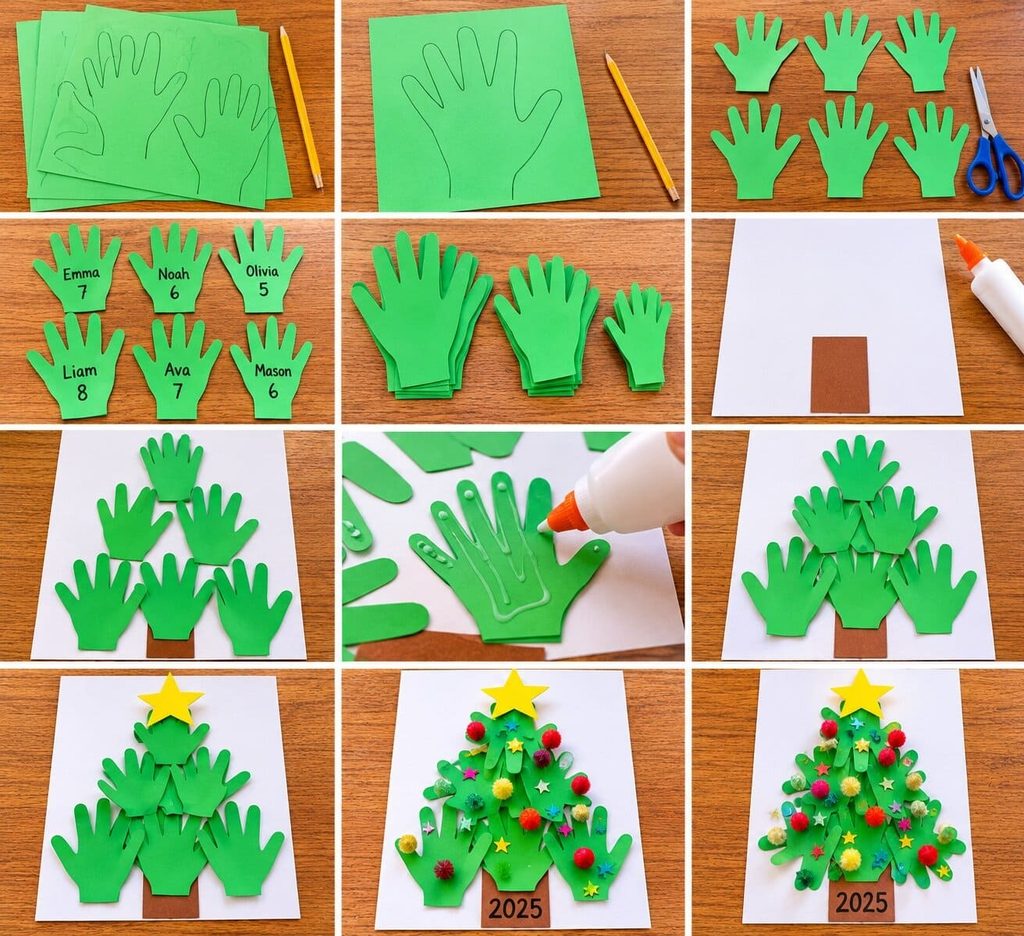
- Gather your hands. Each person traces both hands, so three people give you six hands. Line everyone up by hand size.
- Trace. Lay a hand on green paper with the fingers spread. Trace around it with a pencil, and include a short wrist. Do this for all six hands.
- Cut. Cut each hand out at the wrist, just outside the pencil line. Adults should cut for kids under six.
- Label. Write each person’s name and age in the center of the palm with a black marker.
- Sort. Put the three biggest hands in one pile, the middle two in another, and the smallest hand alone.
- Glue the trunk. Cut a brown rectangle 3 inches wide and 4 inches tall. Glue it to the bottom center of the poster board, about 2 inches above the bottom edge.
- Dry-fit the tree. Lay all six hands on the board with the fingers pointing down. Put three big hands in a row at the bottom, two in the middle, and the smallest on top. Overlap neighbors by about 1 inch. Check the layout before you glue anything.
- Glue the bottom row. Glue the palms and wrists only. Leave the fingers loose so they curl like branches. The fingers of the center hand should cover the top inch of the trunk.
- Glue the middle row. Glue the next two hands so their fingertips overlap the palm tops of the bottom row by about 1 inch. Keep the names visible.
- Glue the top hand. Center the smallest hand above the middle row. Overlap the row below by 1 inch again.
- Add the star. Cut a yellow star about 4 inches wide. Glue it over the wrist of the top hand.
- Decorate. Add stickers, buttons, torn paper ornaments, or pom-poms. Write the year at the base.
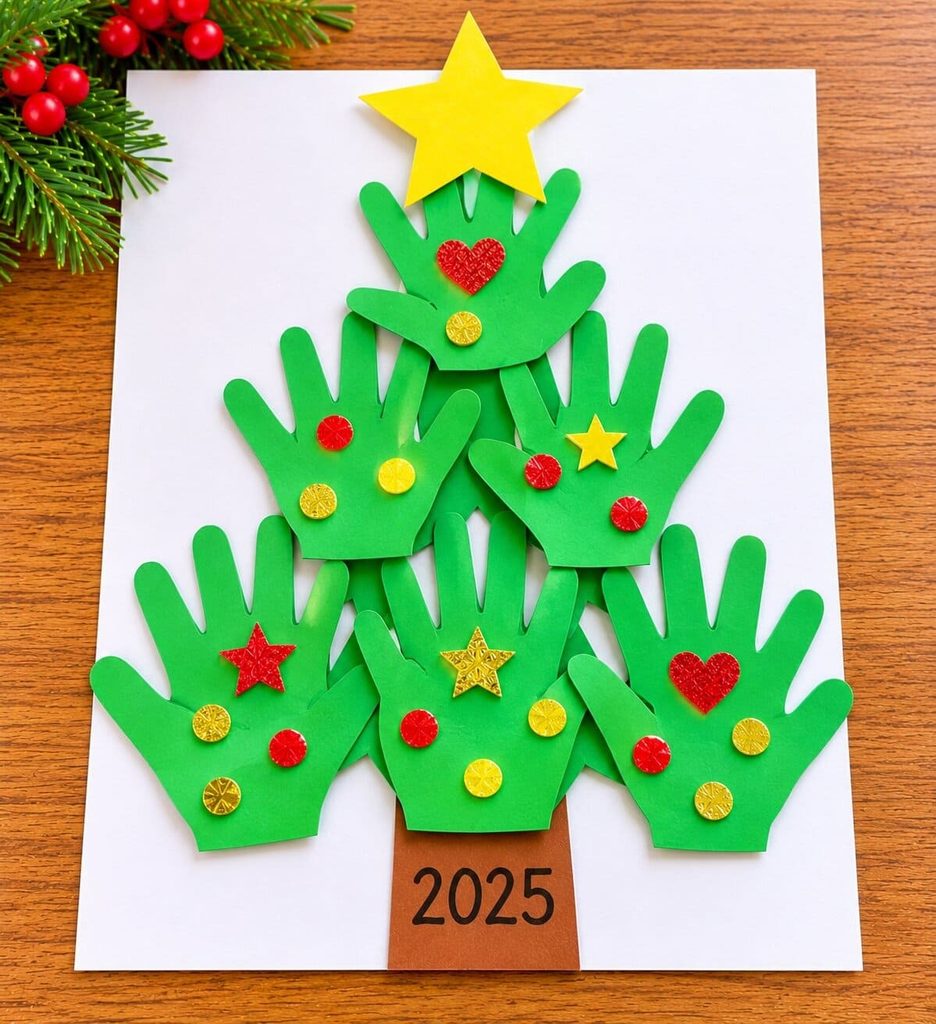
Your finished tree should be about 20 inches wide at the base and 19 inches tall, not counting the trunk. Hands vary, so measure your own layout.
Layout Guide for Different Family and Group Sizes
Use six hands for a small family and ten hands for a bigger group. Both build the same way.
The six-hand tree uses rows of one, two, and three. The ten-hand tree adds a fourth row of four hands at the bottom. Three people make six hands if everyone traces both. Four people make eight. Use the six that fit best, or add two more hands, like a grandparent’s, to reach ten. Not enough people? Trace both hands twice. The size order is what matters.
Tips for Tracing Baby and Toddler Hands
Trace small hands when they’re calm, and trace a foot if the fingers won’t open.
A baby’s fist often stays closed. Gently hold the fingers open while the baby is calm or sleepy. Two adults help here: one holds, one traces. Toddlers wiggle, so use a thick marker. A wobbly line doesn’t matter, since you cut outside it. A tiny foot makes a sweet top for the tree.
Classroom Version
Give each child one hand and build a ten-hand tree for each table group.
Each child traces a hand and writes a name. The teacher’s hands go in the bottom row. Kids line up by hand size to find their rows, which doubles as a lesson in ordering. The teacher assembles the tree with the kids’ help. Kids under six need an adult to cut.
Grandparent Gift Version: Mail It Flat
Cut the hands, then mail them flat so grandparents can build the tree themselves.
Put the cut hands in a flat envelope with a glue stick, a trunk, and a star. Add a note with the row order: three hands at the bottom, then two, then one. Grandparents add their own hands to the bottom row. That makes the gift a craft and a family portrait in one.
Age Guide: What Kids Can Do at Each Age
Ages 1 to 3 decorate, ages 4 to 5 trace and glue, and ages 6 to 7 can do almost all of it.
- Ages 1 to 3: Trace their hands and let them add stickers to the finished tree. Skip buttons and pom-poms, which are choking risks for children under 3.
- Ages 4 to 5: They can trace a hand, write a name with help, and glue the palms with a glue stick. An adult cuts.
- Ages 6 to 7: They can trace, cut, and label hands themselves. Let them dry-fit the layout and glue the rows.
Fixes for Common Problems
Most problems come from layout or glue. Each one has a quick fix.
The hands won’t fit the board. Overlap neighbors a bit more, or trim the wrists.
The tree looks lopsided. Mark the middle of the board at 11 inches across. Line up the center hand in each row with that mark.
The fingers curl too much. Smooth them flat over a table edge. Or glue the fingertips down with a dot of craft glue.
The names are covered. Slide the upper hand up half an inch. Or write the name on a small sticker.
The glue is lifting. Switch to white craft glue on the overlaps. Press down for a full minute.
FAQs About the Handprint Christmas Tree Craft
Can I make this without paint?
Yes. You trace and cut paper hands, so paint never comes out. Paint works too, but it adds mess and drying time.
How many handprints do I need?
Six makes a small tree, and ten makes a fuller one. Each person can trace both hands.
What size paper works best?
Green cardstock or construction paper in standard letter size works well. Use a 22 x 28 inch poster board as the base.
How do I make a handprint tree for a baby?
Trace the hand while the baby is calm, or trace a foot. Make the baby’s print the top of the tree, where the smallest hand belongs.
How do I keep it year after year?
Store it flat in a large folder. Write the year at the base, then make a new tree each year. A stack of trees shows how the hands grow.
That’s the whole handprint Christmas tree craft: big hands, small hands, and a tree that shows who made it. Save this pin so you can find it again when everyone’s home for the holidays.

Sohel Rana is the writer, editor, publisher, and founder of The Tidy Porch. He is the man who is responsible for the craft (my wife created) being converted into a written piece. He also helps her wife (Sumona) by capturing videos of each craft. In short, he brings each craft created by her wife in front of you by transforming it into an article and a video.
