
Last summer, I knelt in my friend’s garden bed with her four-year-old. He grabbed a green top and pulled. Out came a long orange carrot, still dusty with soil. His eyes got huge. “It was hiding!” he said.
I went home and tried to copy that moment with paper. This carrot handprint craft is the result. A green handprint becomes the leafy top. The orange carrot hides in a paper soil pocket.
Your child pulls the leaves, and the carrot slides up. You only need paper, scissors, and glue. It takes less than an hour.
What Is a Pull-Up Carrot Garden Craft, and Why Do Kids Love It?
It is a paper craft where a handprint is the carrot’s leaves and the carrot itself slides out of a soil pocket. Kids love it because it moves. They get to “harvest” a carrot again and again.
Most carrot crafts end when the glue dries. This one keeps going. My friend’s son pulled his carrot up about twenty times before dinner. He also announced that carrots live underground, which shows the lesson stuck.
What Materials Do You Need for a Carrot Handprint Craft?
You need paper, glue, scissors, and a few small extras. This list makes a garden of three carrots.
- 1 sheet of blue paper or poster board, 12 by 18 inches, for the sky
- 1 strip of brown paper, 6 by 18 inches, for the soil
- 2 sheets of green cardstock for three handprints
- 1 to 2 sheets of orange cardstock for three carrots
- 3 index cards or white paper squares for labels
- 6 googly eyes, or a black marker
- 1 pencil and a few markers
- 1 glue stick and 1 small bottle of white glue
- Child-safe scissors, plus sharper scissors for you
Use cardstock for the carrots and handprints. Thin paper bends and catches inside the pocket. White glue holds the soil pocket better than a glue stick.
How Do You Make a Carrot Handprint Craft Step by Step?
Follow these ten steps. The whole craft takes about 45 minutes. It works for ages 2 to 6 with an adult nearby. Toddlers can trace, press, and pull. Older kids can cut.
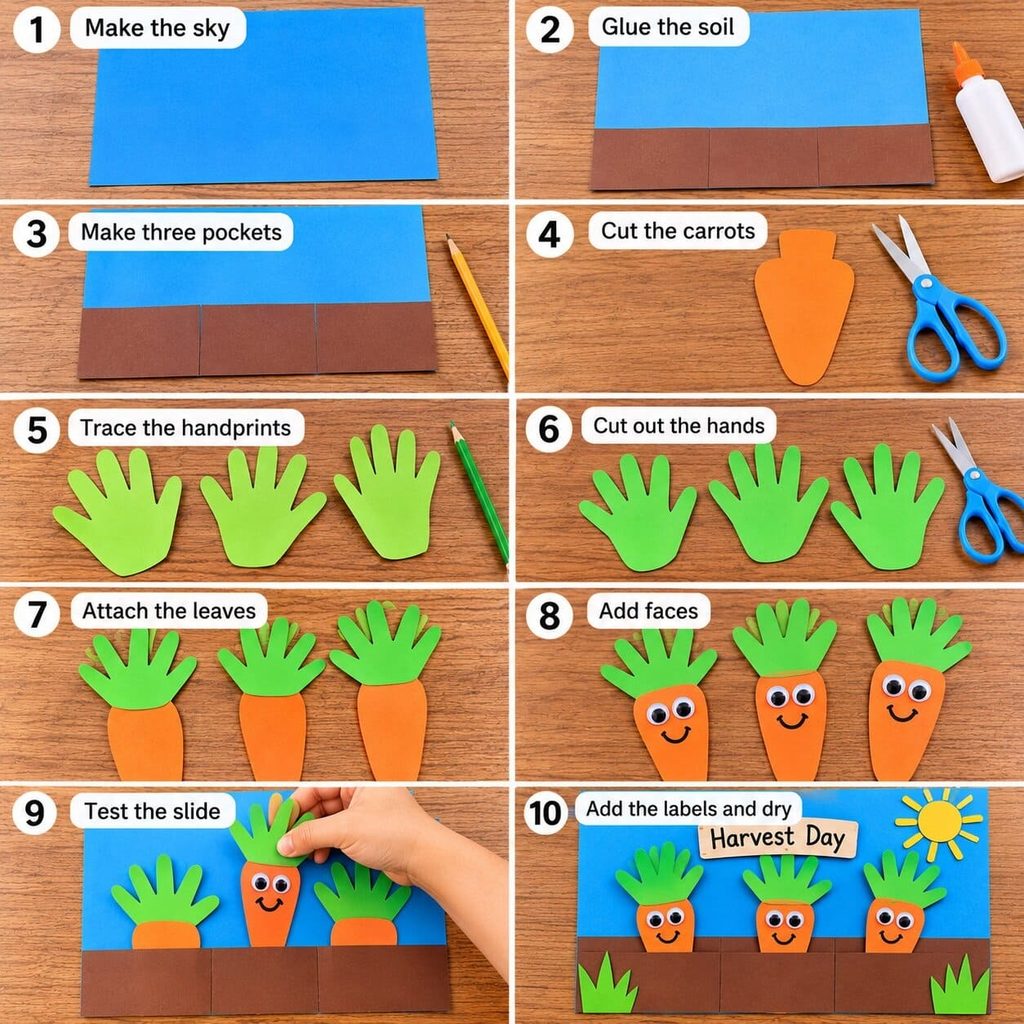
- Make the sky. Lay the blue paper flat with the long side across. This is your garden scene.
- Glue the soil. Run white glue along the bottom edge and both short ends of the brown strip. Press it on the bottom of the blue sheet. Leave the top edge open.
- Make three pockets. Draw two light pencil lines that split the soil into thirds. Glue along each line from the bottom to the top of the brown strip. Press for ten seconds.
- Cut the carrots. Draw a long carrot on orange cardstock, about 2.5 inches wide at the top and 5 inches long. Add a narrow neck on top, 1 inch wide and 3 inches long. Cut it out as one piece.
- Trace the handprints. Press your child’s hand flat on green cardstock with the fingers spread a little. Trace it three times.
- Cut out the hands. Adults should cut for toddlers. Older kids can try wide curves.
- Attach the leaves. Glue the palm of each handprint over the top of a carrot neck. The fingers should fan out like leaves.
- Add faces. Glue two googly eyes on each carrot and draw a smile.
- Test the slide. Drop each carrot into a pocket, pointed end down. The handprint should stay above the soil. Pull it up, then push it back down.
- Add the labels and dry. Follow the Harvest Day steps in the next sections. Let the glue dry flat for 20 minutes before you play.
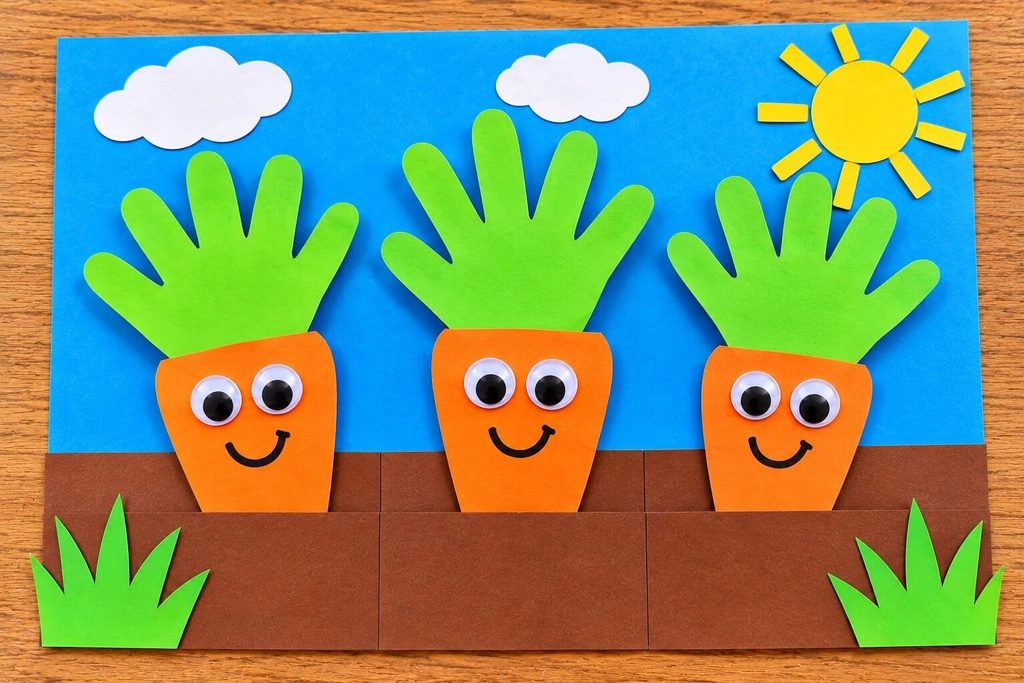
Steps four to six take the longest. If your child gets tired, cut the pieces ahead of time. They can still glue and test.
How Do You Make the Soil Pocket and the Sliding Carrot?
Glue only the bottom, the sides, and the two dividers of the soil strip. Never glue the top. The open top lets the carrot slide in and out.
A few tips keep the slide smooth.
- Make the carrot about half an inch narrower than the pocket.
- Round the pointed end of the carrot a little. A sharp tip can catch the paper.
- Press the glue lines flat while they are wet. Bumps can block the carrot.
- Wait until the glue is fully dry before you test it.
If the carrot slides out all the way, tuck it back in. That is part of the game. If it sticks, trim a little paper off each side of the carrot.
How Do You Make the Handprint Leafy Top?
Glue the green handprint to the top end of the carrot neck so the fingers spread out above it. The fingers look just like feathery carrot leaves.
Hold the hand still and trace slowly. Wiggly toddlers do better with a short job. Count to five while they press down. Then trace the next one.
For extra detail, draw thin lines down each green finger with a darker green marker. Real carrot leaves are lacy and fine. A few lines make the handprint look more like them.
How Do Carrots Really Grow? A Simple Garden Lesson
The orange part of a carrot is a root, and it grows underground. The green leaves grow above the soil. When you pull the leaves, you pull up the root.
Share a few easy facts while the glue dries.
- Carrots grow best in loose soil with plenty of sun.
- They need water to grow.
- A carrot often takes about two to three months to be ready.
- You only see the green leaves until it is time to pull one up.
My friend’s son asked how the carrot got so long. We talked about roots needing room to stretch. He tapped the paper pocket and said, “This is the soil!” That is the lesson in one sentence.
How Can You Help Toddlers and Preschoolers Succeed?
Keep each step short and let kids do the jobs they can finish. A calm, quick session works better than a long one.
- Tape the blue sheet to the table so it does not slide.
- Cut the carrots and trace the hands ahead of time for children under three.
- Let toddlers pull the carrots up. This is the best part for them.
- Skip googly eyes for children under three. Draw the eyes with a marker.
- Keep baby wipes nearby for sticky fingers.
- Split the craft into two short sessions if your child loses interest.
- Praise the ideas, not the neatness.
Crooked carrots look natural. Real ones come in odd shapes too.
How Do You Make a Class Carrot Garden Bed?
Glue one long brown strip across a bulletin board, and let every child’s carrot slide up from it. This works well for a class of about 20.
Here is a simple plan.
- Cover the board with blue paper for the sky.
- Staple a brown strip, about 6 inches tall, along the bottom. Staple the sides and the bottom edge. Leave the top open.
- Have each child trace a hand on green cardstock and glue it to an orange carrot neck.
- Set the carrots into the soil strip, spaced a hand apart.
- Add a title like “Our Carrot Patch.”
Kids can take turns pulling up a carrot to show a friend. Ask what they think is under the soil on a real plant. It is a quick lesson that fits a spring or garden unit.
How Do You Display, Play With, and Keep the Craft?
Hang the garden on a wall or lean it on a shelf where little hands can reach it. Paper holds up well indoors. Keep it out of direct sun, which fades the orange.
Now make the Harvest Day label. Write your child’s name and the date on an index card. Ask your child to draw how tall their carrot grew. Glue the card on the soil strip under the carrot.
For a keepsake, write your child’s age and the year on the back. Store the carrots in an envelope. Next spring, trace the hand again and compare. Many families add a new carrot each year.
Carrot Handprint Craft FAQs
What age is this carrot handprint craft best for?
It works well for ages 2 to 6 with an adult nearby. Toddlers can press, glue, and pull. Kindergarten kids can cut and write their own labels.
Can I use paint instead of paper?
Yes. Paint your child’s palm green and press it on a sheet of paper. Let it dry, cut it out, and glue it to the carrot. Paint straight on the carrot can make it stick in the pocket.
What if the carrot gets stuck?
Trim a little off each side of the carrot. Make sure the pocket glue is dry and flat. A smooth, slightly narrower carrot slides much better.
Can I make it without googly eyes?
Yes. Draw the eyes with a black marker, or cut small white circles and add black dots. This is also safer for toddlers.
Is this a good Easter craft?
Yes. It fits Easter and spring well. Orange and green are classic spring colors, and the carrot works nicely with bunny crafts.
How do I make it a keepsake?
Write your child’s name, age, and the date on the back. Store the carrots in an envelope and the garden scene flat. Trace a new hand every year to see how much it grows.
Your Carrot Handprint Craft Is Ready to Harvest
This carrot handprint craft turns a green handprint into a carrot that really pulls up from paper soil. It takes less than an hour and teaches a simple garden lesson. Hang it up, and let your child harvest it all spring.

Sohel Rana is the writer, editor, publisher, and founder of The Tidy Porch. He is the man who is responsible for the craft (my wife created) being converted into a written piece. He also helps her wife (Sumona) by capturing videos of each craft. In short, he brings each craft created by her wife in front of you by transforming it into an article and a video.
