
Last year, my niece threw her safety scissors across the table. She was three. She wanted to make a Christmas tree, and the scissors refused to cooperate.
I handed her a green paper scrap instead. She ripped it in half and grinned. Then she ripped it again. Ten minutes later, a fluffy, ragged tree sat on the table. She called it perfect. I did too.
You don’t need scissors for a great tree. You need paper, glue, and two hands. Today, I’ll show you how to make a torn paper Christmas tree craft of your own.
What Supplies Do You Need for a Torn Paper Christmas Tree Craft?
You need basic paper and one glue stick. Most of it is already in your recycling bin. Here’s my full list:
- 1 sheet of white or light cardstock, 8.5 x 11 inches
- 3 sheets of green construction paper in light, medium, and dark shades, or the same amount of green scrap paper
- 1 piece of brown paper, about 2 x 2 inches
- 1 piece of yellow paper, about 2 x 2 inches
- Red, yellow, or white scraps for ornaments (optional)
- 1 glue stick
- 1 pencil
- 1 ruler (optional)
- 1 damp cloth or a few wipes
- 1 heavy book for pressing
A glue stick adds less water than liquid glue. That keeps thin paper flat.
What Kind of Paper Works Best for Tearing?
Construction paper tears best, and scrap paper works nicely too. Each type gives a different look:
- Construction paper: It’s thick and leaves a soft, fuzzy edge. Small hands tear it easily.
- Old wrapping paper: Tear it from the plain back. It’s thin, so use less glue.
- Junk mail and magazine pages: Look for green or leafy pages. Glossy paper tears with a sharper edge.
Mixing greens and patterns makes the tree look richer than flat paper. My favorite tree used a seed catalog page, a bank mailer, and old gift wrap.
How Do You Tear Paper So It Looks Like Pine Needles?
Tear slowly, with your hands close together. Slow tears leave fuzzy white fibers on the edge. Those fibers look like frosted pine needles. Here’s the technique I use:
- Hold the paper with both hands, about one inch apart. Tear toward your body. This gives you small, controlled pieces.
- Fold the paper first, then tear along the fold. You get straighter strips.
- Tear strips along the paper’s long side. Paper usually tears straighter that way.
- Tear small pieces for the top of the tree and larger pieces for the bottom. The tree’s shape builds itself.
Tearing is a pinch-and-twist motion. It gives small hands good practice before they ever pick up scissors.
How Do You Make a Torn Paper Christmas Tree Step by Step?
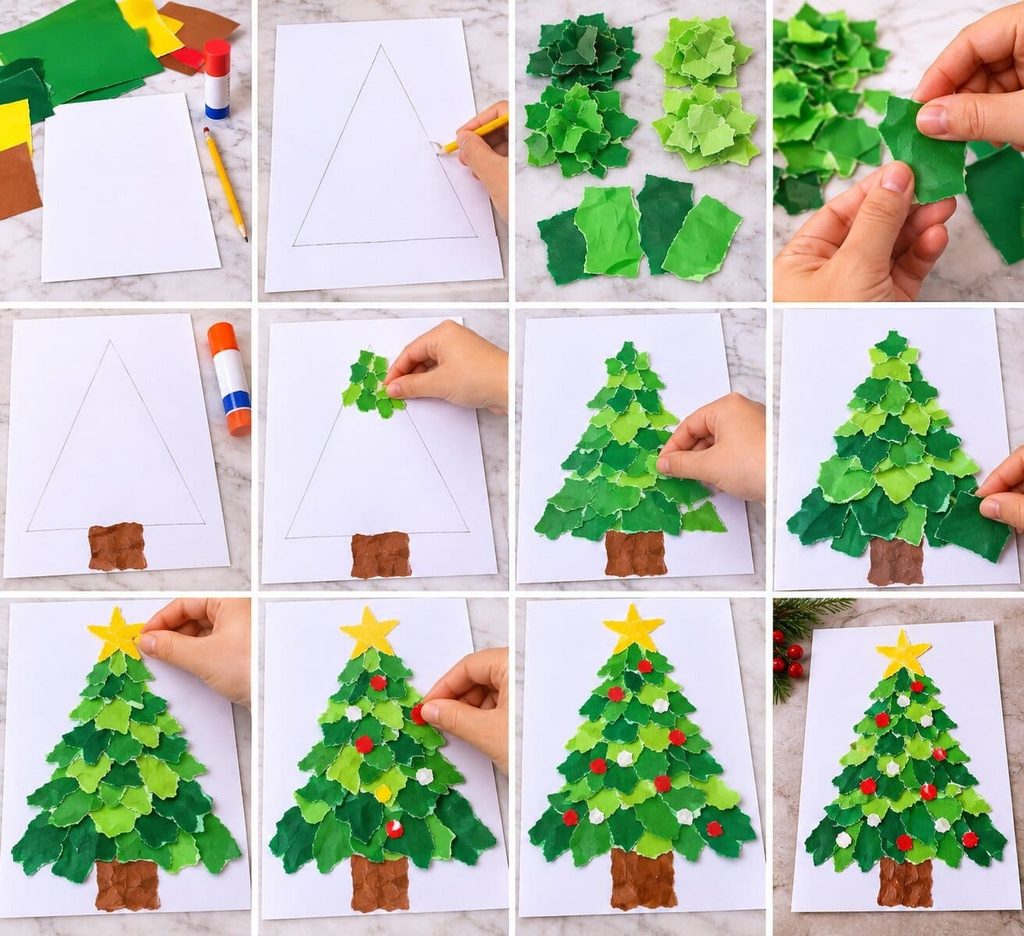
Tear, sort, and glue from the top down, in four tiers. The whole project takes about 30 minutes. Top to bottom works best because your hand stays over blank paper. It never smudges fresh glue.
Prep Your Paper
- Cover your table. Place the cardstock in front of you, tall side up.
- Draw a pencil triangle. Put the tip 2 inches below the top edge. Make it 6 inches tall and 5 inches wide at the base. Center it. This leaves room for a star above and a trunk below.
- Tear the green paper into four piles. Tear tiny pieces about half an inch wide. Tear small pieces about 1 inch, medium pieces about 1.5 inches, and large pieces about 2 inches. Make about 10 of each. Extras are fine.
- Mix the three shades inside each pile, then line the piles up on a tray.
Glue the Trunk and the Tiers
- Glue the trunk first. Tear the brown paper into a block about 1 inch wide and 1 inch tall. Glue it just below the triangle’s base. The bottom tier will overlap its top edge, so no white gap shows.
- Tier one: Swipe glue over the top 1 inch of the triangle. Press on 3 or 4 tiny pieces. Overlap them by about a quarter inch.
- Tier two: Swipe glue over the next 1.5 inches. Use small pieces. Work in sections about 2 inches wide, so the glue never dries before you press.
- Tier three: Glue the next 1.5 inches. Use medium pieces.
- Tier four: Glue the bottom 2 inches. Use large pieces. Let the edges poke past the pencil line. The overhang looks feathery.
- As you go, place a dark piece next to a light one. Avoid putting three of the same shade in a row.
Add the Star and Ornaments
- Tear five thin yellow strips, each about three-quarters of an inch long. Glue them like spokes from one center point, about 1 inch above the tip.
- Tear tiny red or white bits, about a quarter inch wide. Glue 6 to 8 on the tree, roughly 1 inch apart.
- Lay a scrap sheet over the tree. Set a heavy book on top. Press for 10 minutes. The scrap sheet keeps glue off the book.
Keep It Safe and Tidy
Use a glue stick labeled non-toxic, and stay close to young children. Tiny ornament bits are a choking risk for toddlers. Skip them for children under 3.
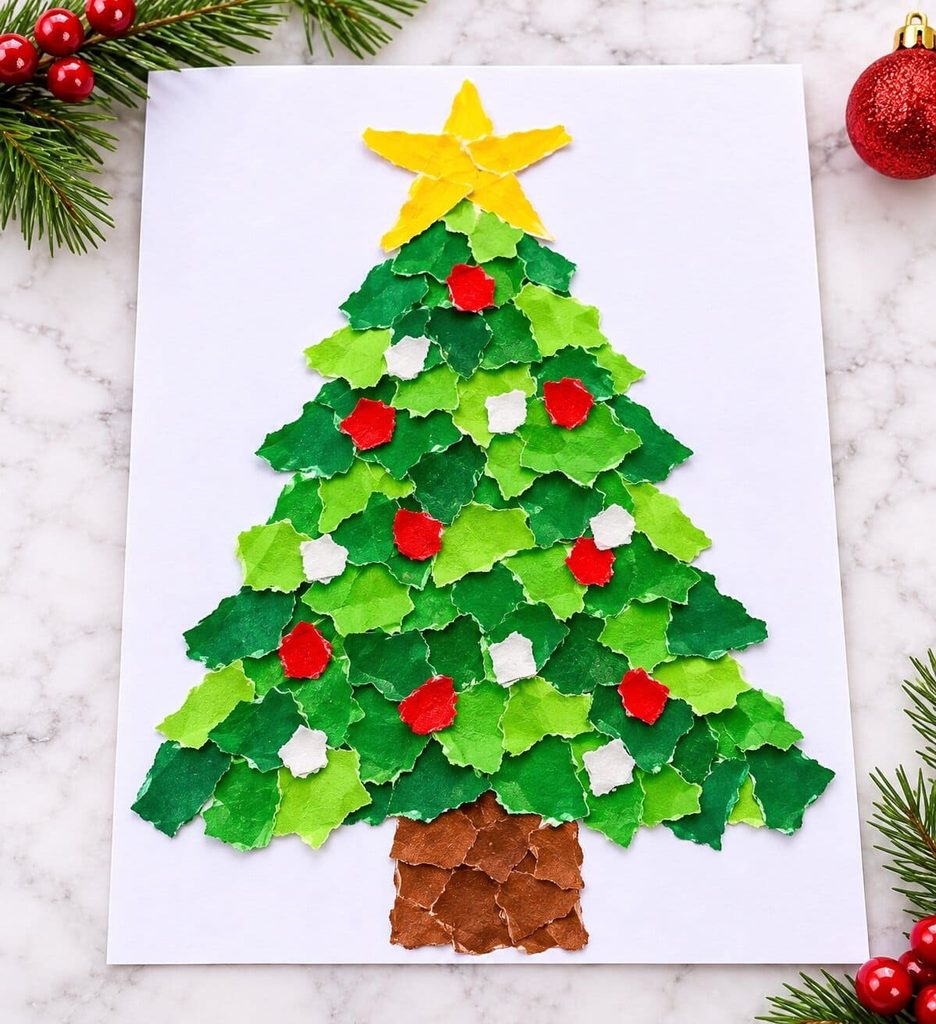
How Do You Fix Gaps, Wrinkles, and Loose Pieces?
Most problems need one more piece or a little more pressure. Here’s what to try:
- White gaps: Tear a piece slightly bigger than the gap. Glue it over the hole.
- Wrinkled paper: You used too much glue. Press it under a book with a scrap sheet. Use a thinner swipe next time.
- Curling or loose pieces: Add a thin swipe of glue to the back. Press for 10 seconds.
- Pieces too large at the top: Tear smaller bits and glue them over the edges.
- A tree that doesn’t look like a triangle: Tuck darker pieces along the sides to sharpen the shape.
How Can You Make This Craft for Toddlers vs. Preschoolers?
Give toddlers big tears and no rules. Give preschoolers sorted tiers and small details. The base technique stays the same.
Toddler Version (Ages 2 to 3)
Draw the triangle for your child. Swipe glue across it yourself. Let your child tear big pieces, about 2 inches wide, and press them anywhere. Gaps are fine. Toddlers tear big and can’t aim yet. This makes an easy Christmas tree craft for toddlers with no scissors. Add one torn yellow piece on top as the star.
Preschool Version (Ages 4 to 5)
Use all four tiers, the star, and the ornaments. Ask your child which pile goes at the top. This turns tearing into a quiet sorting game. It’s a great Christmas tree craft for preschool tearing paper practice.
How Do You Run This Craft With a Whole Class?
Draw the triangles before class, then set up stations of four or five children.
For 20 kids, that’s four stations. Give each station one tray of green paper and one glue stick for every two children.
Pencil triangles ahead of time save about 10 minutes. Allow 30 minutes. Then hang the finished trees side by side as a paper forest.
How Can You Turn the Tree Into a Keepsake?
Use cardstock, then finish it as a card, a gift tag, or a framed print. Write your child’s name and the year on the back in pencil first. Then pick one:
- Framed print: Slip the full tree into an 8.5 x 11 inch frame.
- Card: Draw a 4-inch triangle on 5 x 7 inch cardstock. Use tiny and small pieces only. Glue that sheet to the front of a folded card.
- Gift tag: Make a 2.5-inch tree on a 3 x 5 inch card. Punch a hole at the top. Tie on a ribbon.
Ready to Make Your Own Torn Paper Christmas Tree Craft?
Yes, and you can finish it today. You need scrap paper, a glue stick, and 30 minutes. The tearing does the work. Hang it on the fridge and let your child tell the story of how they made it.
FAQs About Torn Paper Christmas Trees
What paper is best for a torn paper Christmas tree?
Construction paper is best. It’s thick, tears easily, and leaves a soft edge. Scrap paper works for extra color and pattern.
What glue works best for torn paper crafts?
A glue stick works best. It adds little water, so paper stays flat. Liquid glue can wrinkle thin scraps.
At what age can a child tear paper for a craft?
Many children can tear paper around age 2, with help. Follow your child’s lead.
How do I make the torn edges look neat?
Tear slowly with your hands close together. Fold the paper first and tear along the fold. Slow tears leave fuzzy, even edges.
Does tearing paper help fine motor skills?
It can help. Tearing uses a pinch-and-twist motion that gives small hands practice. It’s one helpful activity among many.
Can I use wrapping paper or magazine pages?
Yes. Tear wrapping paper from the plain back. Use less glue on thin pages so they stay flat.

Sohel Rana is the writer, editor, publisher, and founder of The Tidy Porch. He is the man who is responsible for the craft (my wife created) being converted into a written piece. He also helps her wife (Sumona) by capturing videos of each craft. In short, he brings each craft created by her wife in front of you by transforming it into an article and a video.
