
My son once glued a googly eye to his own finger. He held it up like it was the best part of the whole ladybug craft. I laughed so hard I almost knocked over the glue stick, and honestly, that finger-eye stuck around for the rest of the afternoon.
That’s the thing about letter L crafts. They rarely go exactly as planned, and that’s fine. What matters is the letter sticks in their head by the end.
So here are 7 letter L crafts I’ve actually made at my own kitchen table, tested on real toddlers and preschoolers, and adjusted after the glue-stick chaos settled. Every one is paper-only and finishable in one sitting.
- Colored cardstock multipack covers the reds, yellows, greens, and browns you’ll need across every craft on this list.
- Washable glue sticks (multi-pack) hold paper flat and clean without the warping liquid glue causes on thin cardstock.
- Kid-safe blunt-tip scissors give toddlers the chance to practice cutting without constant hovering.
- Wiggle eyes variety pack turns any flat shape into a character in seconds, which buys you extra patience minutes.
- Pre-cut paper shape assortment pack saves the day when precision cutting isn’t happening and the craft still needs to be done.
Paper Ladybug Craft for Letter L
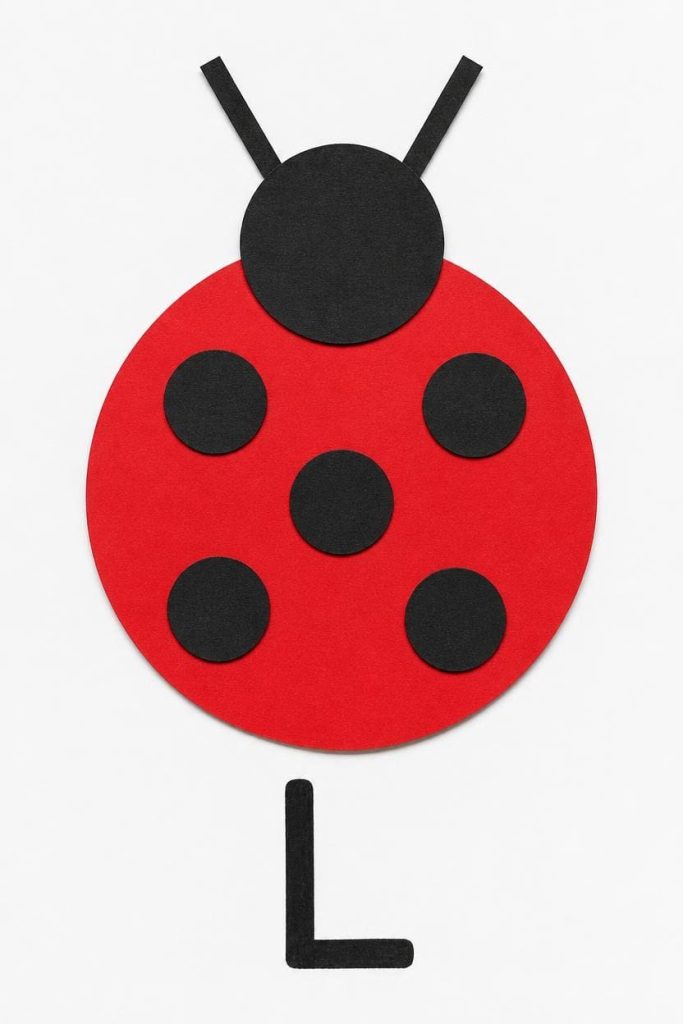
This is the craft that led to the finger-eye incident, and it’s still the one my son asks for by name. It works because the shapes are big and forgiving, so even a shaky toddler cut still looks like a ladybug in the end.
Materials Needed
- One 5-inch red paper circle (body)
- One 2-inch black paper circle (head)
- Five 1-inch black paper circles (spots)
- One black paper strip, 4 inches by half-inch, cut down the middle to make two antennae
- Glue stick
How To Make
- Glue the 2-inch black circle to the top edge of the red circle first, overlapping by about half an inch so it looks attached, not floating.
- Fold the black strip in half, then cut along the fold line so you have two thin antenna strips.
- Glue the bottom inch of each antenna strip to the back of the head circle, angling them outward in a V shape so the tips point up and out.
- Space the five black spot circles evenly across the red body, gluing them flat with a light dab of glue in the center of each.
- Write a large L beneath the ladybug once everything is dry to the touch.
Tips
- Pre-cut the spots ahead of time — five even circles is a lot to ask of small scissors.
- Count the spots out loud together for a bonus number-recognition moment.
- Swap red for yellow or orange for a variation that still reads as a ladybug.
Paper Lion Craft for Letter L
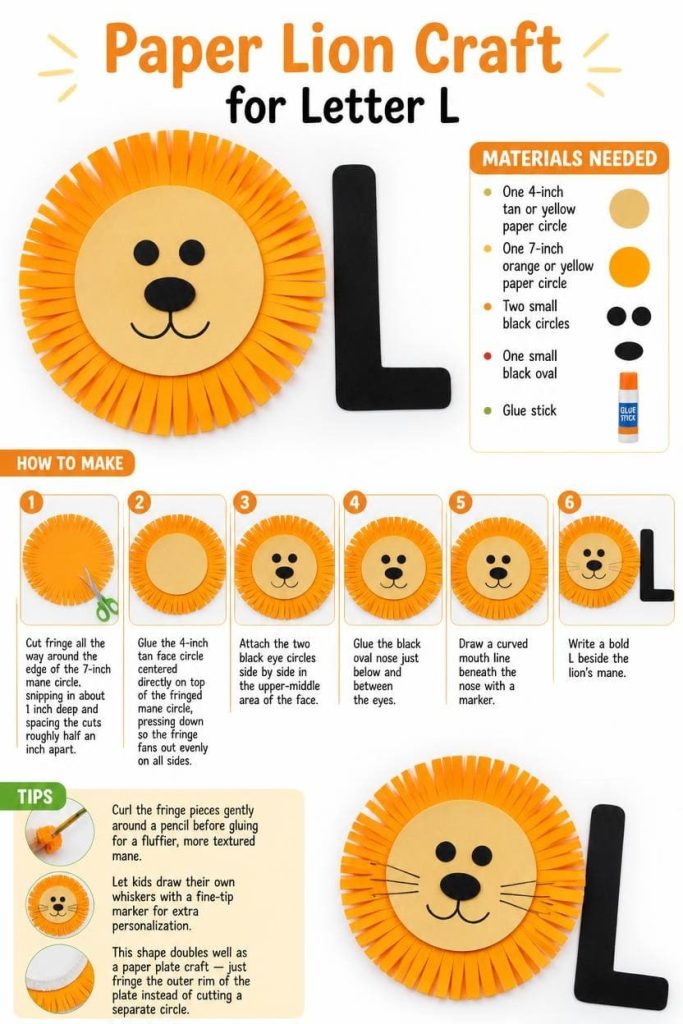
The mane is the star of this craft, and it comes together with one simple fringe-cutting trick that looks far more impressive than the effort it takes.
Materials Needed
- One 4-inch tan or yellow paper circle (face)
- One 7-inch orange or yellow paper circle (mane)
- Two small black circles (eyes)
- One small black oval (nose)
- Glue stick
How To Make
- Cut fringe all the way around the edge of the 7-inch mane circle, snipping in about 1 inch deep and spacing the cuts roughly half an inch apart.
- Glue the 4-inch tan face circle centered directly on top of the fringed mane circle, pressing down so the fringe fans out evenly on all sides.
- Attach the two black eye circles side by side in the upper-middle area of the face.
- Glue the black oval nose just below and between the eyes.
- Draw a curved mouth line beneath the nose with a marker, then write a bold L beside the lion’s mane.
Tips
- Curl the fringe pieces gently around a pencil before gluing for a fluffier, more textured mane.
- Let kids draw their own whiskers with a fine-tip marker for extra personalization.
- This shape doubles well as a paper plate craft — just fringe the outer rim of the plate instead of cutting a separate circle.
Paper Leaf Craft for Letter L
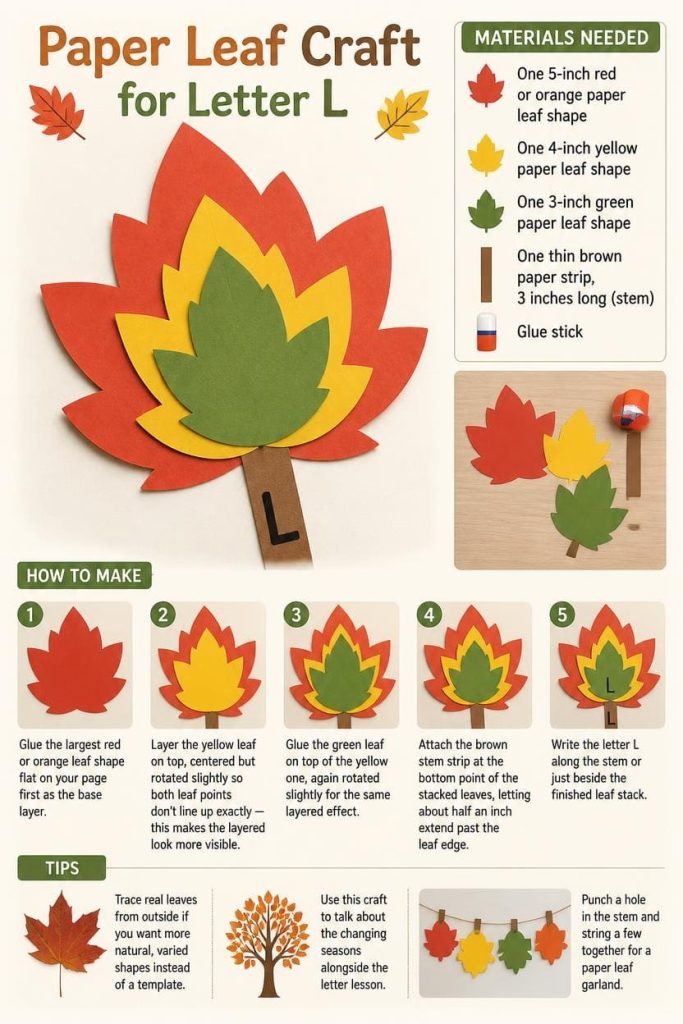
This one leans into fall colors, but it works any time of year and gives kids a chance to practice a layering technique they’ll see again and again in other crafts.
Materials Needed
- One 5-inch red or orange paper leaf shape
- One 4-inch yellow paper leaf shape
- One 3-inch green paper leaf shape
- One thin brown paper strip, 3 inches long (stem)
- Glue stick
How To Make
- Glue the largest red or orange leaf shape flat on your page first as the base layer.
- Layer the yellow leaf on top, centered but rotated slightly so both leaf points don’t line up exactly — this makes the layered look more visible.
- Glue the green leaf on top of the yellow one, again rotated slightly for the same layered effect.
- Attach the brown stem strip at the bottom point of the stacked leaves, letting about half an inch extend past the leaf edge.
- Write the letter L along the stem or just beside the finished leaf stack.
Tips
- Trace real leaves from outside if you want more natural, varied shapes instead of a template.
- Use this craft to talk about the changing seasons alongside the letter lesson.
- Punch a hole in the stem and string a few together for a paper leaf garland.
Paper Lantern Craft for Letter L
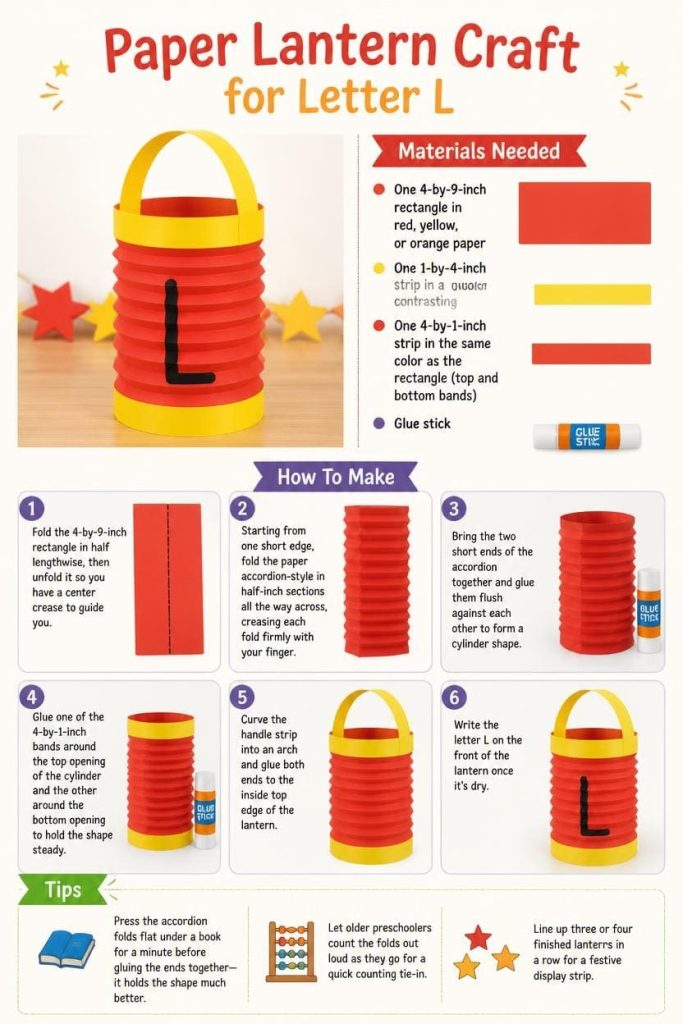
This craft is a nice change of pace because it uses an accordion-fold technique instead of gluing separate shapes together, which gives kids a totally different paper skill to practice.
Materials Needed
- One 4-by-9-inch rectangle in red, yellow, or orange paper
- One 1-by-4-inch strip in a contrasting color (handle)
- One 4-by-1-inch strip in the same color as the rectangle (top and bottom bands)
- Glue stick
How To Make
- Fold the 4-by-9-inch rectangle in half lengthwise, then unfold it so you have a center crease to guide you.
- Starting from one short edge, fold the paper accordion-style in half-inch sections all the way across, creasing each fold firmly with your finger.
- Bring the two short ends of the accordion together and glue them flush against each other to form a cylinder shape.
- Glue one of the 4-by-1-inch bands around the top opening of the cylinder and the other around the bottom opening to hold the shape steady.
- Curve the handle strip into an arch and glue both ends to the inside top edge of the lantern, then write the letter L on the front of the lantern once it’s dry.
Tips
- Press the accordion folds flat under a book for a minute before gluing the ends together — it holds the shape much better.
- Let older preschoolers count the folds out loud as they go for a quick counting tie-in.
- Line up three or four finished lanterns in a row for a festive display strip.
Paper Lollipop Craft for Letter L
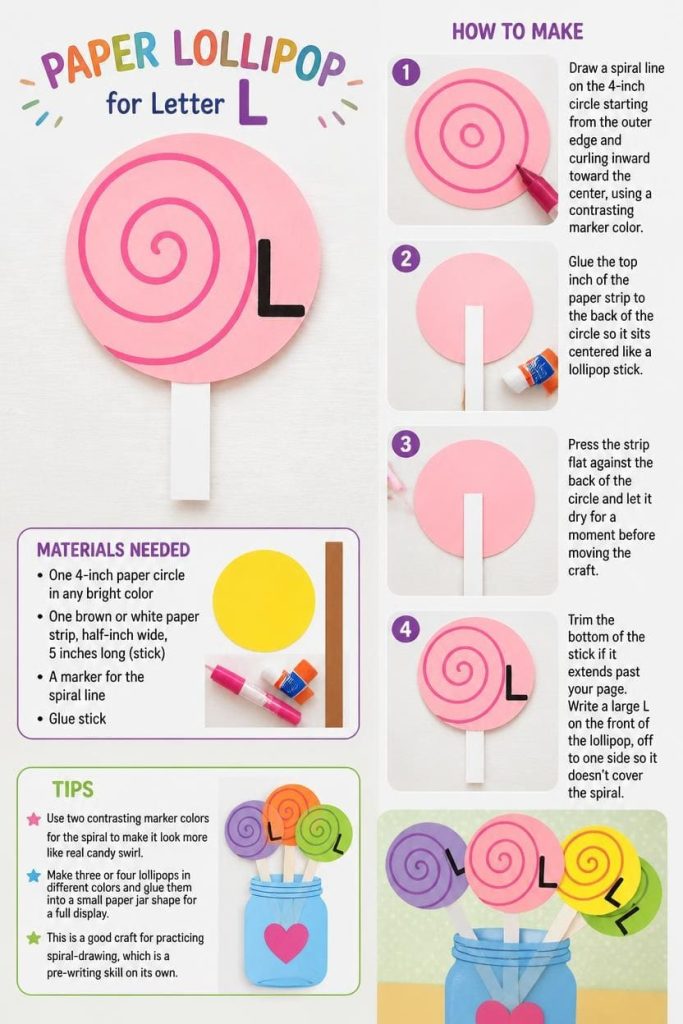
Kids gravitate toward this one fast, mostly because it looks like candy, and the spiral technique is a nice quick win for smaller hands.
Materials Needed
- One 4-inch paper circle in any bright color
- One brown or white paper strip, half-inch wide, 5 inches long (stick)
- A marker for the spiral line
- Glue stick
How To Make
- Draw a spiral line on the 4-inch circle starting from the outer edge and curling inward toward the center, using a contrasting marker color.
- Glue the top inch of the paper strip to the back of the circle so it sits centered like a lollipop stick.
- Press the strip flat against the back of the circle and let it dry for a moment before moving the craft.
- Trim the bottom of the stick if it extends past your page.
- Write a large L on the front of the lollipop, off to one side so it doesn’t cover the spiral.
Tips
- Use two contrasting marker colors for the spiral to make it look more like real candy swirl.
- Make three or four lollipops in different colors and glue them into a small paper jar shape for a full display.
- This is a good craft for practicing spiral-drawing, which is a pre-writing skill on its own.
Paper Lighthouse Craft for Letter L
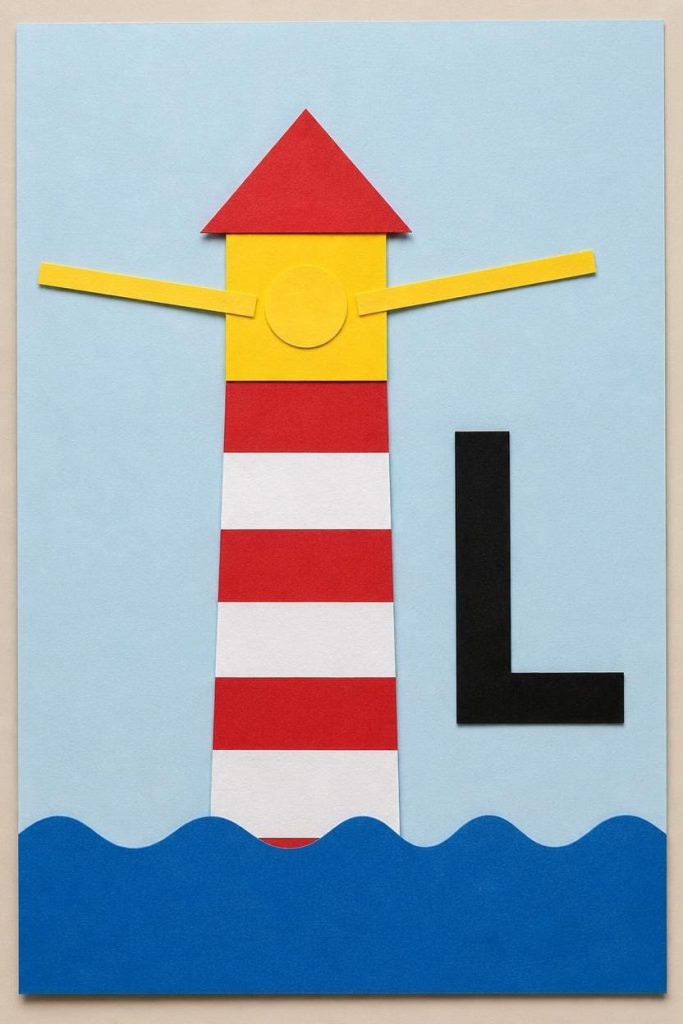
This is the most detailed craft on the list, and it’s a good pick for older preschoolers who are ready for a few extra steps.
Materials Needed
- One 3-by-8-inch white or red-striped rectangle (tower)
- One 4-inch red triangle (roof)
- One 2-by-2-inch yellow square (light room)
- One small yellow circle, 1 inch (light beam center)
- Glue stick
How To Make
- Glue the tall rectangle vertically in the center of your page to form the tower base.
- Attach the yellow square directly on top of the tower, centered, to form the light room.
- Glue the red triangle on top of the yellow square, aligning the flat bottom edge of the triangle with the top edge of the square.
- Glue the small yellow circle in the center of the light room square to represent the light.
- Add two thin yellow paper strips fanning outward from the circle to suggest a light beam, then write L beside the lighthouse.
Tips
- Use striped paper or draw horizontal stripes on the tower for a more realistic lighthouse look.
- Add a blue paper strip along the bottom of the page to suggest the ocean.
- This craft pairs well with a short conversation about how lighthouses help guide boats — a nice tie-in for curious older preschoolers.
Paper Llama Craft for Letter L
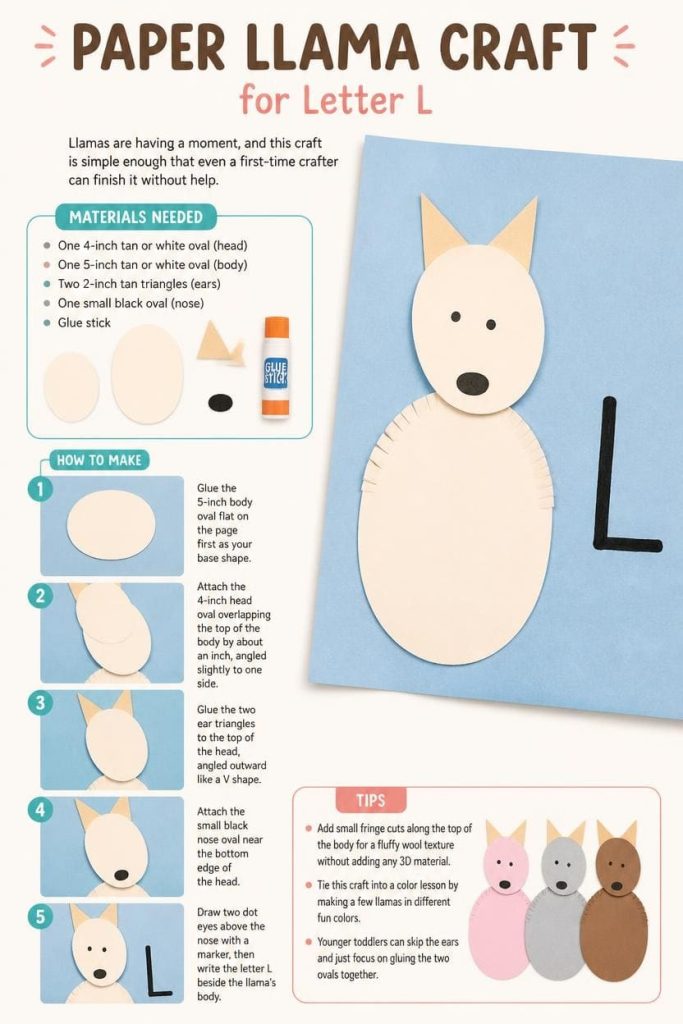
Llamas are having a moment, and this craft is simple enough that even a first-time crafter can finish it without help.
Materials Needed
- One 4-inch tan or white oval (head)
- One 5-inch tan or white oval (body)
- Two 2-inch tan triangles (ears)
- One small black oval (nose)
- Glue stick
How To Make
- Glue the 5-inch body oval flat on the page first as your base shape.
- Attach the 4-inch head oval overlapping the top of the body by about an inch, angled slightly to one side.
- Glue the two ear triangles to the top of the head, angled outward like a V shape.
- Attach the small black nose oval near the bottom edge of the head.
- Draw two dot eyes above the nose with a marker, then write the letter L beside the llama’s body.
Tips
- Add small fringe cuts along the top of the body for a fluffy wool texture without adding any 3D material.
- Tie this craft into a color lesson by making a few llamas in different fun colors.
- Younger toddlers can skip the ears and just focus on gluing the two ovals together.
FAQ
Is this craft list appropriate for toddlers, or just preschoolers?
Most of these work for both age groups. The lollipop and leaf crafts are the easiest starting points for toddlers. The lighthouse and lion involve more layering and precision, so pre-cutting the pieces helps for kids under 3.
How do I use these crafts to reinforce the L sound specifically?
Stretch the L sound out loud while your child glues each piece — “llllladybug,” “llllion.” Pointing at the letter L on the page while saying it out loud connects the sound to the shape more than the craft alone.
Can I turn these into a full letter-of-the-week unit?
Yes. Spread two or three crafts across separate days instead of doing all seven at once. This keeps the momentum going without overwhelming a short attention span, and it gives you built-in review days later in the week.
What’s the best way to display finished letter L crafts?
A string with clothespins works well for a rotating home gallery. In a classroom, a bulletin board titled “L is for…” with each craft labeled underneath turns the display into a review tool later on.
Do I need any special tools for these crafts?
No. Everything here uses paper, cardstock, glue sticks, and safety scissors. Nothing requires 3D materials, paint, or extended drying time beyond the glue itself.

I’m Sloane Everly, the heart and soul behind TheTidyPorch.com, where I pour my love for home decor, interior styling, and curated living into everything I do.
I’m all about turning houses into homes that feel like you—full of warmth, character, and a little bit of magic.
My style? Think cozy charm with a splash of bold, always designed to make your space feel like a hug you never want to leave.