
My daughter cut her rainbow into confetti last week. Every strip, snipped into pieces the size of rice. I sat there holding a glue stick, staring at what used to be red and orange paper, and I had two choices: get frustrated or start over smarter.
We started over. This time I pre-cut the strips and just let her glue. Ten minutes later, she was pointing at her paper rainbow yelling “R! R! R!” like she’d invented the letter herself.
That’s the moment I realized letter crafts work best when the prep does the heavy lifting, not the child. So here are 7 letter R crafts I’ve actually made, tested, and fixed after messy first attempts. Every one is paper-only and finishable in one sitting.
- Colored cardstock multipack makes every craft on this list pop, since red, orange, yellow, and gray are the core colors you’ll need repeatedly.
- Washable glue sticks (multi-pack) hold paper cleanly without the wrinkling or sogginess liquid glue causes on thin paper.
- Kid-safe blunt-tip scissors let toddlers practice cutting straight lines without you hovering over every snip.
- Wiggle eyes variety pack turns a flat paper shape into a character in about three seconds, which matters when a 3-year-old’s patience is running out.
- Pre-cut paper shape assortment pack is a lifesaver on days when precision cutting just isn’t happening and you still want the craft done.
Paper Plate Rainbow Craft for Letter R
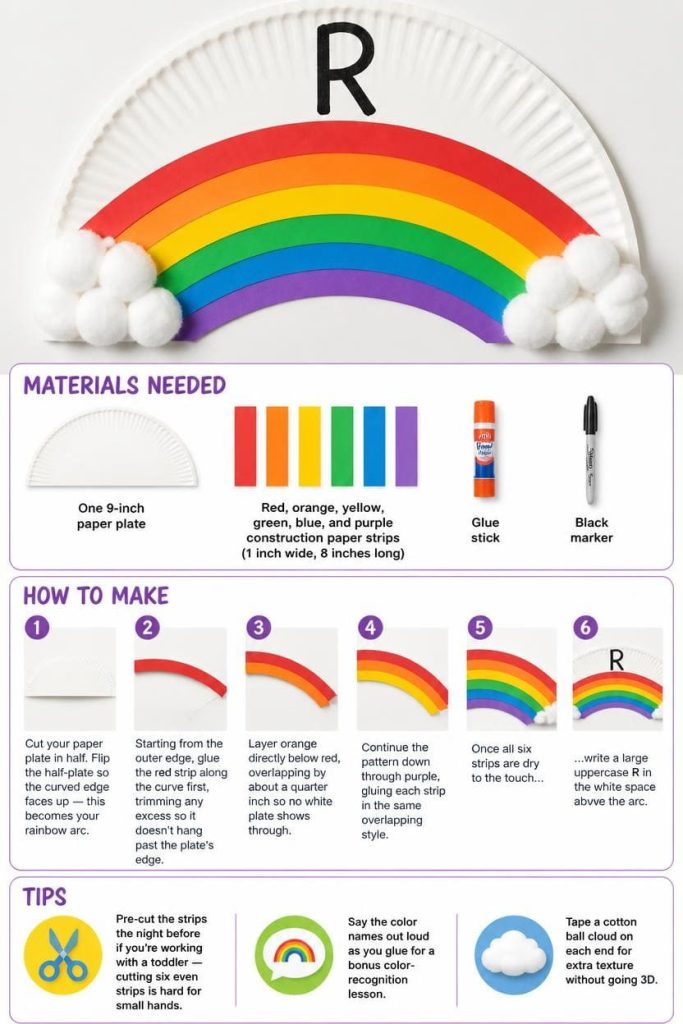
This is the craft that started it all in our house, and it’s still the fastest way to get a big burst of color on the page. It works because kids can build it in the exact order the rainbow appears, which reinforces the visual pattern before the letter recognition even kicks in.
Materials Needed
- One 9-inch paper plate
- Red, orange, yellow, green, blue, and purple construction paper strips (1 inch wide, 8 inches long)
- Glue stick
- Black marker
How To Make
- Cut your paper plate in half.
- Flip the half-plate so the curved edge faces up — this becomes your rainbow arc.
- Starting from the outer edge, glue the red strip along the curve first, trimming any excess so it doesn’t hang past the plate’s edge.
- Layer orange directly below red, overlapping by about a quarter inch so no white plate shows through.
- Continue the pattern down through purple, gluing each strip in the same overlapping style.
- Once all six strips are dry to the touch, write a large uppercase R in the white space above the arc.
Tips
- Pre-cut the strips the night before if you’re working with a toddler — cutting six even strips is hard for small hands.
- Say the color names out loud as you glue for a bonus color-recognition lesson.
- Tape a cotton ball cloud on each end for extra texture without going 3D.
Paper Robot Craft for Letter R
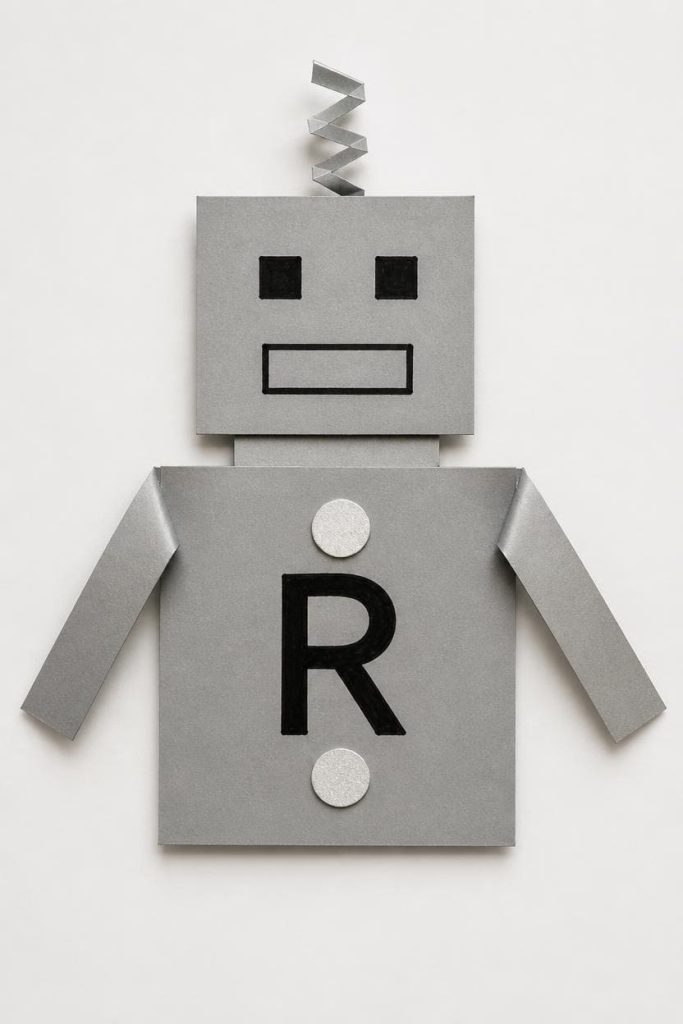
Robots are forgiving. There’s no “right” way for the pieces to look, which takes the pressure off and lets the letter be the actual focus.
Materials Needed
- One 5-inch gray or silver cardstock square (body)
- One 3-inch gray cardstock square (head)
- Two 1-inch silver circles (buttons)
- Two 4-inch strips, half-inch wide (arms)
- Black marker
How To Make
- Glue the 3-inch square directly above the 5-inch square, centered, with about a quarter-inch gap between them to suggest a neck.
- Attach the two silver circles vertically down the center of the body, spaced an inch apart.
- Fold each 4-inch arm strip in half, then glue the folded end to the outer edge of the body at a slight downward angle so the arms don’t stick straight out.
- Draw a rectangular mouth and two square eyes on the head.
- Write a bold R across the chest, centered between the buttons.
Tips
- Use a silver marker instead of gray paper if that’s what you have on hand.
- Let kids draw their own robot face — no two robots need to match.
- Add antenna made from a thin strip folded into a zigzag for extra flair.
Rocket Ship Craft for Letter R
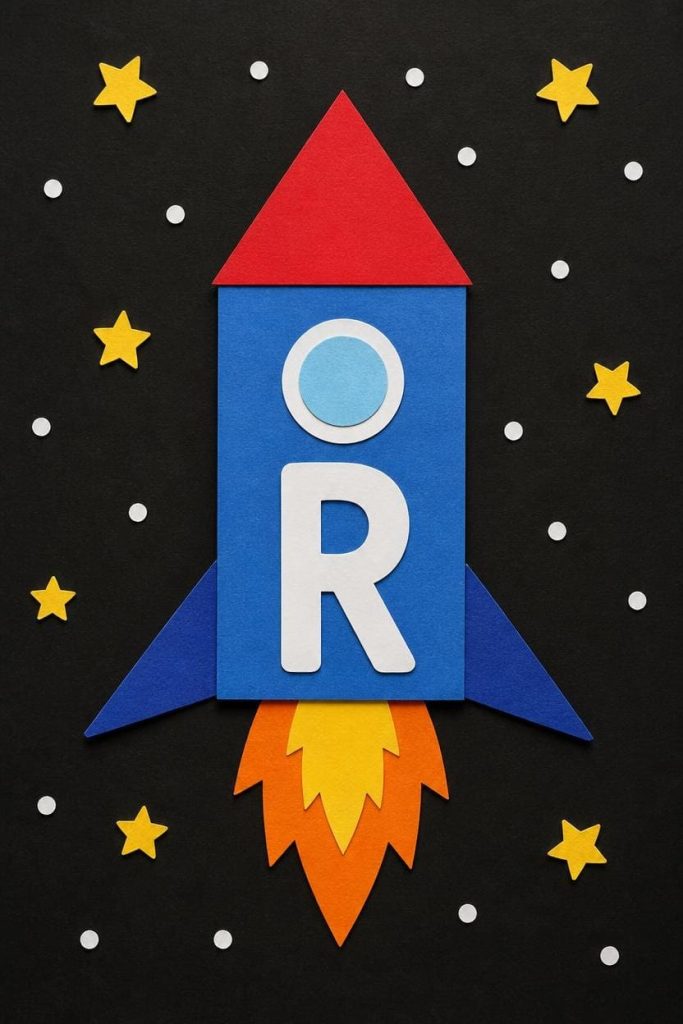
A rocket needs to feel like it’s moving even sitting flat on paper, and that comes down to how you angle the flame at the bottom.
Materials Needed
- One 4-inch red or blue triangle (nose cone)
- One 4-by-6-inch rectangle (body)
- Two small triangles, 2 inches each (fins)
- One yellow and one orange 2-inch triangle (flame)
- Glue stick
How To Make
- Glue the rectangle vertically in the center of your page first.
- Attach the nose cone triangle directly on top, point facing up, aligning the flat edge with the top of the rectangle exactly.
- Glue the two fin triangles to the bottom corners of the rectangle, angled outward at roughly 45 degrees.
- Layer the orange flame triangle behind the bottom edge of the rocket body, then glue the smaller yellow triangle centered on top of the orange one so both colors show.
- Add a large R to the center of the rocket body.
Tips
- Cut the flame triangles slightly uneven for a more realistic flicker look.
- Add small circle “windows” cut from white paper for extra detail.
- Older kids can add stars around the rocket using a hole punch and scrap paper.
Raccoon Face Craft for Letter R
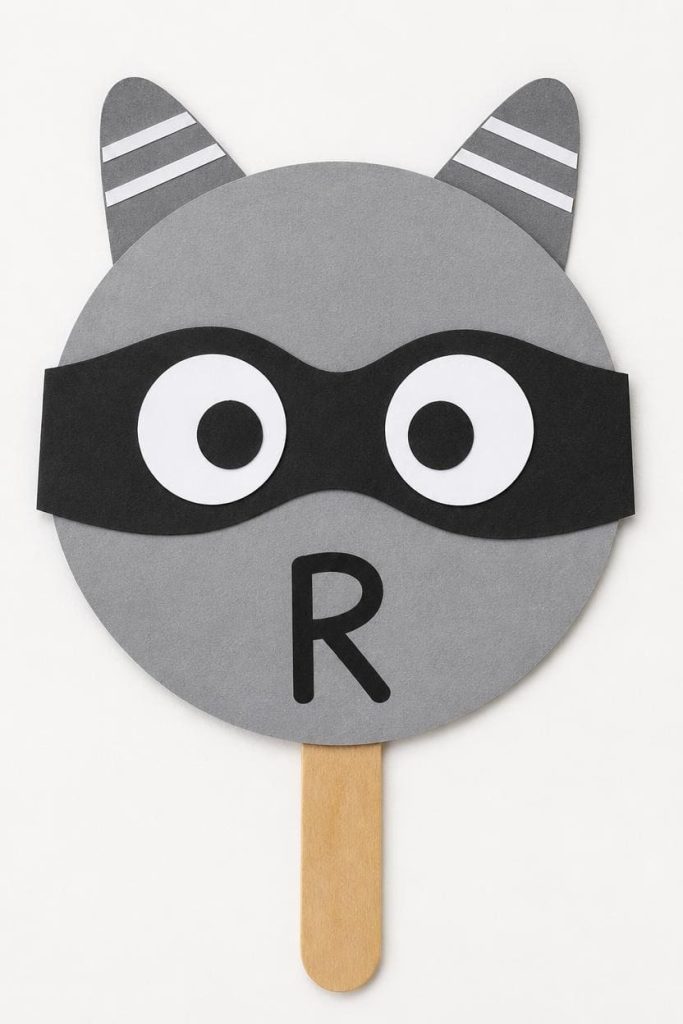
The mask shape is what sells this craft, and it comes from one simple fold-and-cut trick.
Materials Needed
- One 6-inch gray paper circle (face)
- One 4-by-2-inch black paper strip
- Two 2-inch white paper ovals (eye patches)
- Two small black circles (eyes)
- Two 3-inch gray triangles (ears)
How To Make
- Fold the black strip in half and cut a shallow curve out of the center so it forms a mask shape when unfolded — this becomes the raccoon’s signature band across the eyes.
- Glue this black band horizontally across the middle of the gray circle first.
- Layer the two white ovals on top of the black band, positioned where the eyes will sit, then glue the small black circles centered on the white ovals.
- Attach the two triangle ears to the top back edge of the circle, angled slightly inward.
- Write the letter R below the face.
Tips
- Curve the ear triangles slightly by rounding the top corners with scissors before gluing.
- Add thin white paper stripes across the ears for a fuller raccoon look.
- This one works well as a stick puppet — just glue a craft stick to the back.
Rain Cloud Craft for Letter R
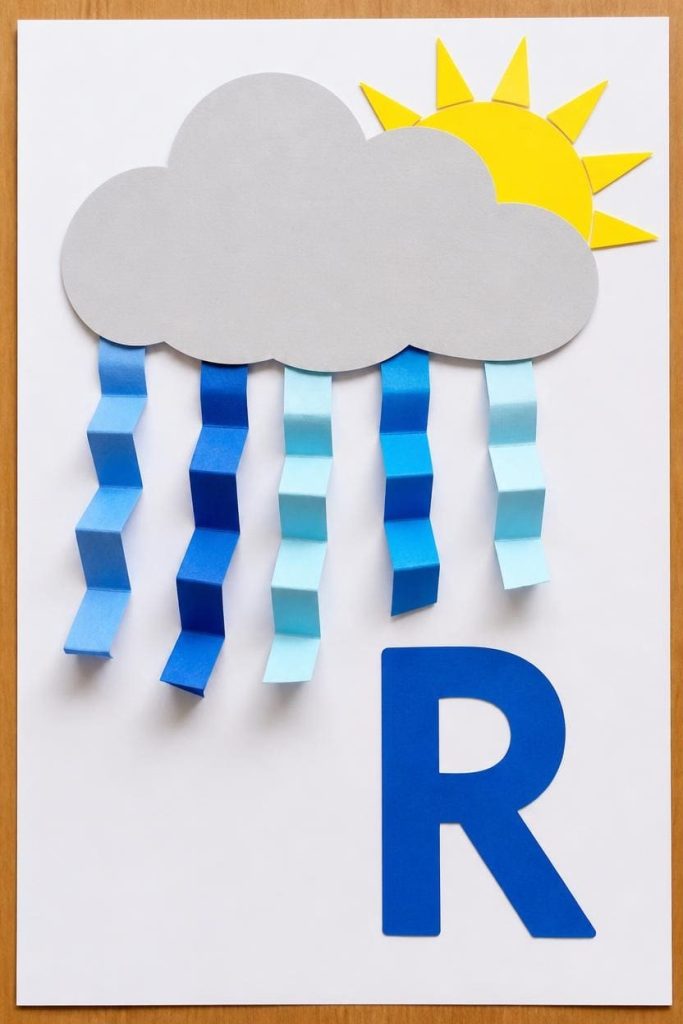
This is the calmest craft on the list, and it’s a good one for kids who need a slower, less fussy project.
Materials Needed
- One 6-inch gray or white cloud shape (pre-cut or hand-cut)
- Five blue paper strips, half-inch wide, 3 inches long
- Glue stick
How To Make
- Glue the cloud shape centered near the top of your page.
- Fold each blue strip in a gentle zigzag — two folds per strip — so it holds a raindrop shape instead of lying flat.
- Glue the top of each folded strip just beneath the bottom edge of the cloud, spacing them evenly about an inch apart.
- Let the folded ends hang free so they look like falling rain.
- Write a large R directly beside or beneath the cloud.
Tips
- Use different shades of blue for the raindrops to add visual interest.
- Skip the fold and use straight strips for younger toddlers who aren’t ready for folding.
- Add a small yellow paper sun peeking from behind the cloud for a rainbow tie-in.
Red Racecar Craft for Letter R
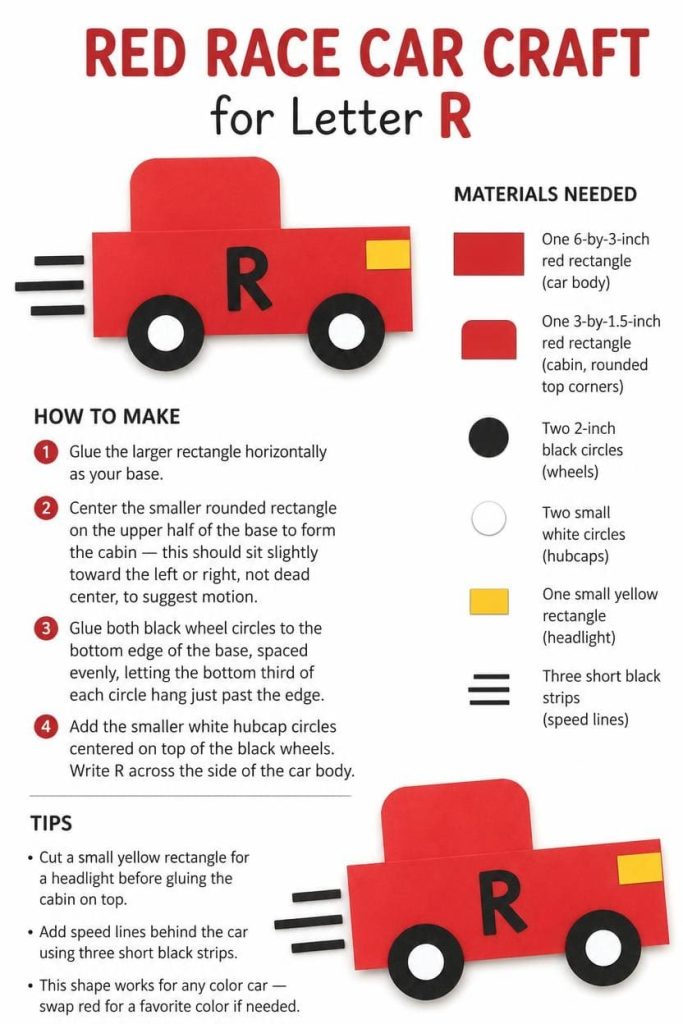
Cars are an easy win because the shape recognition (rectangle plus circles) is already familiar to most preschoolers.
Materials Needed
- One 6-by-3-inch red rectangle (car body)
- One 3-by-1.5-inch red rectangle (cabin, rounded top corners)
- Two 2-inch black circles (wheels)
- Two small white circles (hubcaps)
How To Make
- Glue the larger rectangle horizontally as your base.
- Center the smaller rounded rectangle on the upper half of the base to form the cabin — this should sit slightly toward the left or right, not dead center, to suggest motion.
- Glue both black wheel circles to the bottom edge of the base, spaced evenly, letting the bottom third of each circle hang just past the edge.
- Add the smaller white hubcap circles centered on top of the black wheels.
- Write R across the side of the car body.
Tips
- Cut a small yellow rectangle for a headlight before gluing the cabin on top.
- Add speed lines behind the car using three short black strips.
- This shape works for any color car — swap red for a favorite color if needed.
Paper Rose Craft for Letter R
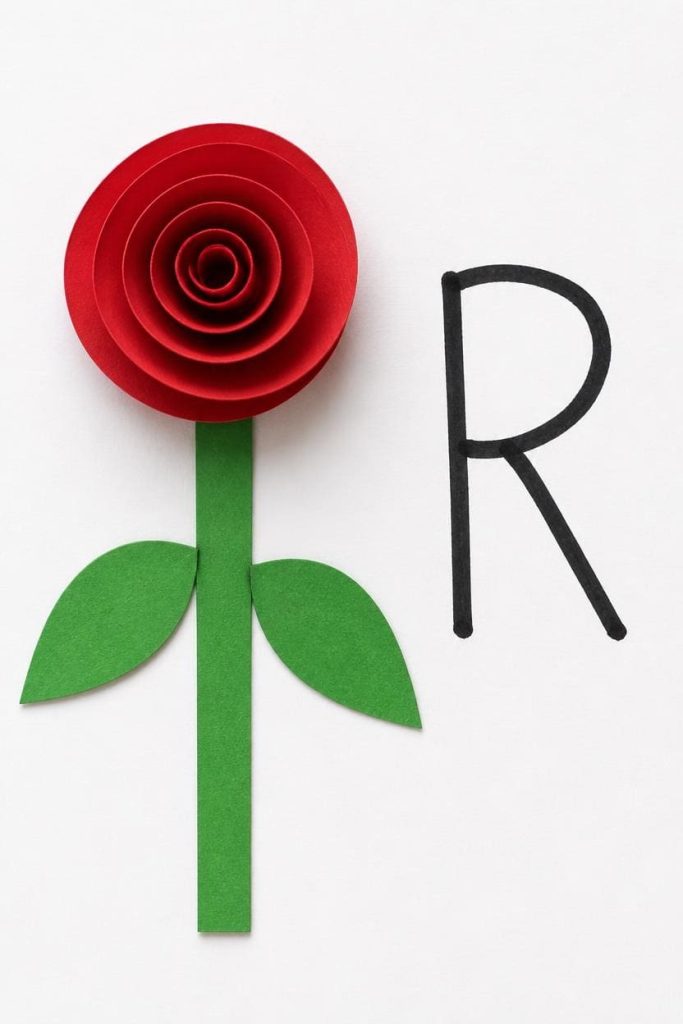
This one looks the most impressive for the least effort, which makes it a good finale project.
Materials Needed
- One 5-inch red paper circle (spiral-cut)
- One 4-inch green paper strip (stem)
- Two 2-inch green leaf shapes
- Glue stick
How To Make
- Cut the red circle in a continuous spiral from the outer edge toward the center, leaving about a half-inch uncut in the middle.
- Starting from the outer end of the spiral, roll the paper tightly inward toward the center point, then glue the very end down against the base so it holds its coiled shape.
- Glue the finished rose bud to the top of the green stem strip.
- Attach the two leaf shapes to the sides of the stem, angled slightly downward.
- Write the letter R just beside the rose.
Tips
- Younger kids can skip the spiral cut and layer three flat circles instead for a simpler flower.
- Let the spiral sit under a book for a minute after rolling so it holds its shape better.
- Make a few roses and glue them into a small paper vase for a bouquet display.
FAQ
Is this craft list appropriate for toddlers, or just preschoolers?
Most of these work for both, but a few need adjusting. The rain cloud and racecar are toddler-friendly as-is. The rose and raccoon involve more precise folding and cutting, so a grown-up should pre-cut the pieces for kids under 3.
How do I use these crafts to reinforce the R sound specifically?
Say the subject word slowly and stretch the R sound while your child glues each piece — “rrrrrainbow,” “rrrrrobot.” Pointing at the letter R on the page while saying it out loud reinforces the letter-to-sound connection more than the craft alone.
Can I turn these into a full letter-of-the-week unit?
Yes. Pick two or three crafts per day rather than all seven at once. Spreading them across a week keeps kids engaged instead of overwhelmed, and it gives you natural review days.
What’s the best way to display finished letter R crafts?
A simple string with clothespins works well for a rotating gallery. For classrooms, a bulletin board titled “R is for…” with each craft labeled underneath doubles as a review tool later in the week.
Do I need special tools for any of these?
No. Everything here uses paper, cardstock, glue sticks, and safety scissors. Nothing requires 3D materials, paint, or anything that needs extra drying time beyond the glue itself.

Sohel Rana is the writer, editor, publisher, and founder of The Tidy Porch. He is the man who is responsible for the craft (my wife created) being converted into a written piece. He also helps her wife (Sumona) by capturing videos of each craft. In short, he brings each craft created by her wife in front of you by transforming it into an article and a video.
