
I hit the Q wall three weeks into our alphabet unit. A, B, C, all easy. Then Q showed up and my craft bin went quiet.
Every list I found online repeated the same three ideas — a queen, a quilt, done. My son wanted more.
I sat at the kitchen table one night with a stack of construction paper and just started cutting shapes, trying to find real, kid-friendly Q words that could turn into something flat, glue-stick-simple, and actually fun to make.
Seven ideas later, we had a full lineup. Here’s what worked, step by step, so you don’t have to start from a blank page like I did.
Supplies That Make These Crafts Easier
- Crayola Construction Paper 240-Count Variety Pack — gives you enough color range for queens, quilts, and quokkas without running out mid-project. [Amazon link placeholder]
- Elmer’s Disappearing Purple School Glue Sticks (6-Pack) — dries clear, goes on visible so little hands can see coverage, and never gets messy like liquid glue. [Amazon link placeholder]
- Fiskars Blunt-Tip Kid Scissors — sized for small hands and sharp enough to cut clean edges on paper feathers and coin circles. [Amazon link placeholder]
- Googly Eyes Assorted Size Pack (100-Count) — instant personality for the quail, quokka, and queen faces without adding any 3D bulk. [Amazon link placeholder]
- Black Fine-Tip Washable Markers (Crayola, 10-Pack) — perfect for outlining, adding detail lines, and writing the letter Q directly onto each craft. [Amazon link placeholder]
Paper Queen Craft
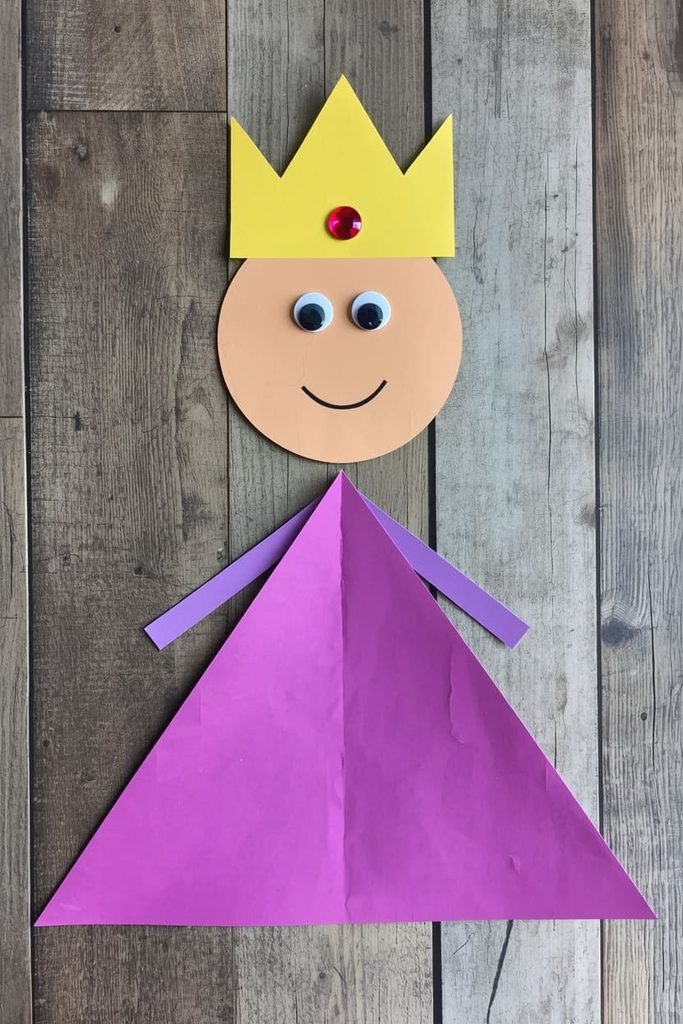
A queen is the fastest way into letter Q, and this version stays completely flat — no cone crowns, no 3D dresses, just paper shapes glued in layers.
How to make it:
- Cut a 6-inch oval from peach or tan paper for the queen’s face.
- Cut a triangle crown shape, about 5 inches wide at the base, from yellow or gold paper.
- Trim small triangle points along the top edge of the crown, 3 to 4 points total.
- Glue the crown to the top of the face oval, base edges lined up.
- Cut small colored circle “jewels” (red, blue, purple) and glue one to the center of the crown.
- Cut a wide triangle for the dress body, about 7 inches at the base, in purple or pink paper.
- Glue the face oval directly on top of the dress triangle’s narrow point.
- Add two thin rectangle strips for arms, angled slightly outward, glued behind the dress shape.
- Glue on googly eyes and draw a small smile with marker.
- Let dry flat for 10 minutes before moving.
Materials Needed:
- Peach, gold, purple/pink construction paper
- Glue stick
- Googly eyes
- Black marker
Tips:
- Pre-cut the crown triangle for kids under 4 — the small points are tricky to cut cleanly.
- Let your child pick the jewel color to make it feel personal.
Paper Patchwork Quilt Square
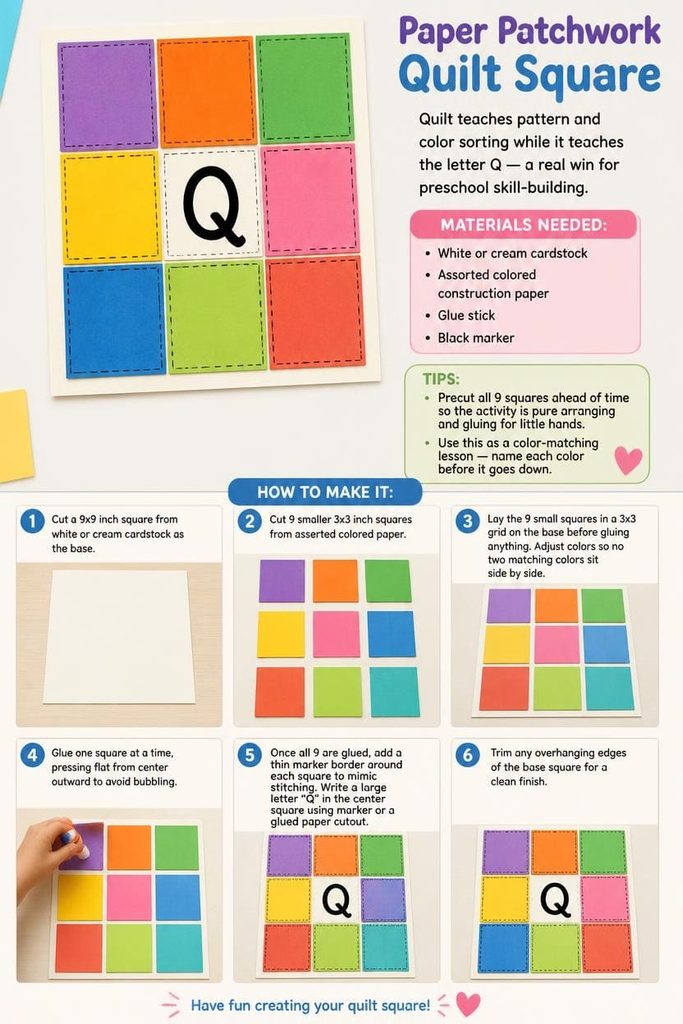
Quilt teaches pattern and color sorting while it teaches the letter Q — a real win for preschool skill-building.
How to make it:
- Cut a 9×9 inch square from white or cream cardstock as the base.
- Cut 9 smaller 3×3 inch squares from assorted colored paper.
- Lay the 9 small squares in a 3×3 grid on the base before gluing anything.
- Adjust colors so no two matching colors sit side by side.
- Glue one square at a time, pressing flat from center outward to avoid bubbling.
- Once all 9 are glued, add a thin marker border around each square to mimic stitching.
- Write a large letter “Q” in the center square using marker or a glued paper cutout.
- Trim any overhanging edges of the base square for a clean finish.
Materials Needed:
- White or cream cardstock
- Assorted colored construction paper
- Glue stick
- Black marker
Tips:
- Precut all 9 squares ahead of time so the activity is pure arranging and gluing for little hands.
- Use this as a color-matching lesson — name each color before it goes down.
Paper Quail Craft
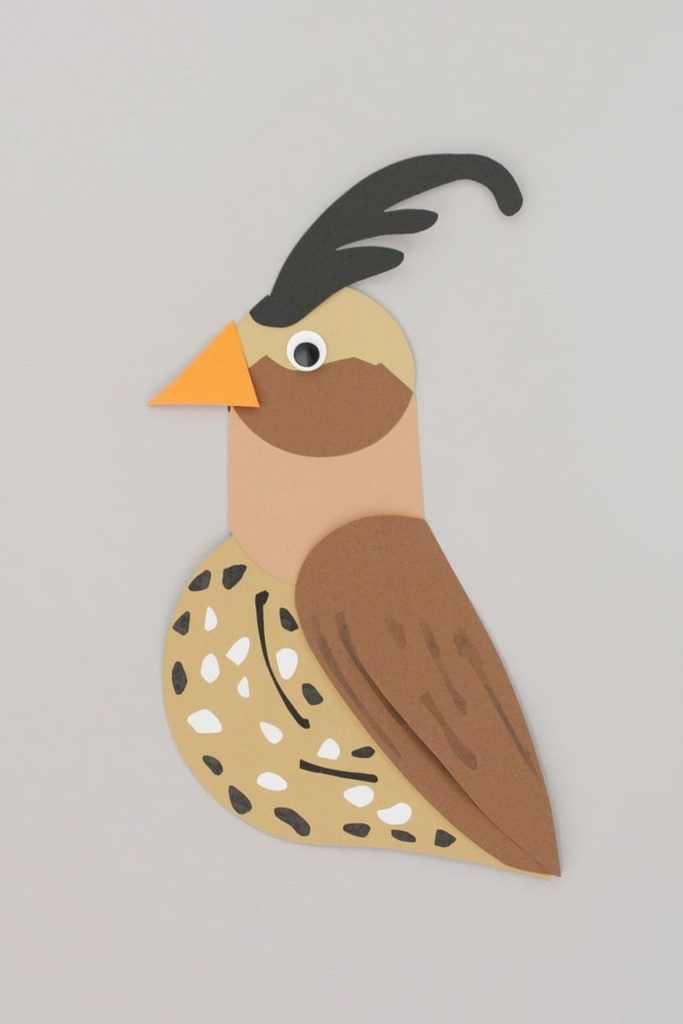
Quail is an underused bird for letter crafts, and its signature head feather makes it instantly recognizable.
How to make it:
- Cut a 5-inch oval from brown paper for the quail’s body.
- Cut a smaller 3-inch circle from the same brown paper for the head.
- Glue the head circle to the upper-left side of the body oval, overlapping slightly.
- Cut a thin curved teardrop shape, about 2 inches long, from black paper for the signature top feather.
- Glue the feather to the top of the head, curving forward over the beak area.
- Cut a small triangle from orange paper for the beak and glue to the front of the head.
- Cut small white paper ovals for belly speckles and glue in a scattered pattern on the lower body.
- Glue on one googly eye above the beak.
- Add thin black marker lines for wing detail on the body.
- Let dry flat for 10 minutes.
Materials Needed:
- Brown, black, orange, white construction paper
- Glue stick
- Googly eyes
- Black marker
Tips:
- The curved top feather is the trickiest cut — model it slowly for younger kids.
- Talk through what quail eat and where they live while you craft; it turns a project into a mini nature lesson.
Question Mark Art Craft

This one skips animals entirely and turns the letter Q’s most iconic symbol into a full art piece — great for kids who already know letter shapes and want a creative twist.
How to make it:
- Cut a large question mark shape, about 10 inches tall, from thick cardstock as a template.
- Trace the question mark shape lightly onto a full sheet of paper using pencil.
- Cut small squares or triangles from several colors of scrap paper.
- Glue the colored scraps inside the traced question mark outline, filling it like a mosaic.
- Work in sections — top curve first, then the straight stem, then the bottom dot.
- Once the shape is fully filled, let it dry flat for 15 minutes before handling.
- Trim any scrap paper that hangs outside the traced line.
- Optional: outline the finished question mark with black marker for a clean edge.
Materials Needed:
- Cardstock for the template
- Full sheet of paper for the base
- Assorted scrap paper pieces
- Glue stick
- Black marker (optional)
Tips:
- Save scraps from other Q crafts on this list — this project is a great use for leftover paper.
- Let kids ask their own “question mark question” out loud as they glue, tying the shape to its meaning.
Paper Quarter (Coin) Craft
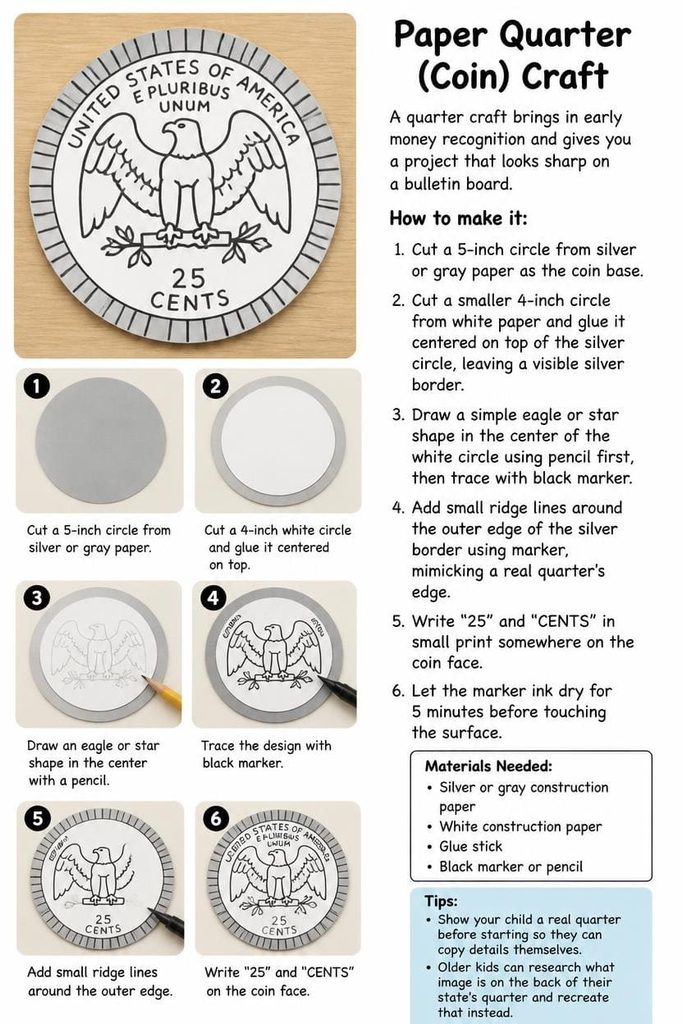
A quarter craft brings in early money recognition and gives you a project that looks sharp on a bulletin board.
How to make it:
- Cut a 5-inch circle from silver or gray paper as the coin base.
- Cut a smaller 4-inch circle from white paper and glue it centered on top of the silver circle, leaving a visible silver border.
- Draw a simple eagle or star shape in the center of the white circle using pencil first, then trace with black marker.
- Add small ridge lines around the outer edge of the silver border using marker, mimicking a real quarter’s edge.
- Write “25” and “CENTS” in small print somewhere on the coin face.
- Let the marker ink dry for 5 minutes before touching the surface.
Materials Needed:
- Silver or gray construction paper
- White construction paper
- Glue stick
- Black marker or pencil
Tips:
- Show your child a real quarter before starting so they can copy details themselves.
- Older kids can research what image is on the back of their state’s quarter and recreate that instead.
Paper Quokka Face Craft
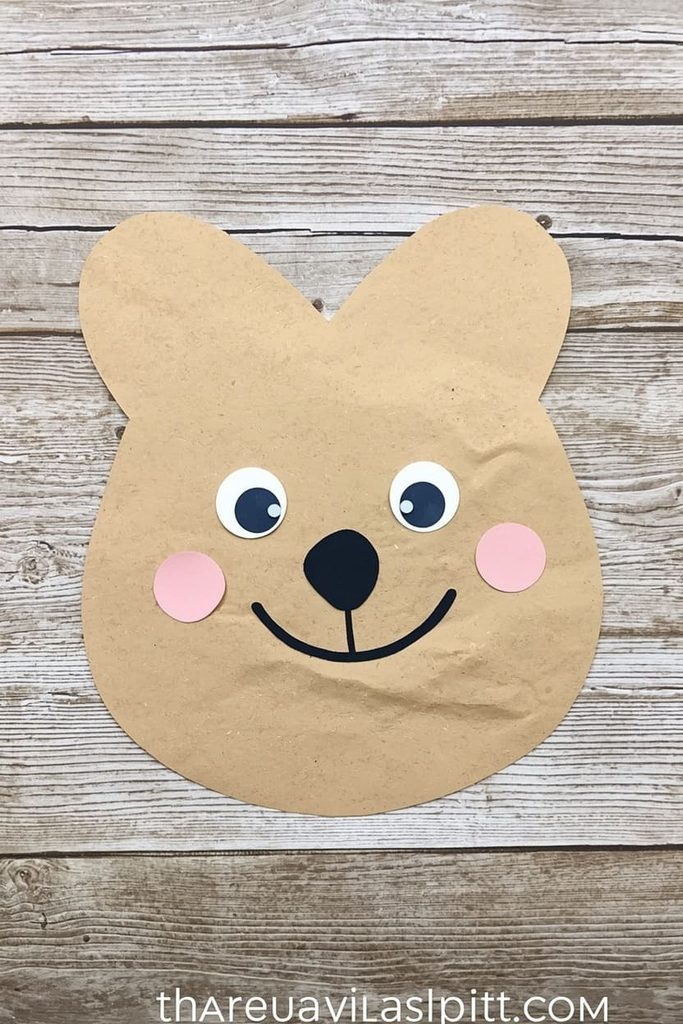
Quokkas are having a moment online for their smile, and kids respond fast to that same friendly face on paper.
How to make it:
- Cut a 6-inch circle from light brown or tan paper for the quokka’s face.
- Cut two small rounded triangle ears, about 2 inches tall, from the same brown paper.
- Glue the ears to the back top edges of the face circle so they peek out slightly.
- Cut a small oval nose shape from black paper and glue it centered low on the face.
- Glue on two googly eyes above the nose, spaced evenly apart.
- Draw a wide curved smile beneath the nose using black marker — this is the signature quokka feature.
- Add small round cheeks using pink or light-colored paper circles, one on each side of the smile.
- Let dry flat before displaying.
Materials Needed:
- Light brown/tan construction paper
- Black paper
- Pink paper (optional for cheeks)
- Googly eyes
- Black marker
Tips:
- Exaggerate the smile curve — it’s what makes the quokka instantly recognizable.
- This is a great one for very young toddlers since every shape is a simple circle or oval.
Paper Quill Pen Craft
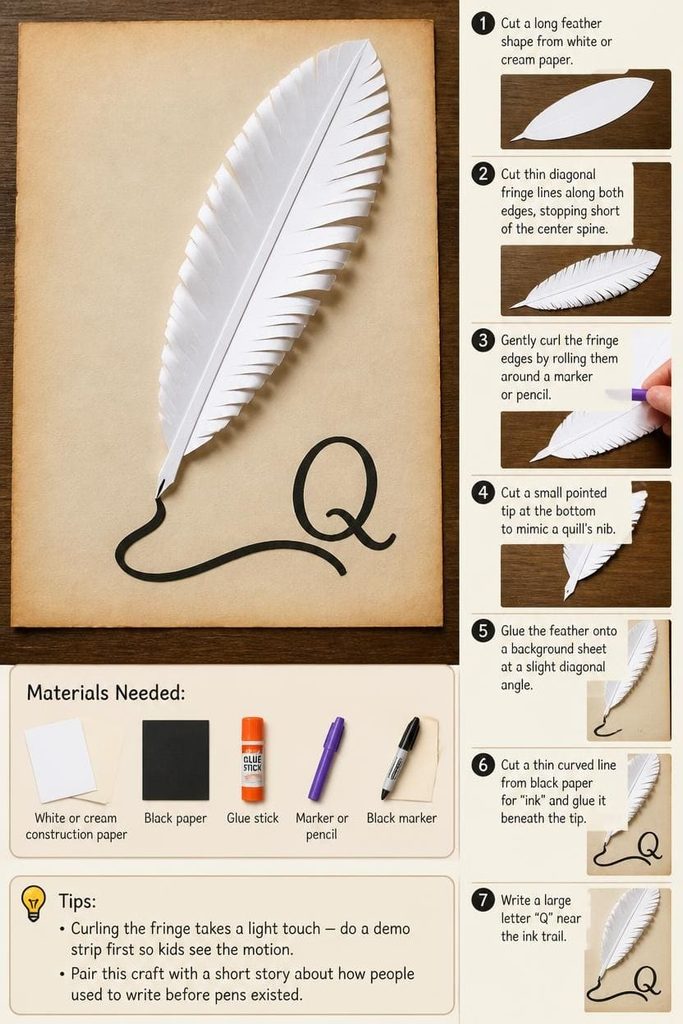
A quill pen ties letter Q to old-fashioned writing history, which makes it a natural fit if you’re also covering writing tools in your unit.
How to make it:
- Cut a long feather shape, about 8 inches tall, from white or cream paper.
- Cut thin diagonal fringe lines along both edges of the feather shape, stopping short of the center spine.
- Gently curl the fringe edges by rolling them around a marker or pencil for texture.
- Cut a small pointed tip at the bottom of the feather to mimic a quill’s nib.
- Glue the feather onto a background sheet of paper at a slight diagonal angle.
- Cut a thin curved line from black paper to represent “ink” trailing from the tip.
- Glue the ink line beneath the quill’s point, curving it like handwriting.
- Write a large letter “Q” near the ink trail using marker.
Materials Needed:
- White or cream construction paper
- Black paper
- Glue stick
- Marker or pencil (for curling)
- Black marker
Tips:
- Curling the fringe takes a light touch — do a demo strip first so kids see the motion.
- Pair this craft with a short story about how people used to write before pens existed.
FAQ: Letter Q Crafts
Why is letter Q so hard to find crafts for?
Q simply has fewer common English words tied to it than most letters, and even fewer that turn into a recognizable shape. That’s why so many lists repeat the same two or three ideas.
How do I explain the “Q” sound to a toddler?
Point out that Q almost always pairs with U, making a “kw” sound, like in queen or quilt. Say the word slowly while pointing to the Q on the page.
Can I do these crafts with a 2-year-old?
Yes, with adjustments. Pre-cut every piece ahead of time and let your toddler focus purely on placing and gluing. The quokka face and quilt square are the easiest starting points.
How do I make this work for older kids too?
Ask older kids to cut their own shapes freehand instead of using a template, and add the research step for the quarter craft.
What if I don’t have googly eyes on hand?
Draw the eyes with black marker instead. It changes nothing about the letter-learning value.
How should I display the finished crafts?
A simple string across a wall with mini clothespins works well, or group all seven onto one poster board labeled “Q is for…” across the top.

Sohel Rana is the writer, editor, publisher, and founder of The Tidy Porch. He is the man who is responsible for the craft (my wife created) being converted into a written piece. He also helps her wife (Sumona) by capturing videos of each craft. In short, he brings each craft created by her wife in front of you by transforming it into an article and a video.
